
Arduino UNO Smart Parking System with IR Sensors and Servo Motors
View and Edit Project In Cirkit Designer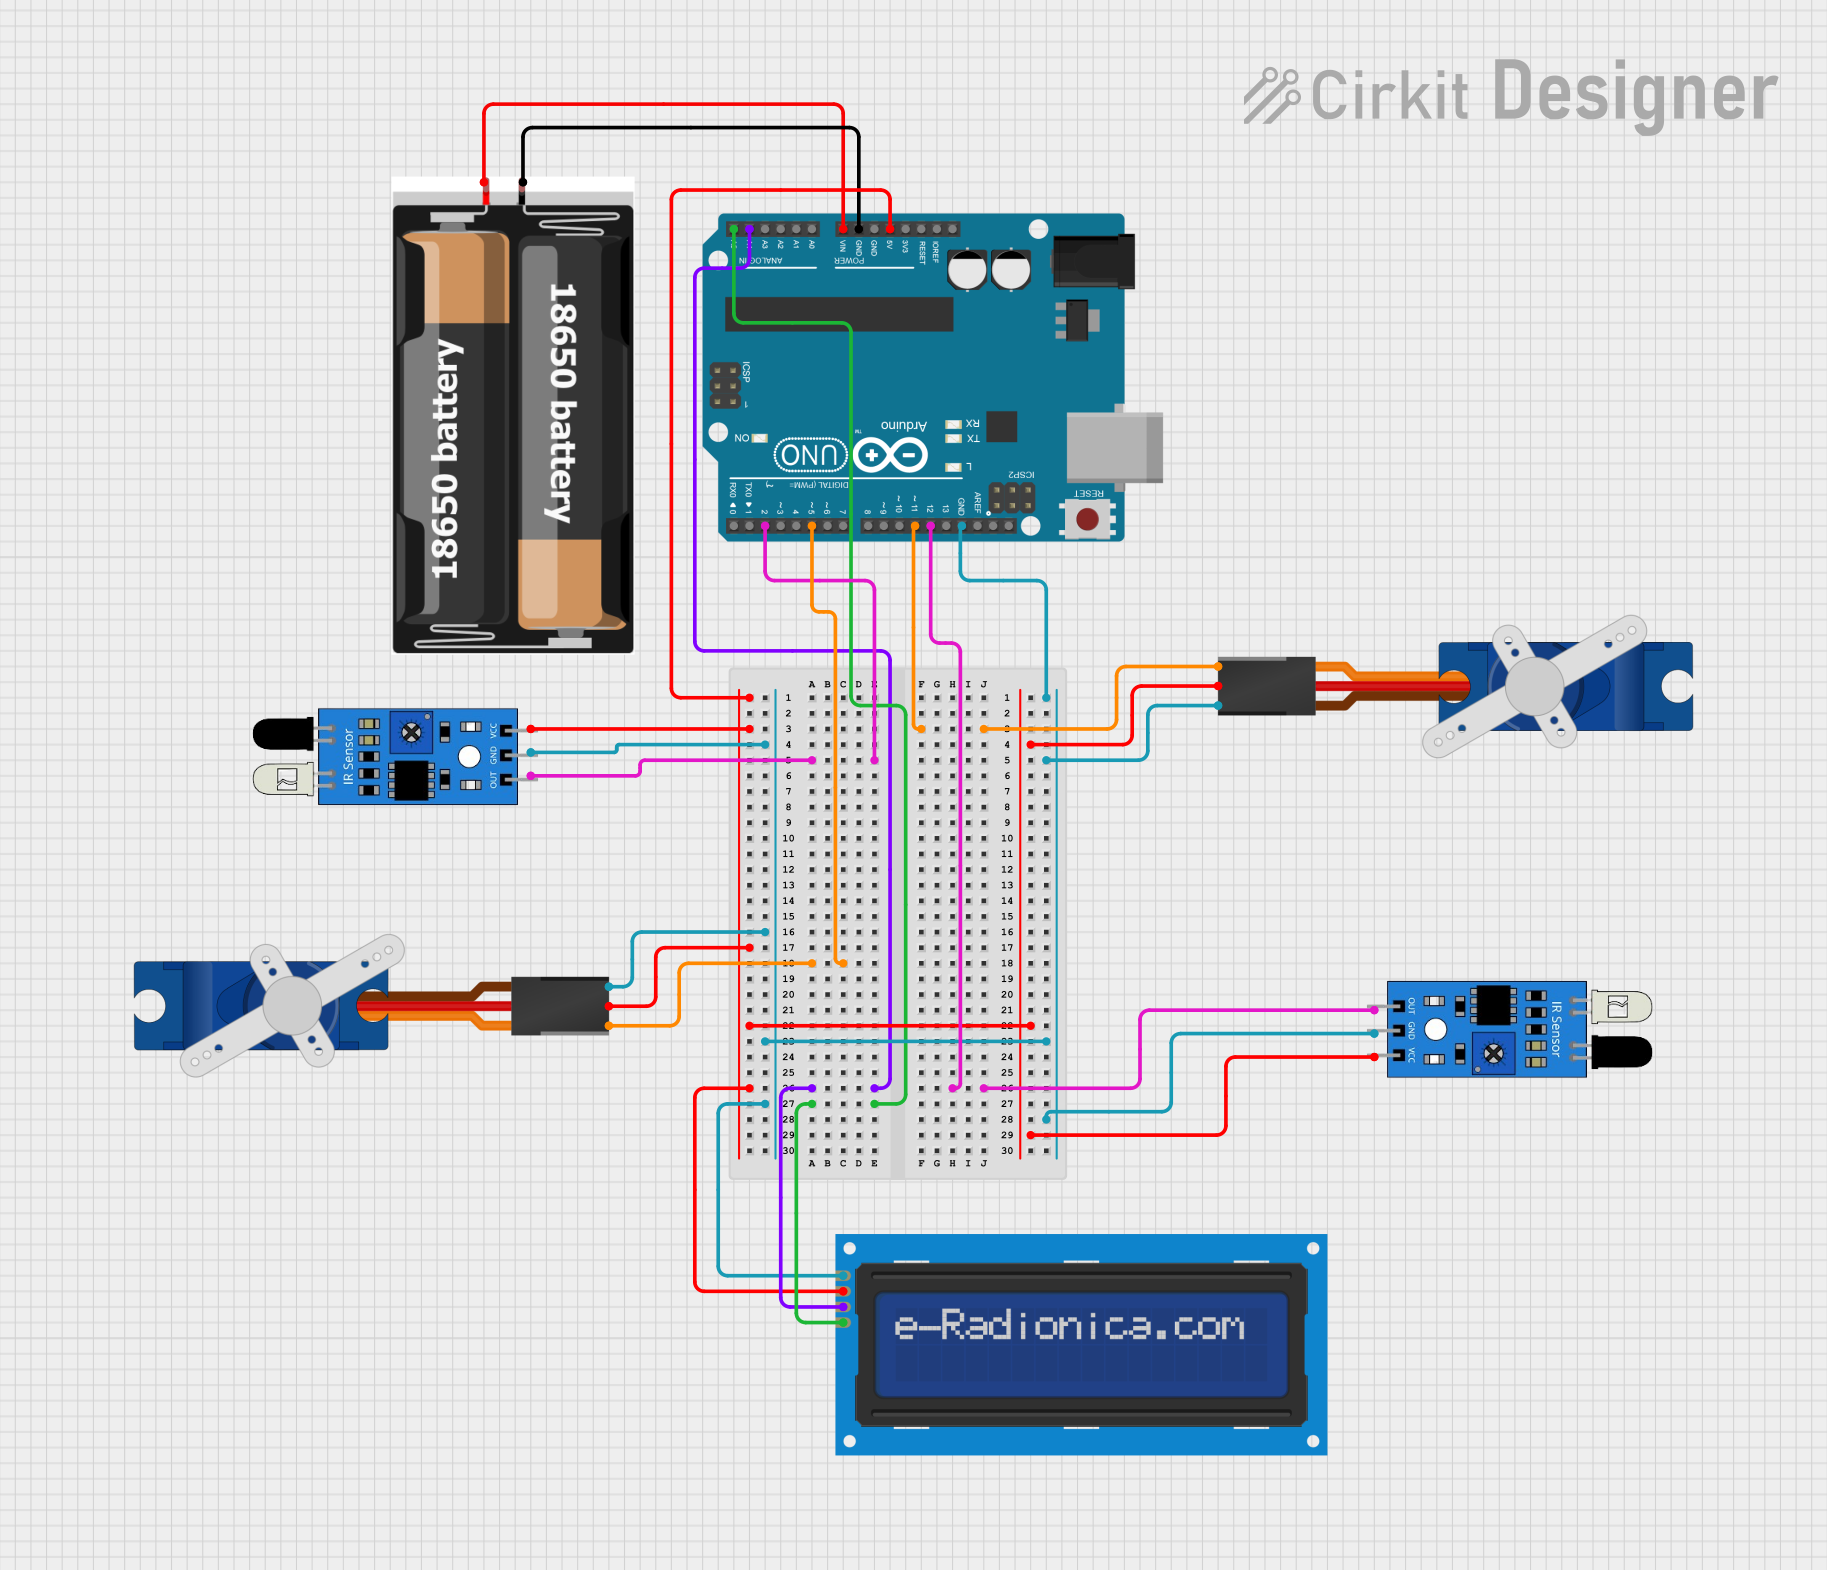
Circuit Documentation
Summary
This circuit is designed to manage a smart parking system. It uses an Arduino UNO microcontroller to control two servos, read inputs from two IR sensors, and display information on an LCD screen. The system is powered by a 2x 18650 battery pack. The servos control the entry and exit gates, while the IR sensors detect the presence of vehicles. The LCD screen displays the status of the parking lot.
Component List
Tower Pro SG90 Servo
- Description: A small and lightweight servo motor used for controlling the entry and exit gates.
- Pins: Signal, +5V, GND
IR Sensor
- Description: An infrared sensor used to detect the presence of vehicles.
- Pins: out, gnd, vcc
Arduino UNO
- Description: A microcontroller board based on the ATmega328P, used to control the entire system.
- Pins: UNUSED, IOREF, Reset, 3.3V, 5V, GND, Vin, A0, A1, A2, A3, A4, A5, SCL, SDA, AREF, D13, D12, D11, D10, D9, D8, D7, D6, D5, D4, D3, D2, D1, D0
2x 18650 Battery Pack
- Description: A battery pack consisting of two 18650 batteries, used to power the system.
- Pins: vcc, gnd
LCD Screen 16x2 I2C
- Description: A 16x2 character LCD screen with I2C interface, used to display information.
- Pins: SCL, SDA, VCC, GND
Wiring Details
Tower Pro SG90 Servo (Entry Gate)
- Signal: Connected to Arduino UNO pin D11
- +5V: Connected to Arduino UNO pin 5V
- GND: Connected to Arduino UNO pin GND
Tower Pro SG90 Servo (Exit Gate)
- Signal: Connected to Arduino UNO pin D5
- +5V: Connected to Arduino UNO pin 5V
- GND: Connected to Arduino UNO pin GND
IR Sensor (Entry)
- out: Connected to Arduino UNO pin D12
- gnd: Connected to Arduino UNO pin GND
- vcc: Connected to Arduino UNO pin 5V
IR Sensor (Exit)
- out: Connected to Arduino UNO pin D2
- gnd: Connected to Arduino UNO pin GND
- vcc: Connected to Arduino UNO pin 5V
Arduino UNO
- 5V: Connected to IR sensors, servos, and LCD screen VCC
- GND: Connected to IR sensors, servos, LCD screen GND, and 2x 18650 battery pack GND
- Vin: Connected to 2x 18650 battery pack VCC
- D11: Connected to entry gate servo Signal
- D5: Connected to exit gate servo Signal
- D12: Connected to entry IR sensor out
- D2: Connected to exit IR sensor out
- A4: Connected to LCD screen SDA
- A5: Connected to LCD screen SCL
2x 18650 Battery Pack
- vcc: Connected to Arduino UNO pin Vin
- gnd: Connected to Arduino UNO pin GND
LCD Screen 16x2 I2C
- SCL: Connected to Arduino UNO pin A5
- SDA: Connected to Arduino UNO pin A4
- VCC: Connected to Arduino UNO pin 5V
- GND: Connected to Arduino UNO pin GND
Documented Code
Arduino UNO Code
#include <Servo.h>  // Thư viện cho Servo
Servo servoIN; // khai báo servo lối vào
Servo servoOUT; // khai báo servo lối ra
#include <LiquidCrystal_I2C.h> // Thư viện cho LCD I2C
#include <Wire.h>
LiquidCrystal_I2C lcd(0x27,16,2); // Khai báo địa chỉ cho LCD
int A;
int B;
int cambien1 = 12; // chân cảm biến lối vào tại D12
int cambien2 = 2; // chân cảm biến lối ra tại D2
int Total = 5; // Tổng chỗ trống
int Lots;

void setup() {
  servoIN.attach(11); // servo lối vào ở D11
  servoIN.write(0);
  servoOUT.attach(5); // servo lối ra ở D5
  servoOUT.write(0);
  pinMode(cambien1,INPUT); //Khai báo cho cảm biến 1
  pinMode(cambien2,INPUT); //Khai báo cho cảm biến 2
  lcd.init(); //Khởi chạy LCD
  lcd.backlight(); // Bật đèn nền
  lcd.clear();// Xóa màn hình hiện có
  lcd.setCursor(2, 0); // Đặt con trỏ tại cột 2, hàng 0
  lcd.print("Smart Parking");
  lcd.setCursor(5,1);  // Đặt con trỏ tại cột 5, hàng 1
  lcd.print("System");
  delay(1500);
  lcd.clear();
  Lots = Total;
}

void loop() {
  A = digitalRead(cambien1);
  B = digitalRead(cambien2);
  if (A == LOW && Lots > 0)  {
      delay(100);
      servoIN.write(90);
      if (digitalRead(cambien1) == HIGH) {

          lcd.clear();
          lcd.setCursor(4, 0);
          lcd.print("Welcome!");
          servoIN.write(90);
          delay(1000);
          lcd.clear();
          servoIN.write(0);
          Lots = Lots - 1;
          }
  }
  if (A == LOW && Lots == 0){
      lcd.clear();
      lcd.setCursor(2,0);
      lcd.print("Sorry no lot");
      lcd.setCursor(3,1);
      lcd.print("available!");
      delay (1200);
      lcd.clear();
    }
   if (B == LOW && Lots < 5)  {
      delay(100);
      servoOUT.write(90);
      if (digitalRead(cambien2) == HIGH) {

          lcd.clear();
          lcd.setCursor(1, 0);
          lcd.print("See you again!");
          servoOUT.write(90);
          delay(1000);
          lcd.clear();
          servoOUT.write(0);
          Lots = Lots + 1;
          }
    }
  lcd.setCursor(0,0);
  lcd.print("Total Lots: "); // Tổng chỗ trống
  lcd.print(Total);
  lcd.setCursor(0,1);
  lcd.print("Lots Left: "); // Chỗ trống còn lại
  lcd.print(Lots);
}
LCD Screen 16x2 I2C Code
void setup() {
  // put your setup code here, to run once:

}

void loop() {
  // put your main code here, to run repeatedly:

}
This documentation provides a comprehensive overview of the smart parking system circuit, including a summary, component list, wiring details, and documented code.