
Solar-Powered Battery Charger with Arduino-Controlled Display and Relay
View and Edit Project In Cirkit Designer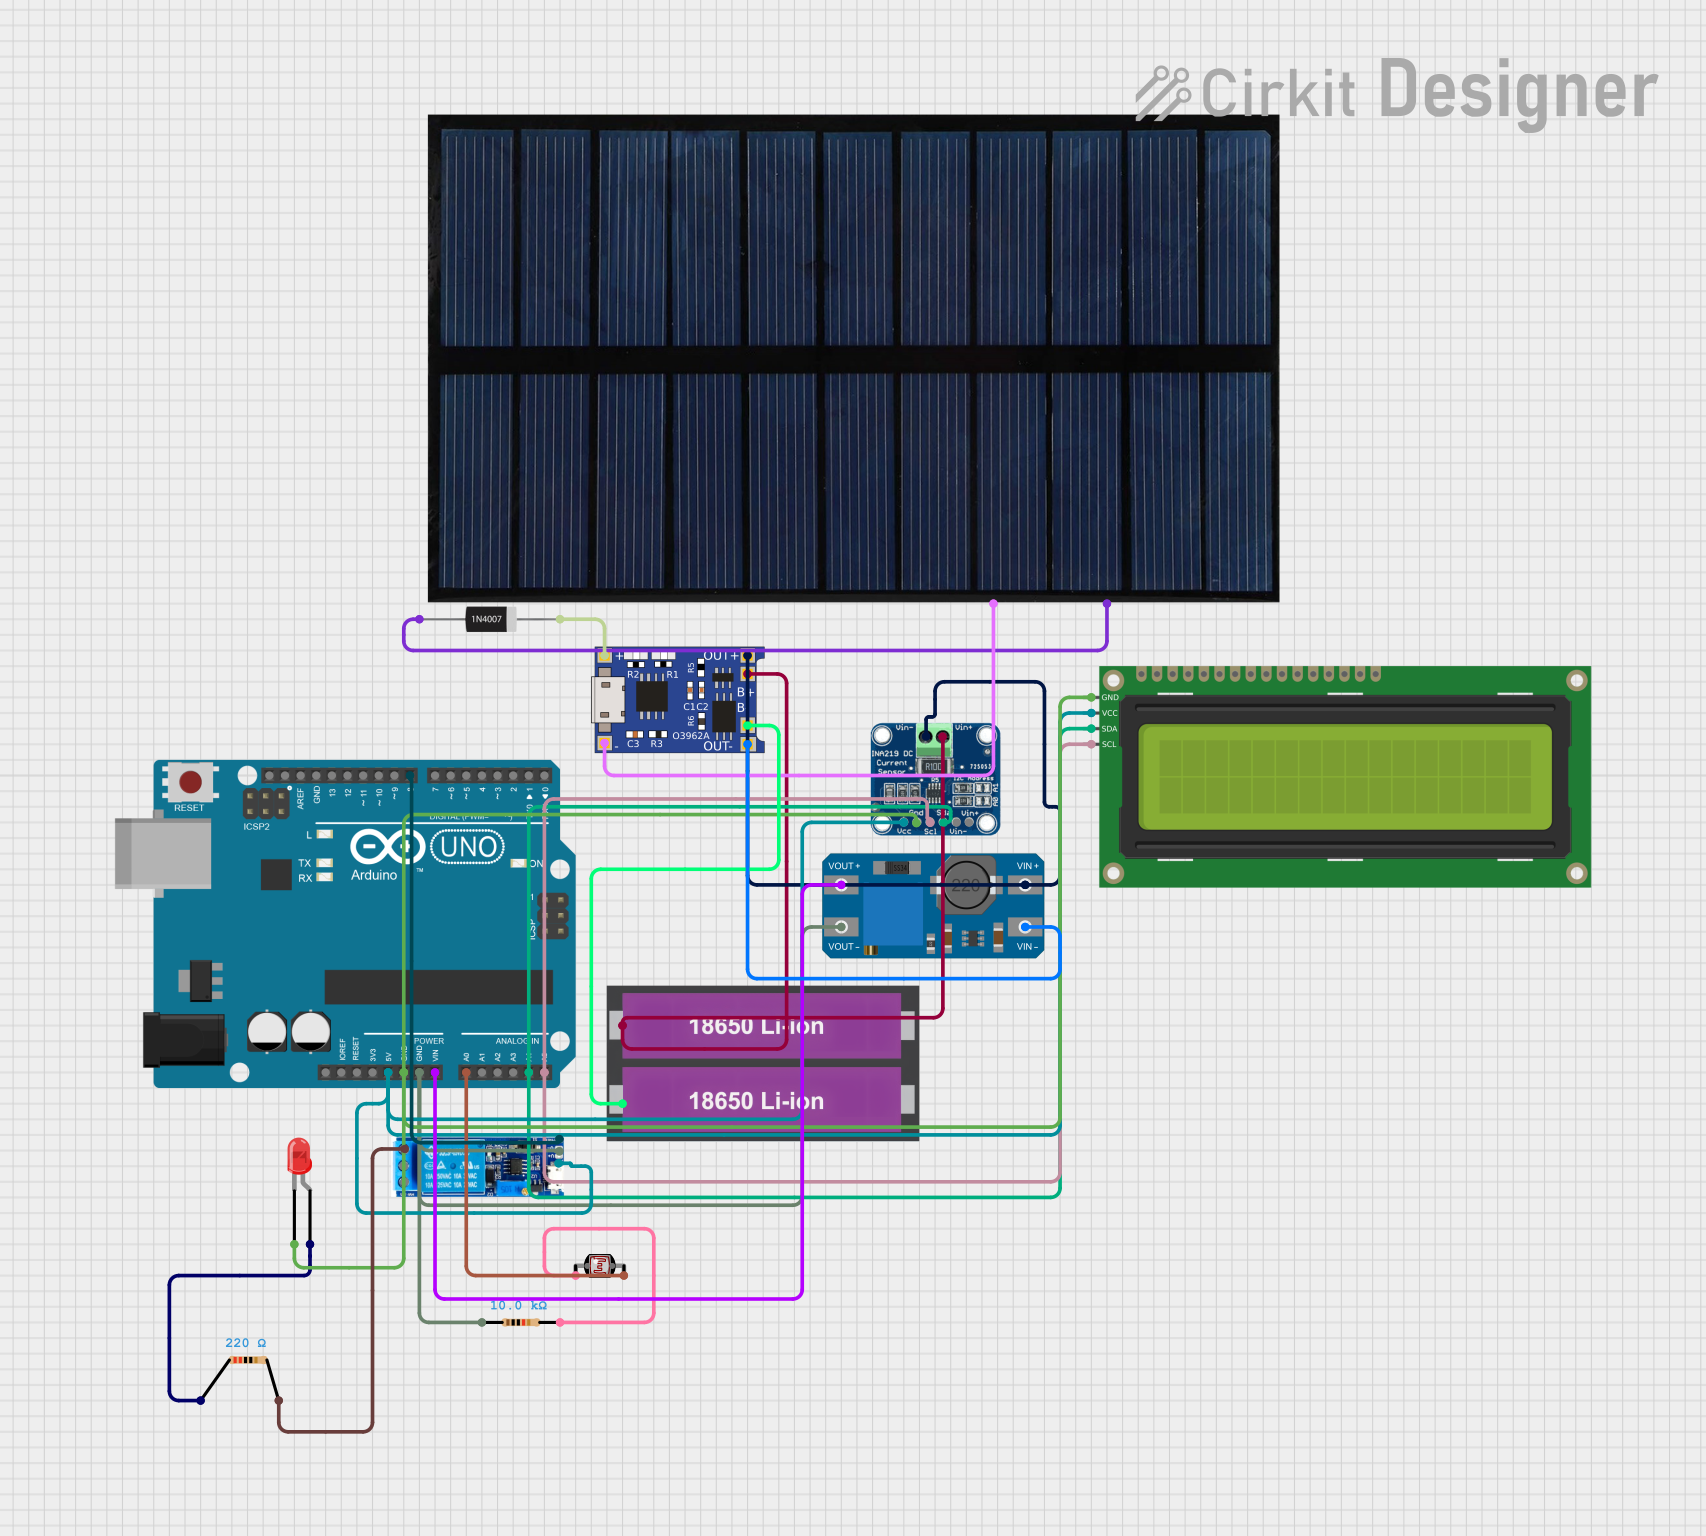
Circuit Documentation
Summary
This circuit is designed to manage and monitor a solar-powered system using various components including a solar cell, a TP4056 battery charger, 18650 Li-ion batteries, an Arduino UNO, a relay module, an LED, resistors, an INA219 current sensor, a 16x2 I2C LCD, an MT3608 DC-DC converter, and a photocell (LDR). The system charges the batteries using solar power and monitors the current and voltage levels, displaying the information on an LCD. The Arduino UNO controls the relay module and reads data from the sensors.
Component List
Solar Cell
- Description: Converts solar energy into electrical energy.
- Pins: +, -
TP4056
- Description: Lithium-ion battery charger module.
- Pins: OUT-, B-, B+, OUT+, IN-, IN+
18650 Li-ion Battery x 2
- Description: Rechargeable lithium-ion batteries.
- Pins: +, -
Arduino UNO
- Description: Microcontroller board based on the ATmega328P.
- Pins: UNUSED, IOREF, Reset, 3.3V, 5V, GND, Vin, A0, A1, A2, A3, A4, A5, SCL, SDA, AREF, D13, D12, D11, D10, D9, D8, D7, D6, D5, D4, D3, D2, D1, D0
Relay Module 5V-30V
- Description: Relay module for switching high voltage devices.
- Pins: common contact, normally open, normally closed, trigger, V-, V+
LED: Two Pin (Red)
- Description: Light-emitting diode.
- Pins: cathode, anode
Resistor (220 Ohms)
- Description: Limits current flow.
- Pins: pin1, pin2
Resistor (10k Ohms)
- Description: Limits current flow.
- Pins: pin1, pin2
INA219
- Description: Current and power sensor.
- Pins: VCC, GND, SCL, SDA, VIN -, VIN +
16x2 I2C LCD
- Description: LCD display with I2C interface.
- Pins: GND, VCC, SDA, SCL
MT3608
- Description: DC-DC step-up converter.
- Pins: VOUT+, VIN+, VOUT-, VIN-
Photocell (LDR)
- Description: Light-dependent resistor.
- Pins: pin 0, pin 1
1N4007 Rectifier Diode
- Description: General-purpose rectifier diode.
- Pins: Cathode, Anode
Wiring Details
Solar Cell
- + connected to Anode of 1N4007 Rectifier Diode
- - connected to IN- of TP4056
TP4056
- IN- connected to - of Solar Cell
- IN+ connected to Cathode of 1N4007 Rectifier Diode
- OUT- connected to VIN- of MT3608
- OUT+ connected to VIN+ of MT3608 and VIN - of INA219
- B- connected to - of 18650 Li-ion Battery x 2
- B+ connected to + of 18650 Li-ion Battery x 2 and VIN + of INA219
18650 Li-ion Battery x 2
- + connected to B+ of TP4056 and VIN + of INA219
- - connected to B- of TP4056
Arduino UNO
- 5V connected to VCC of 16x2 I2C LCD, V+ of Relay Module, and VCC of INA219
- GND connected to GND of 16x2 I2C LCD, cathode of LED, GND of INA219, VOUT- of MT3608, and V- of Relay Module
- Vin connected to VOUT+ of MT3608
- A0 connected to pin 1 of Photocell (LDR)
- A4 connected to SDA of 16x2 I2C LCD and SDA of INA219
- A5 connected to SCL of 16x2 I2C LCD and SCL of INA219
- D8 connected to trigger of Relay Module
Relay Module 5V-30V
- V+ connected to 5V of Arduino UNO
- V- connected to GND of Arduino UNO
- trigger connected to D8 of Arduino UNO
- normally open connected to pin2 of Resistor (220 Ohms)
LED: Two Pin (Red)
- cathode connected to GND of Arduino UNO
- anode connected to pin1 of Resistor (220 Ohms)
Resistor (220 Ohms)
- pin1 connected to anode of LED
- pin2 connected to normally open of Relay Module
Resistor (10k Ohms)
- pin1 connected to VOUT- of MT3608
- pin2 connected to pin 0 of Photocell (LDR)
INA219
- VCC connected to 5V of Arduino UNO
- GND connected to GND of Arduino UNO
- SCL connected to A5 of Arduino UNO
- SDA connected to A4 of Arduino UNO
- VIN - connected to OUT+ of TP4056
- VIN + connected to B+ of TP4056
16x2 I2C LCD
- VCC connected to 5V of Arduino UNO
- GND connected to GND of Arduino UNO
- SDA connected to A4 of Arduino UNO
- SCL connected to A5 of Arduino UNO
MT3608
- VIN+ connected to OUT+ of TP4056
- VIN- connected to OUT- of TP4056
- VOUT+ connected to Vin of Arduino UNO
- VOUT- connected to GND of Arduino UNO
Photocell (LDR)
- pin 0 connected to pin2 of Resistor (10k Ohms)
- pin 1 connected to A0 of Arduino UNO
1N4007 Rectifier Diode
- Anode connected to + of Solar Cell
- Cathode connected to IN+ of TP4056
Code Documentation
Arduino UNO Code
void setup() {
  // put your setup code here, to run once:

}

void loop() {
  // put your main code here, to run repeatedly:

}
This code is a basic template for the Arduino UNO. The setup() function is where you initialize your components and settings, and the loop() function is where you place the main code that runs repeatedly. You can add your specific logic for controlling the relay, reading sensor data, and updating the LCD display in these functions.