
Arduino-Based Rain Detection System with Servo-Controlled Mechanism
View and Edit Project In Cirkit Designer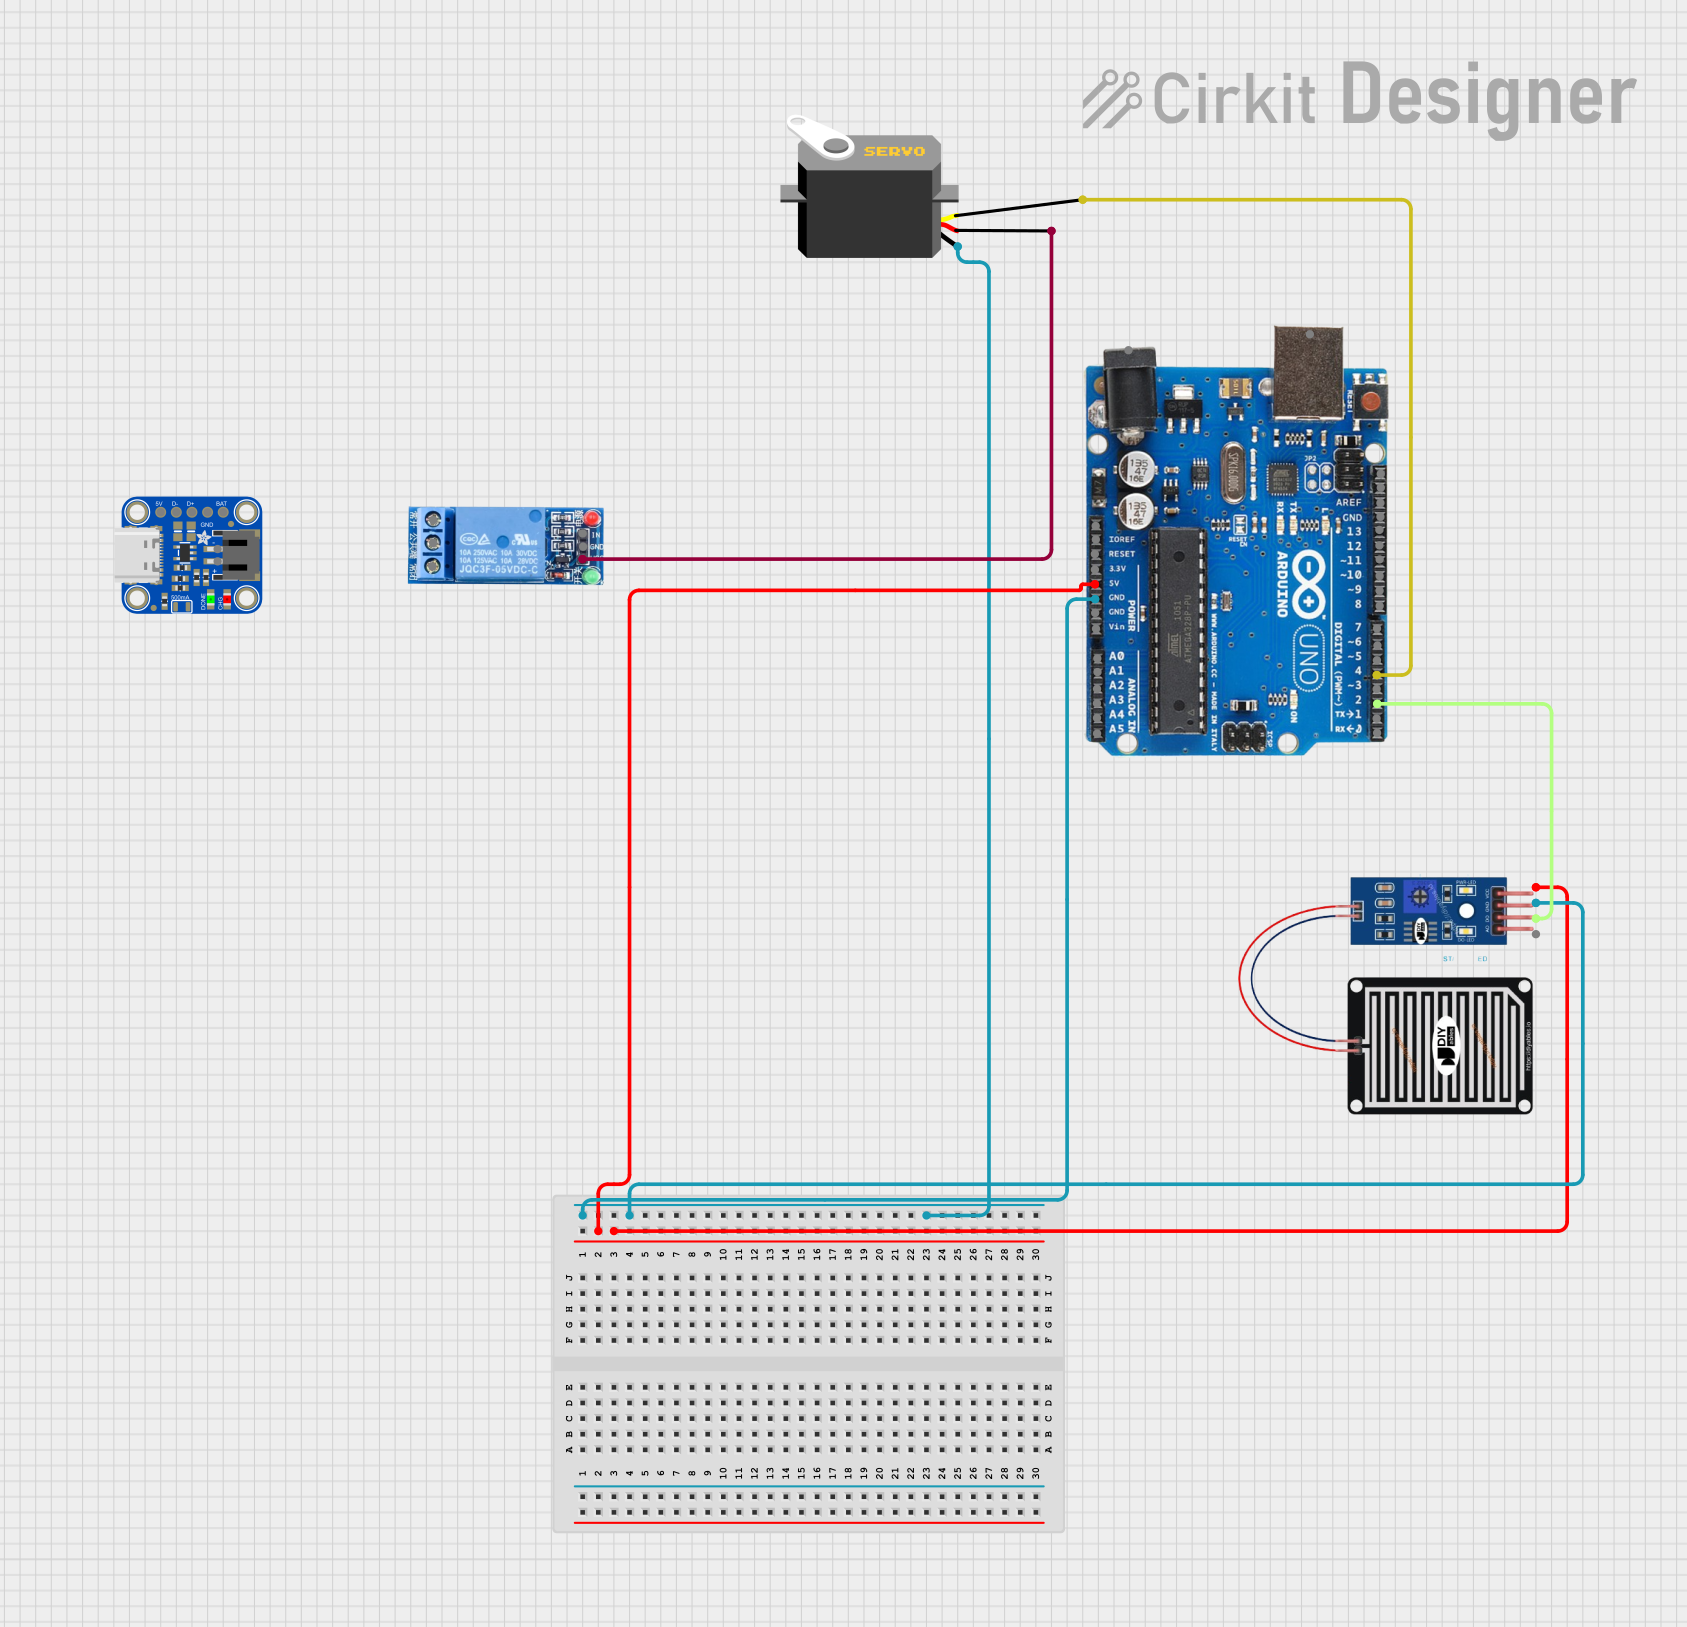
Circuit Documentation
Summary
This circuit is designed to control a servo motor based on the input from a rain sensor. The system uses an Arduino Uno R3 to read the rain sensor data and control the servo motor accordingly. Additionally, a 1 Channel Relay and an Adafruit MicroLipo Charger USB Type C are included in the circuit.
Component List
Servo
- Description: A servo motor used for precise control of angular position.
- Pins: gnd, vcc, pulse
Arduino Uno R3
- Description: A microcontroller board based on the ATmega328P.
- Pins: D8, D9, D10, D11, D12, D13, GND, AREF, SDA, SCL, D0/RX, D1/Tx, D2, D3, D4, D5, 6, D7, A5/SCL, A4/SDA, A3, A2, A1, A0, Vin, 5V, 3.3V, RESET, IOREF, NONE, USB Jack, Power Jack
Adafruit MicroLipo Charger USB Type C
- Description: A USB Type C charger for LiPo batteries.
- Pins: GND, VBAT, 5V, D-, D+
RAIN SENSOR
- Description: A sensor used to detect the presence of rain.
- Pins: AO, DO, GRD, VCC
1 Channel Relay 5V
- Description: A relay module used to control high voltage devices.
- Pins: VCC, GND, IN, NC, COM, NO
Wiring Details
Servo
- gnd connected to Arduino Uno R3 GND and RAIN SENSOR GRD
- vcc connected to 1 Channel Relay 5V VCC
- pulse connected to Arduino Uno R3 D4
Arduino Uno R3
- GND connected to RAIN SENSOR GRD and Servo gnd
- 5V connected to RAIN SENSOR VCC
- D4 connected to Servo pulse
- D2 connected to RAIN SENSOR DO
Adafruit MicroLipo Charger USB Type C
- No specific connections detailed in the net list.
RAIN SENSOR
- GRD connected to Arduino Uno R3 GND and Servo gnd
- VCC connected to Arduino Uno R3 5V
- DO connected to Arduino Uno R3 D2
1 Channel Relay 5V
- VCC connected to Servo vcc
Documented Code
Arduino Uno R3 Code
#include <Servo.h>

// Inisialisasi servo
Servo servo1;

// Inisialisasi pin sensor
const int pinHujan = 0; // Updated pin number

// Inisialisasi pembacaan sensor
int hujan;

// Inisialisasi derajat buka-tutup servo
int tutup = 150;
int buka = 10;

// ------------------------ Program Default Awal ------------------------ //

void setup() {
    // Setting baud rate serial monitor
    Serial.begin(9600);

    // Inisialisasi pin servo
    servo1.attach(4);

    // Inisialisasi status input/output pin
    pinMode(pinHujan, INPUT);
}

// -------------------------- Program Utama --------------------------- //

void loop() {
    // Pembacaan sensor
    hujan = digitalRead(pinHujan);

    // Menulis pada serial monitor pembacaan sensor hujan
    Serial.print("Hujan: ");
    Serial.println(hujan);

    // Jika kondisi hujan
    if (hujan == 0) {
        // Servo menutup
        servo1.write(tutup);
    }
    // Jika kondisi tidak hujan
    else if (hujan == 1) {
        // Servo membuka
        servo1.write(buka);
    }

    // Delay jalannya program
    delay(300);
}
Servo Code
// Memanggil library motor servo
#include <Servo.h>

// Inisialisasi servo
Servo servo1;

// Inisialisasi pin sensor
const int pinHujan = 2;

// Inisialisasi pembacaan sensor
int hujan;

// Inisialisasi derajat buka-tutup servo
int tutup = 110;
int buka = 10;

// ------------------------ Program Default Awal ------------------------ //

void setup() {
    // Setting baud rate serial monitor
    Serial.begin(9600);

    // Inisialisasi pin servo
    servo1.attach(4);

    // Inisialisasi status input/output pin
    pinMode(pinHujan, INPUT);
}

// -------------------------- Program Utama --------------------------- //

void loop() {
    // Pembacaan sensor
    hujan = digitalRead(pinHujan);

    // Menulis pada serial monitor pembacaan sensor hujan
    Serial.print("Hujan: ");
    Serial.println(hujan);

    // Sensor hujan akan bernilai = 0 saat ada air (hujan)
    // dan bernilai = 1 saat kering (tidak hujan)

    // Jika kondisi hujan
    if (hujan == 0) {
        // Servo menutup
        servo1.write(tutup);
    }
    // Jika kondisi tidak hujan
    else if (hujan == 1) {
        // Servo membuka
        servo1.write(buka);
    }

    // Delay jalannya program
    delay(300);
}
Adafruit MicroLipo Charger USB Type C Code
void setup() {
  // put your setup code here, to run once:

}

void loop() {
  // put your main code here, to run repeatedly:

}
RAIN SENSOR Code
void setup() {
  // put your setup code here, to run once:

}

void loop() {
  // put your main code here, to run repeatedly:

}