
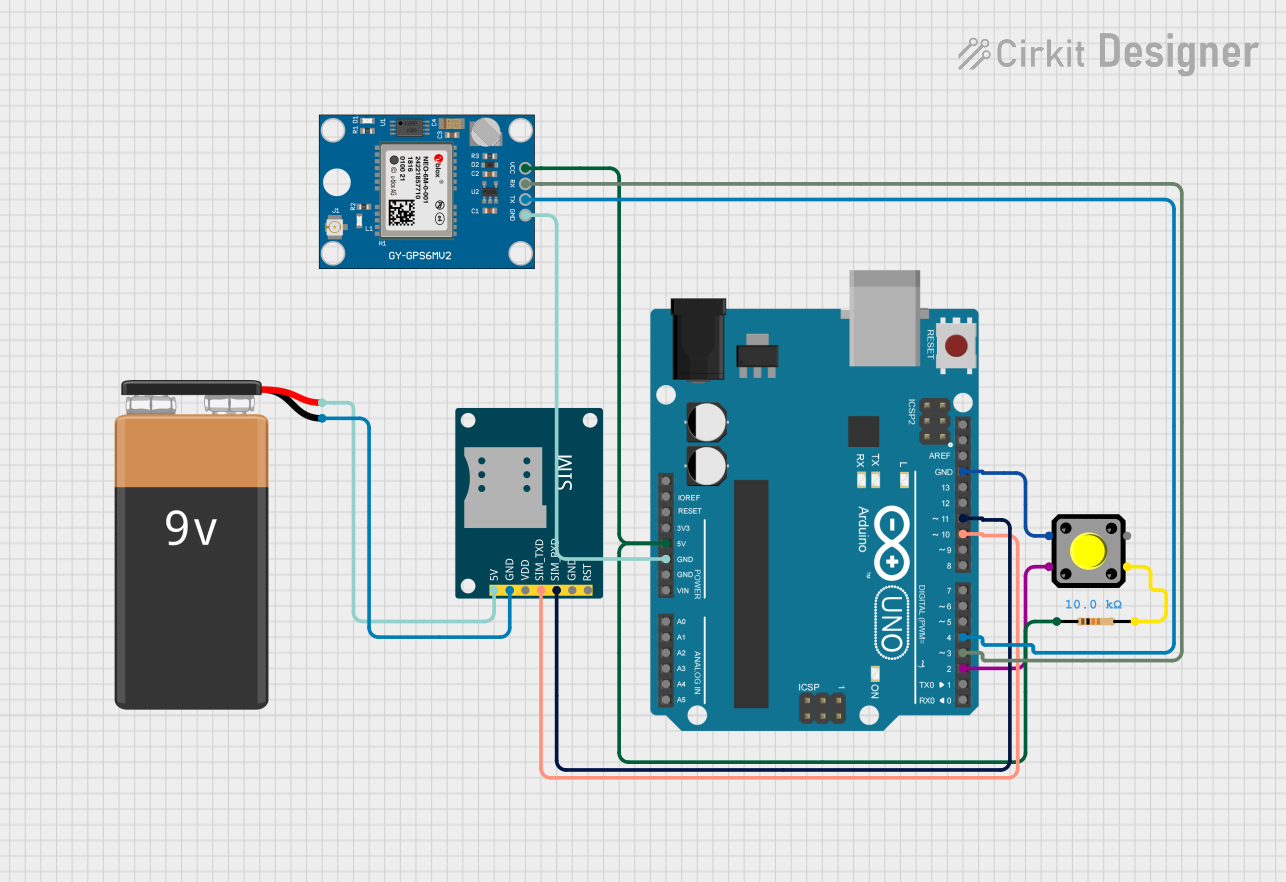
Circuit Documentation
Summary
This circuit is designed to interface an Arduino UNO with a SIM800L GSM Module, a Neo 6M GPS Module, and a pushbutton. The purpose of the circuit is to send an SMS message with GPS location data when the pushbutton is pressed. The Arduino UNO acts as the central processing unit, reading GPS data from the Neo 6M GPS Module and sending SMS messages through the SIM800L GSM Module. A resistor is used for pull-up configuration on the pushbutton. The 9V battery provides power to the SIM800L GSM Module.
Component List
Arduino UNO
- Microcontroller board based on the ATmega328P
- It has 14 digital input/output pins, 6 analog inputs, a 16 MHz quartz crystal, a USB connection, a power jack, an ICSP header, and a reset button.
Pushbutton
- A simple switch mechanism for controlling some aspect of a machine or a process. Buttons are typically made out of hard material, usually plastic or metal.
SIM800L GSM Module
- A complete Quad-band GSM/GPRS solution in an LGA package, which can be embedded in customer applications.
Resistor
- A passive two-terminal electrical component that implements electrical resistance as a circuit element. In this circuit, a 10,000 Ohms resistor is used.
9V Battery
- A standard size of dry cell battery commonly used in portable electronic devices.
Neo 6M GPS Module
- A standalone GPS receiver that features high performance u-blox 6 positioning engine.
Wiring Details
Arduino UNO
5Vconnected to Neo 6M GPS ModuleVCCand through a resistor to the pushbutton.GNDconnected to Neo 6M GPS ModuleGND, PushbuttonPin 4, and SIM800L GSM ModuleGND.D2connected to one side of the Pushbutton.D3connected to Neo 6M GPS ModuleRX.D4connected to Neo 6M GPS ModuleTX.D10connected to SIM800L GSM ModuleSIM_TXD.D11connected to SIM800L GSM ModuleSIM_RXD.
Pushbutton
- One side connected to Arduino UNO
D2. - The other side connected to Arduino UNO
GNDthrough a 10,000 Ohms resistor.
SIM800L GSM Module
5Vconnected to 9V Battery+.GNDconnected to 9V Battery-.SIM_TXDconnected to Arduino UNOD10.SIM_RXDconnected to Arduino UNOD11.
Resistor
- One side connected to Arduino UNO
5V. - The other side connected to Pushbutton.
9V Battery
+connected to SIM800L GSM Module5V.-connected to SIM800L GSM ModuleGND.
Neo 6M GPS Module
VCCconnected to Arduino UNO5V.GNDconnected to Arduino UNOGND.TXconnected to Arduino UNOD4.RXconnected to Arduino UNOD3.
Documented Code
#include <SoftwareSerial.h>
#include <TinyGPS++.h>

// Define pin numbers
const int buttonPin = 2;  // Push button connected to digital pin 2
const int gsmRxPin = 10;  // RX pin of GSM module
const int gsmTxPin = 11;  // TX pin of GSM module
const int gpsRxPin = 4;   // RX pin of GPS module
const int gpsTxPin = 3;   // TX pin of GPS module

// Create software serial objects
SoftwareSerial gsmSerial(gsmRxPin, gsmTxPin);
SoftwareSerial gpsSerial(gpsRxPin, gpsTxPin);

// Create a TinyGPS++ object
TinyGPSPlus gps;

// Variables
int buttonState = 0;
bool messageSent = false;
const char* phoneNumber = "+1234567890";  // Replace with the desired phone number
const char* message = "Emergency! Help needed at this location: ";

void setup() {
  Serial.begin(9600);
  gsmSerial.begin(9600);
  gpsSerial.begin(9600);

  pinMode(buttonPin, INPUT_PULLUP);

  // Initialize GSM module
  delay(1000);
  gsmSerial.println("AT");
  delay(1000);
  gsmSerial.println("AT+CMGF=1"); // Set SMS text mode
  delay(1000);
}

void loop() {
  // Update GPS data
  while (gpsSerial.available() > 0) {
    gps.encode(gpsSerial.read());
  }

  buttonState = digitalRead(buttonPin);

  if (buttonState == LOW && !messageSent) {
    sendSMS();
    messageSent = true;
  }

  if (buttonState == HIGH) {
    messageSent = false;
  }
}

void sendSMS() {
  Serial.println("Button pressed, sending SMS with location...");

  String locationMessage = message;

  if (gps.location.isValid()) {
    locationMessage += "http://maps.google.com/maps?q=";
    locationMessage += String(gps.location.lat(), 6);
    locationMessage += ",";
    locationMessage += String(gps.location.lng(), 6);
  } else {
    locationMessage += "GPS location not available";
  }

  // Send SMS
  gsmSerial.println("AT+CMGS=\"" + String(phoneNumber) + "\"");
  delay(1000);
  gsmSerial.print(locationMessage);
  delay(100);
  gsmSerial.write(26); // End SMS with Ctrl+Z character

  Serial.println("SMS sent with location!");
  delay(1000);
}
This code is designed to be uploaded to the Arduino UNO. It initializes the GSM and GPS modules, reads the button state, and sends an SMS with GPS coordinates when the button is pressed. The GPS data is obtained from the Neo 6M GPS Module, and the SMS is sent through the SIM800L GSM Module. The code uses the TinyGPS++ library to parse the GPS data and SoftwareSerial to communicate with the GSM and GPS modules.