
Circuit Documentation
Summary
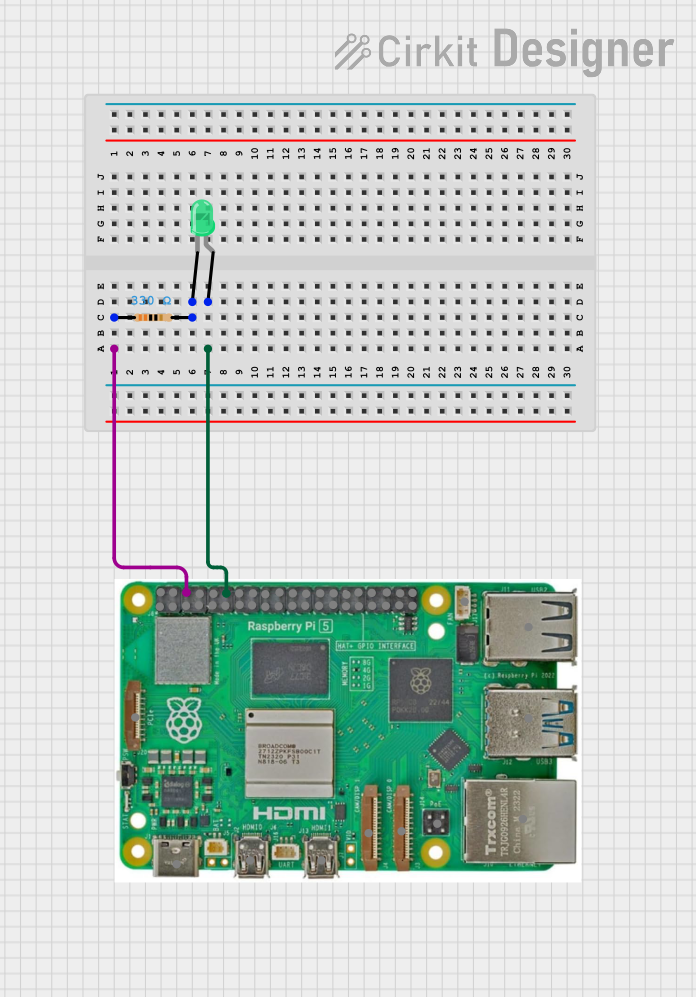
This document provides a detailed overview of a simple circuit involving a Raspberry Pi 5, a resistor, and a green LED. The circuit is designed to control the LED using one of the GPIO pins on the Raspberry Pi. The resistor is used to limit the current flowing through the LED to prevent damage.
Component List
Raspberry Pi 5
- Description: A single-board computer with multiple GPIO pins for interfacing with other components.
- Pins: Type-C, Micro HDMI 1, Micro HDMI 2, Camera 1, Camera 2, PoE, Fan, PCIe, USB 3.0, USB 2.0, Ethernet, 5V, GND, 3.3v, GPIO 14, GPIO 15, GPIO 18, GPIO 23, GPIO 24, GPIO 25, GPIO 8, GPIO 7, GPIO 1, GPIO 12, GPIO 16, GPIO 20, GPIO 21, GPIO 2, GPIO 3, GPIO 4, GPIO 17, GPIO 27, GPIO 22, GPIO 10, GPIO 9, GPIO 11, GPIO 0, GPIO 5, GPIO 6, GPIO 13, GPIO 19, GPIO 26
Resistor
- Description: A passive electrical component that limits the flow of electric current.
- Pins: pin1, pin2
- Properties:
- Resistance: 330 Ohms
LED: Two Pin (green)
- Description: A light-emitting diode that emits green light when current flows through it.
- Pins: cathode, anode
Wiring Details
Raspberry Pi 5
- GND is connected to pin1 of the Resistor.
- GPIO 18 is connected to the anode of the LED.
Resistor
- pin1 is connected to GND of the Raspberry Pi 5.
- pin2 is connected to the cathode of the LED.
LED: Two Pin (green)
- anode is connected to GPIO 18 of the Raspberry Pi 5.
- cathode is connected to pin2 of the Resistor.
Code
There is no code provided for this circuit. If you plan to control the LED using the Raspberry Pi, you can use a simple Python script to toggle the GPIO pin connected to the LED.
Example Python code to control the LED:
import RPi.GPIO as GPIO
import time

# Pin Definitions
led_pin = 18  # GPIO pin connected to the LED

# Pin Setup
GPIO.setmode(GPIO.BCM)  # Broadcom pin-numbering scheme
GPIO.setup(led_pin, GPIO.OUT)  # LED pin set as output

# Initial state for LED
GPIO.output(led_pin, GPIO.LOW)

print("Starting LED control. Press CTRL+C to exit.")
try:
    while True:
        GPIO.output(led_pin, GPIO.HIGH)  # Turn LED on
        time.sleep(1)  # Wait for 1 second
        GPIO.output(led_pin, GPIO.LOW)  # Turn LED off
        time.sleep(1)  # Wait for 1 second
except KeyboardInterrupt:
    print("Exiting program.")

# Cleanup
GPIO.cleanup()
This script will blink the LED on and off every second. Make sure to install the RPi.GPIO library on your Raspberry Pi before running the script.