
Wi-Fi Connected Air Quality and Weather Station with ESP8266, DHT22, and Nova PM Sensor
View and Edit Project In Cirkit Designer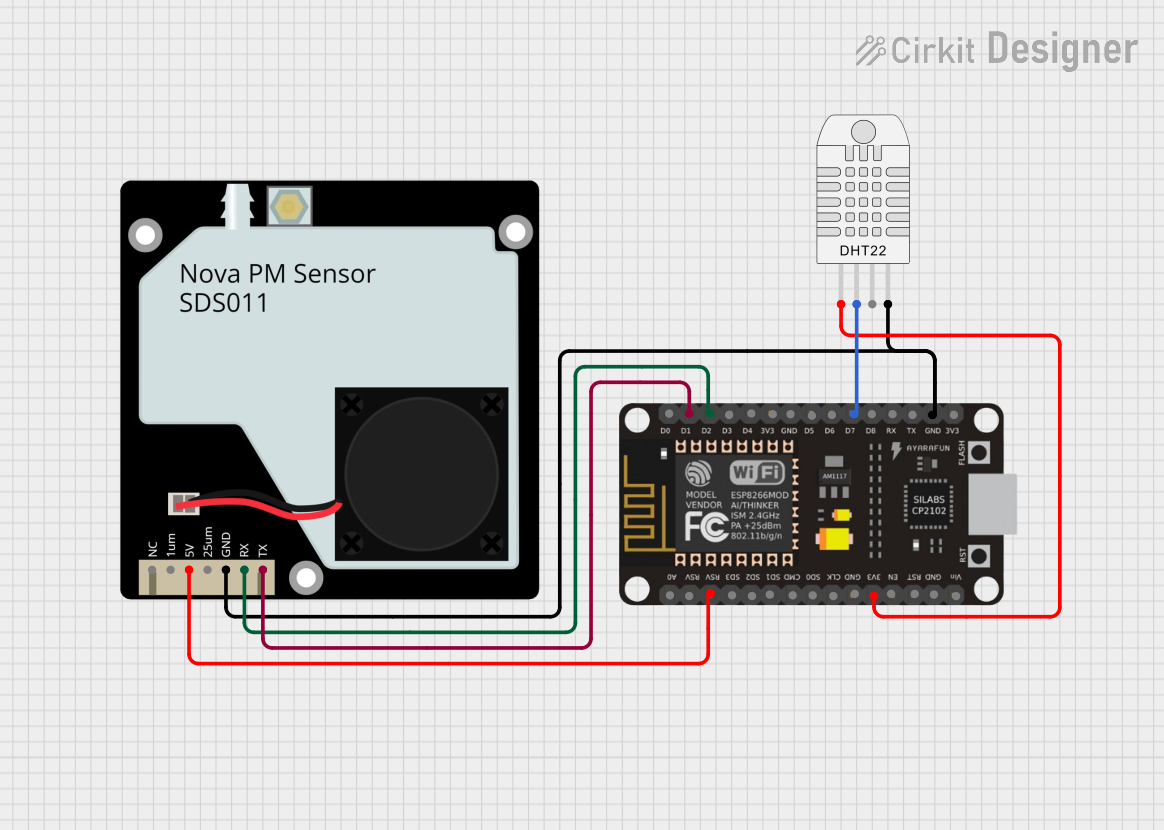
Circuit Documentation
Summary
This circuit involves an ESP8266 NodeMCU microcontroller connected to a DHT22 sensor and a Nova PM Sensor (SDS011). The ESP8266 reads temperature and humidity data from the DHT22 and particulate matter data from the SDS011. It connects to a WiFi network and periodically sends the sensor data to an MQTT broker running on a Raspberry Pi.
Component List
Nova PM Sensor (SDS011)
- Description: A sensor used to measure particulate matter (PM2.5 and PM10) in the air.
- Pins: TXD, RXD, GND, 25um, 5V, 1um, NC
ESP8266 NodeMCU
- Description: A low-cost Wi-Fi microchip with full TCP/IP stack and microcontroller capability.
- Pins: D0, D1, D2, D3, D4, 3V3, GND, D5, D6, D7, D8, RX, TX, A0, RSV, SD3, SD2, SD1, CMD, SD0, CLK, EN, RST, VIN
DHT22 (Wokwi Compatible)
- Description: A basic, low-cost digital temperature and humidity sensor.
- Pins: VCC, SDA, NC, GND
Wiring Details
Nova PM Sensor (SDS011)
- TXD connected to D1 of ESP8266 NodeMCU
- RXD connected to D2 of ESP8266 NodeMCU
- GND connected to GND of ESP8266 NodeMCU and DHT22
- 5V connected to RSV of ESP8266 NodeMCU
ESP8266 NodeMCU
- D1 connected to TXD of Nova PM Sensor
- D2 connected to RXD of Nova PM Sensor
- D7 connected to SDA of DHT22
- GND connected to GND of Nova PM Sensor and DHT22
- RSV connected to 5V of Nova PM Sensor
- 3V3 connected to VCC of DHT22
DHT22 (Wokwi Compatible)
- VCC connected to 3V3 of ESP8266 NodeMCU
- SDA connected to D7 of ESP8266 NodeMCU
- GND connected to GND of ESP8266 NodeMCU and Nova PM Sensor
Code Documentation
/*
 * This Arduino Sketch is for an ESP8266 microcontroller connected to a DHT22
 * sensor and a Nova PM Sensor (SDS011). The ESP8266 reads temperature and
 * humidity data from the DHT22 and particulate matter data from the SDS011.
 * It connects to a WiFi network and periodically sends the sensor data to an
 * MQTT broker running on a Raspberry Pi.
 */

#include <ESP8266WiFi.h>
#include <PubSubClient.h>
#include <DHT.h>

// WiFi credentials
const char* ssid = "your_SSID";
const char* password = "your_PASSWORD";

// MQTT broker
const char* mqtt_server = "your_raspberry_pi_ip";

WiFiClient espClient;
PubSubClient client(espClient);

// DHT22 sensor
#define DHTPIN D7
#define DHTTYPE DHT22
DHT dht(DHTPIN, DHTTYPE);

// SDS011 sensor
#define SDS011_RX D2
#define SDS011_TX D1

void setup() {
  Serial.begin(115200);
  setup_wifi();
  client.setServer(mqtt_server, 1883);
  dht.begin();
}

void setup_wifi() {
  delay(10);
  Serial.println();
  Serial.print("Connecting to ");
  Serial.println(ssid);

  WiFi.begin(ssid, password);

  while (WiFi.status() != WL_CONNECTED) {
    delay(500);
    Serial.print(".");
  }

  Serial.println("");
  Serial.println("WiFi connected");
  Serial.println("IP address: ");
  Serial.println(WiFi.localIP());
}

void reconnect() {
  while (!client.connected()) {
    Serial.print("Attempting MQTT connection...");
    if (client.connect("ESP8266Client")) {
      Serial.println("connected");
    } else {
      Serial.print("failed, rc=");
      Serial.print(client.state());
      Serial.println(" try again in 5 seconds");
      delay(5000);
    }
  }
}

void loop() {
  if (!client.connected()) {
    reconnect();
  }
  client.loop();

  // Read DHT22 sensor
  float h = dht.readHumidity();
  float t = dht.readTemperature();

  // Read SDS011 sensor
  // (Assuming you have a library and code to read from SDS011)
  // float pm25 = readSDS011PM25();
  // float pm10 = readSDS011PM10();

  // Publish data to MQTT
  char msg[50];
  snprintf(msg, 50, "Temperature: %f", t);
  client.publish("sensor/temperature", msg);
  snprintf(msg, 50, "Humidity: %f", h);
  client.publish("sensor/humidity", msg);
  // snprintf(msg, 50, "PM2.5: %f", pm25);
  // client.publish("sensor/pm25", msg);
  // snprintf(msg, 50, "PM10: %f", pm10);
  // client.publish("sensor/pm10", msg);

  delay(60000); // Wait for 60 seconds
}
This code initializes the ESP8266, connects it to a WiFi network, and sets up an MQTT client. It reads data from the DHT22 sensor and (optionally) from the SDS011 sensor, then publishes the data to an MQTT broker. The loop function ensures that the ESP8266 remains connected to the MQTT broker and periodically sends sensor data.