ESP32C3-Based Thermal Imaging Camera with TFT Display
Circuit Documentation
Summary
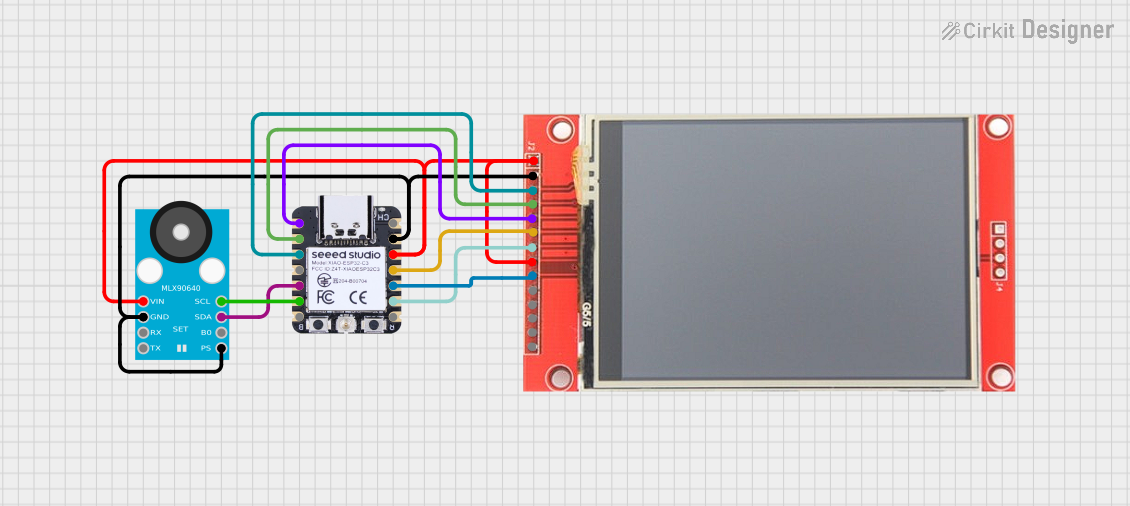
The circuit in question consists of three main components: a GY-MCU90640 thermal camera module, a XIAO ESP32C3 microcontroller, and an ili9341 TFT display. The XIAO ESP32C3 serves as the central processing unit, interfacing with both the thermal camera module and the TFT display. The thermal camera captures temperature data, which is then processed by the microcontroller and displayed on the TFT screen. The display shows the thermal data visually and provides additional information such as ambient temperature and frame rate.
Component List
GY-MCU90640
- Description: A thermal camera module capable of capturing temperature data over an array of pixels.
- Pins:
- Pin 1: VCC
- Pin 2: GND
- Pin 3: Not connected
- Pin 4: Not connected
- Pin 5: GND
- Pin 6: Not connected
- Pin 7: SDA
- Pin 8: SCL
XIAO ESP32C3
- Description: A compact microcontroller based on the ESP32-C3 chip, featuring Wi-Fi and Bluetooth capabilities.
- Pins:
- GPIO2/A0/D0
- GPIO3/A1/D1
- GPIO4/A2/D2
- GPIO5/A3/D3
- GPIO6/SDA/D4
- GPIO7/SCL/D5
- GPIO21/Tx/D6
- 5V
- GND
- 3V3
- GPIO10/MOSI/D10
- GPIO9/MISO/D9
- GPIO8/SCK/D8
- GPIO20/Rx/D7
ili9341 TFT Display
- Description: A color TFT LCD display module with a resolution of 240x320 pixels, commonly used for embedded systems.
- Pins:
- VCC
- GND
- CS
- RESET
- DC/RS
- SDI
- SCK
- LED
- SDO
- T_CLK
- T_CS
- T_DIN
- T_DO
- T_IRQ
Wiring Details
GY-MCU90640
- VCC connected to 3V3 of XIAO ESP32C3
- GND connected to GND of XIAO ESP32C3
- SDA connected to GPIO6/SDA/D4 of XIAO ESP32C3
- SCL connected to GPIO7/SCL/D5 of XIAO ESP32C3
XIAO ESP32C3
- GPIO2/A0/D0 connected to DC/RS of ili9341 TFT Display
- GPIO3/A1/D1 connected to RESET of ili9341 TFT Display
- GPIO4/A2/D2 connected to CS of ili9341 TFT Display
- GPIO6/SDA/D4 connected to SDA of GY-MCU90640
- GPIO7/SCL/D5 connected to SCL of GY-MCU90640
- GND connected to GND of GY-MCU90640 and GND of ili9341 TFT Display
- 3V3 connected to VCC of GY-MCU90640 and VCC & LED of ili9341 TFT Display
- GPIO10/MOSI/D10 connected to SDI of ili9341 TFT Display
- GPIO9/MISO/D9 connected to SDO of ili9341 TFT Display
- GPIO8/SCK/D8 connected to SCK of ili9341 TFT Display
ili9341 TFT Display
- VCC connected to 3V3 of XIAO ESP32C3
- GND connected to GND of XIAO ESP32C3
- CS connected to GPIO4/A2/D2 of XIAO ESP32C3
- RESET connected to GPIO3/A1/D1 of XIAO ESP32C3
- DC/RS connected to GPIO2/A0/D0 of XIAO ESP32C3
- SDI connected to GPIO10/MOSI/D10 of XIAO ESP32C3
- SCK connected to GPIO8/SCK/D8 of XIAO ESP32C3
- LED connected to 3V3 of XIAO ESP32C3
- SDO connected to GPIO9/MISO/D9 of XIAO ESP32C3
Documented Code
The code provided is for the XIAO ESP32C3 microcontroller and is written in Arduino C/C++. It includes libraries for the Adafruit MLX90640 thermal camera and the Adafruit GFX library for the ili9341 TFT display. The code initializes the thermal camera and the TFT display, captures temperature data from the thermal camera, and displays it on the TFT screen. It also calculates and displays the ambient temperature and the frame rate.
#include <Adafruit_MLX90640.h>
#include <Adafruit_GFX.h>    // Core graphics library
#include <Adafruit_ST7789.h> // Hardware-specific library for ST7789
#include <SPI.h>

// ... (Code omitted for brevity)

void setup() {
  // Setup code to initialize the display and thermal camera
  // ... (Code omitted for brevity)
}

void loop() {
  // Main loop code to capture and display thermal data
  // ... (Code omitted for brevity)
}
Note: The full code is not displayed here due to brevity. The provided code snippet shows the inclusion of necessary libraries and the structure of the setup and loop functions, which are essential in Arduino programming. The setup function is called once when the program starts and is used to initialize settings. The loop function runs repeatedly, allowing the device to change and respond. It's where the main logic of the program is implemented.