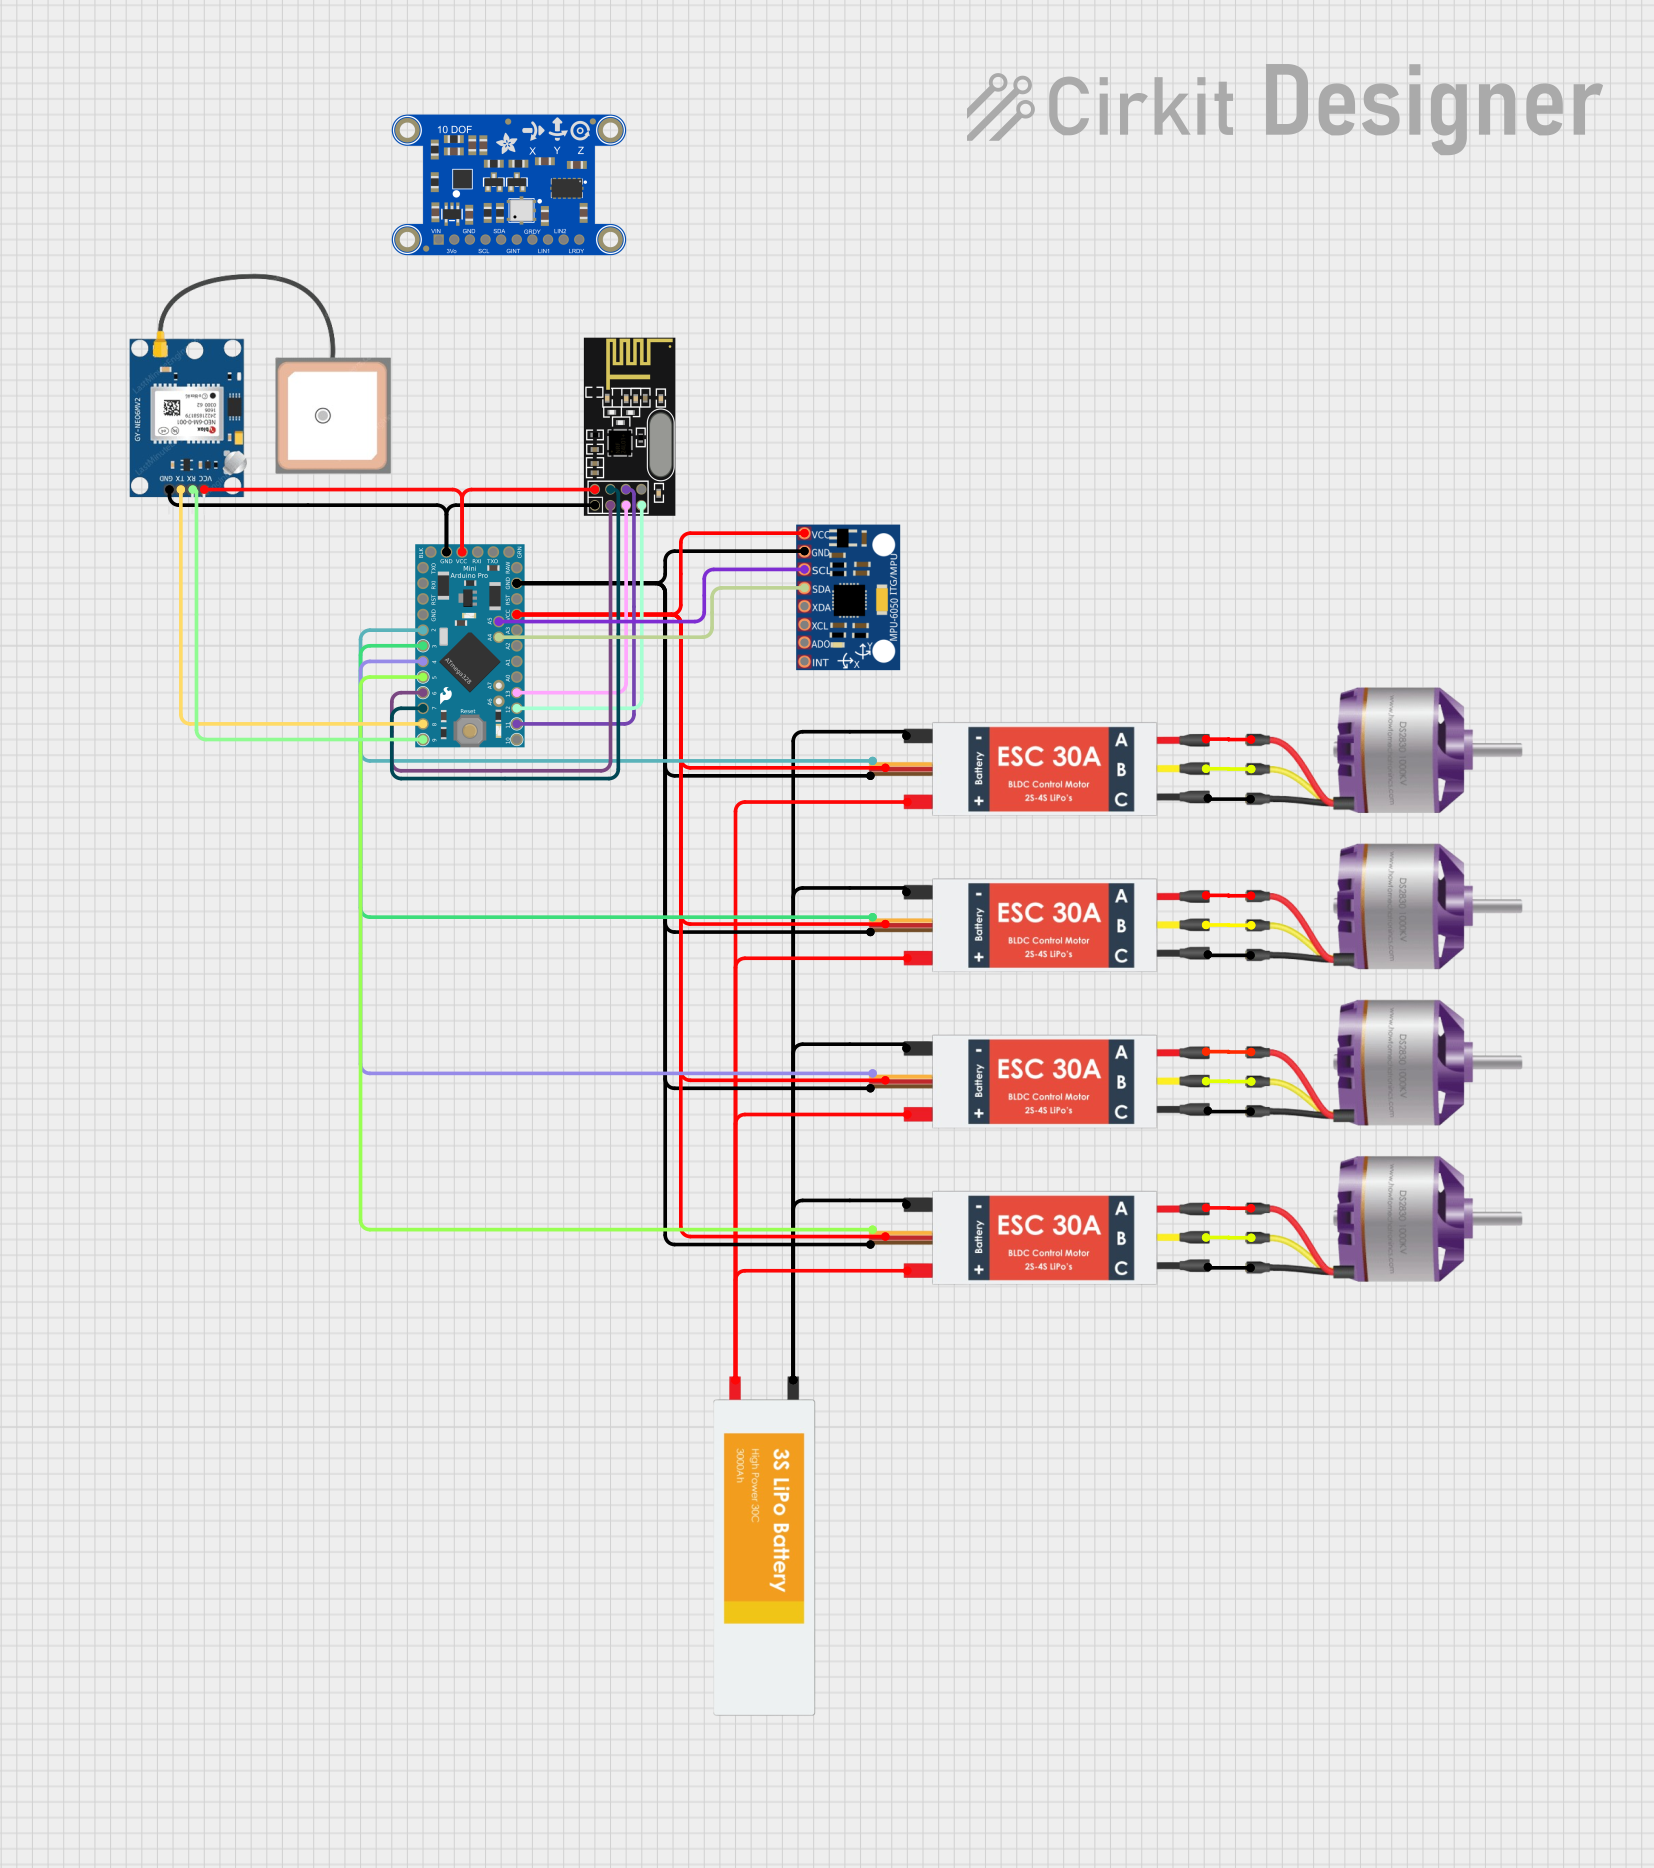
Arduino-Controlled Quadcopter with GPS and Wireless Communication

Circuit Documentation
Summary
This circuit appears to be designed for a multi-motor control application, possibly for a drone or a similar vehicle that requires independent motor control. It includes an Arduino Pro Mini as the central microcontroller, interfaced with a GPS module (GPS NEO 6M), a wireless communication module (NRF24L01), and a motion tracking sensor (MPU-6050). The circuit is powered by a Lipo Battery and uses four Electronic Speed Controllers (ESCs) to manage the power and control signals to four Brushless Motors. The ESCs also provide a 5V output that powers the Arduino and the sensors.
Component List
Microcontroller
- Arduino Pro Mini: A compact microcontroller board based on the ATmega328, with a variety of digital and analog I/O pins.
Sensors
- GPS NEO 6M: A GPS module for receiving location data.
- MPU-6050: A motion processing unit that contains a gyroscope and an accelerometer.
Communication Module
- NRF24L01: A 2.4GHz wireless transceiver module for remote communication.
Power Components
- Lipo Battery: A rechargeable battery that provides power to the circuit.
- Electronic Speed Controller (ESC): A device that regulates the power to an electric motor.
Actuators
- Brushless Motor: A type of electric motor that is commonly used in drones and other high-performance applications.
Wiring Details
Arduino Pro Mini
- VCC: Connected to the 5V output from the ESCs and the VCC of the GPS NEO 6M and NRF24L01.
- GND: Common ground with all components.
- A4 (SDA): Connected to the SDA pin of the MPU-6050.
- A5 (SCL): Connected to the SCL pin of the MPU-6050.
- D2-D6: Control signals for the ESCs.
- D7 (CSN): Chip Select Not for the NRF24L01.
- D8 (TX): Transmit pin connected to the RX pin of the GPS NEO 6M.
- D9 (RX): Receive pin connected to the TX pin of the GPS NEO 6M.
- MISO, MOSI, SCK: SPI pins connected to the corresponding pins on the NRF24L01.
GPS NEO 6M
- VCC: Powered by the 5V output from the ESCs.
- GND: Common ground with all components.
- RX: Connected to the TX (D8) pin of the Arduino Pro Mini.
- TX: Connected to the RX (D9) pin of the Arduino Pro Mini.
NRF24L01
- VCC (3V): Powered by the 5V output from the ESCs.
- GND: Common ground with all components.
- CE: Connected to D6 of the Arduino Pro Mini.
- CSN: Connected to D7 of the Arduino Pro Mini.
- SCK: Connected to the SCK pin of the Arduino Pro Mini.
- MISO: Connected to the MISO pin of the Arduino Pro Mini.
- MOSI: Connected to the MOSI pin of the Arduino Pro Mini.
MPU-6050
- VCC: Powered by the 5V output from the ESCs.
- GND: Common ground with all components.
- SDA: Connected to A4 (SDA) of the Arduino Pro Mini.
- SCL: Connected to A5 (SCL) of the Arduino Pro Mini.
Electronic Speed Controller (ESC)
- Battery VCC: Connected to the VCC of the Lipo Battery.
- Battery GND: Connected to the GND of the Lipo Battery.
- Signal: Connected to the control pins D2-D6 of the Arduino Pro Mini.
- 5v out: Provides 5V power to the Arduino Pro Mini and sensors.
- GND out: Common ground with all components.
- M1, M2, M3: Connected to the corresponding L1, L2, L3 pins of the Brushless Motors.
Brushless Motor
- L1, L2, L3: Connected to the corresponding M1, M2, M3 pins of the ESCs.
Lipo Battery
- VCC: Provides power to the ESCs.
- GND: Common ground with all components.
Documented Code
Arduino Pro Mini Code (sketch.ino)
void setup() {
  // put your setup code here, to run once:

}

void loop() {
  // put your main code here, to run repeatedly:

}
The provided code is a template with empty setup() and loop() functions. The setup() function is intended for initialization code that runs once at startup, and the loop() function contains the main logic that runs repeatedly. Actual implementation details need to be added based on the specific requirements of the application.
Additional Notes
- The code for the Arduino Pro Mini is minimal and does not include any functionality. It needs to be populated with the logic for reading sensors, controlling the ESCs, and handling wireless communication.
- The NRF24L01 module requires a 3.3V power supply, but it is listed as connected to a 5V output. This needs to be corrected to prevent damage to the module.
- The documentation file for the code is empty and should be updated with relevant information as the code is developed.