
Arduino UNO and Adafruit PCA9685 Controlled Multi-Servo Tester
View and Edit Project In Cirkit Designer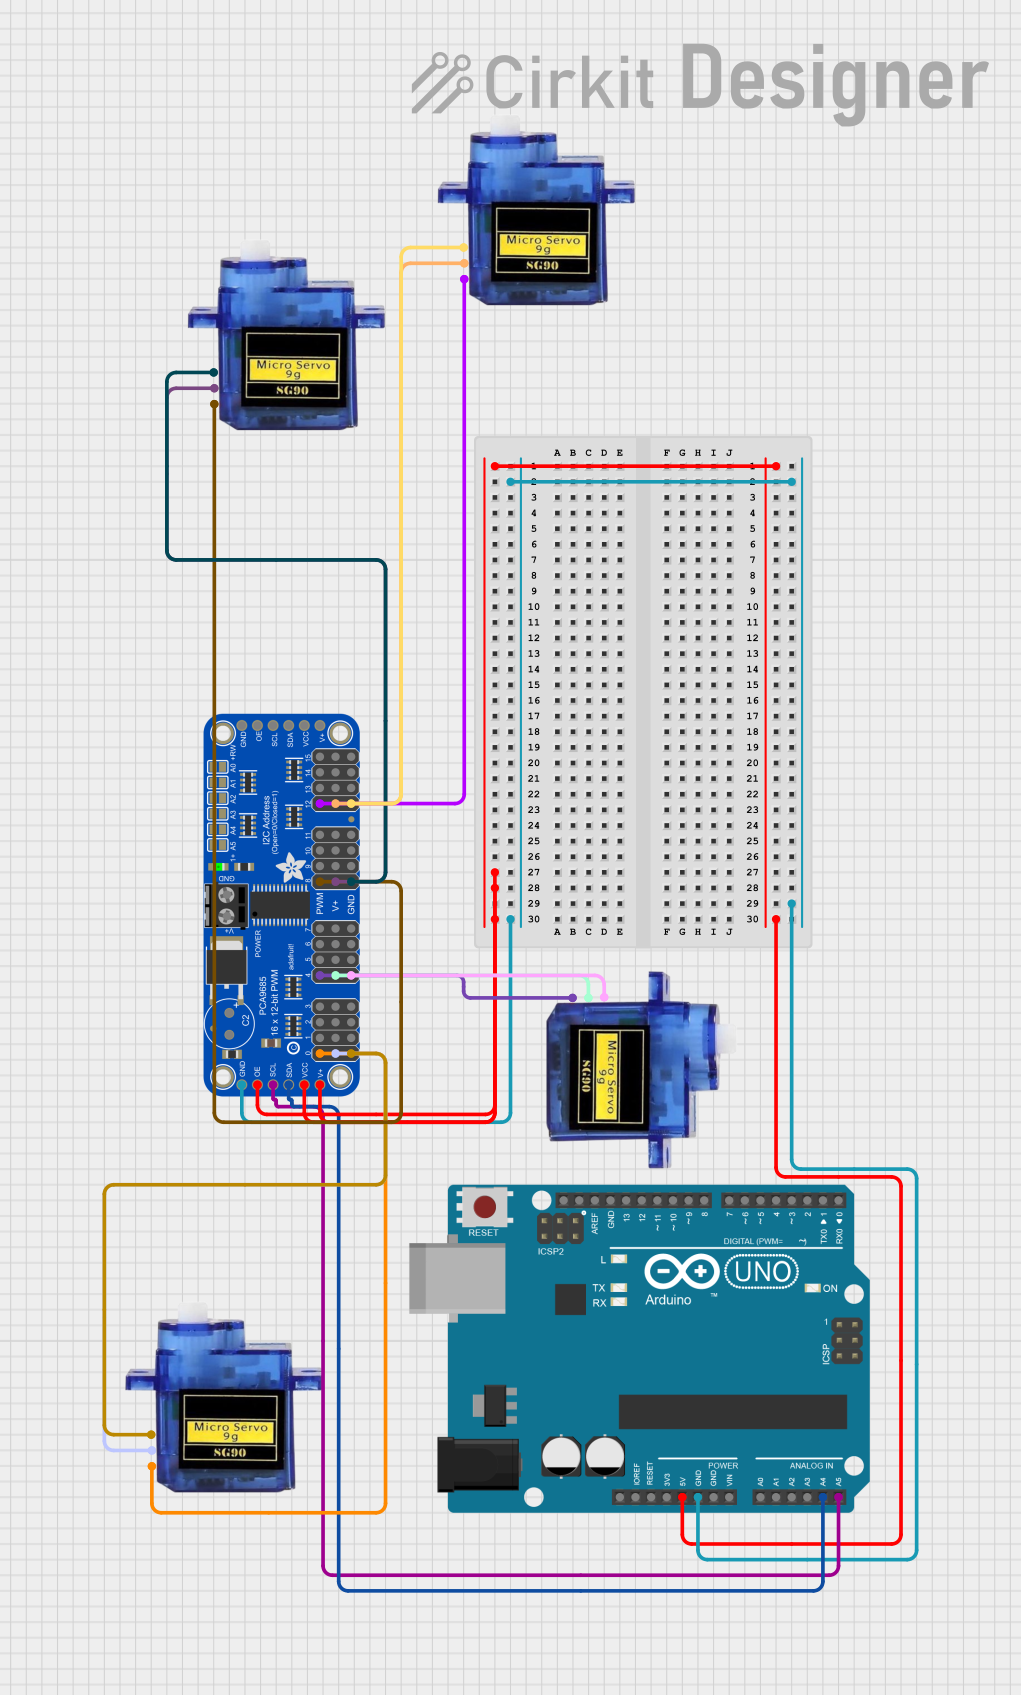
Circuit Documentation
Summary
This circuit is designed to control multiple micro servos using an Arduino UNO and an Adafruit PCA9685 PWM Servo Breakout board. The servos are connected to the PWM outputs of the PCA9685, which is controlled by the Arduino via I2C communication. The Arduino runs a sketch to test the wiring and functionality of the servos by rotating them back and forth.
Component List
Micro servo 9G
- Description: A small and lightweight servo motor commonly used in RC models and small robotics.
- Pins: GND, +5V, PWM
Arduino UNO
- Description: A microcontroller board based on the ATmega328P. It has 14 digital input/output pins, 6 analog inputs, and is programmable with the Arduino IDE.
- Pins: UNUSED, IOREF, Reset, 3.3V, 5V, GND, Vin, A0, A1, A2, A3, A4, A5, SCL, SDA, AREF, D13, D12, D11, D10, D9, D8, D7, D6, D5, D4, D3, D2, D1, D0
Adafruit PCA9685 PWM Servo Breakout
- Description: A 16-channel PWM driver board that can control up to 16 servos or LEDs with I2C interface.
- Pins: 5.0V, GND, PWRIN, PWM7, PWM6, PWM5, PWM4, PWM3, PWM2, PWM1, PWM0, VCC, SDA, SCL, OE, PWM15, PWM14, PWM13, PWM12, PWM11, PWM10, PWM9, PWM8
Wiring Details
Micro servo 9G (1)
- GND connected to GND of Adafruit PCA9685 PWM Servo Breakout
- +5V connected to 5.0V of Adafruit PCA9685 PWM Servo Breakout
- PWM connected to PWM4 of Adafruit PCA9685 PWM Servo Breakout
Micro servo 9G (2)
- GND connected to GND of Adafruit PCA9685 PWM Servo Breakout
- +5V connected to 5.0V of Adafruit PCA9685 PWM Servo Breakout
- PWM connected to PWM8 of Adafruit PCA9685 PWM Servo Breakout
Micro servo 9G (3)
- GND connected to GND of Adafruit PCA9685 PWM Servo Breakout
- +5V connected to 5.0V of Adafruit PCA9685 PWM Servo Breakout
- PWM connected to PWM12 of Adafruit PCA9685 PWM Servo Breakout
Micro servo 9G (4)
- GND connected to GND of Adafruit PCA9685 PWM Servo Breakout
- +5V connected to 5.0V of Adafruit PCA9685 PWM Servo Breakout
- PWM connected to PWM0 of Adafruit PCA9685 PWM Servo Breakout
Arduino UNO
- 5V connected to 5.0V, VCC, and OE of Adafruit PCA9685 PWM Servo Breakout
- GND connected to GND of Adafruit PCA9685 PWM Servo Breakout
- A4 connected to SDA of Adafruit PCA9685 PWM Servo Breakout
- A5 connected to SCL of Adafruit PCA9685 PWM Servo Breakout
Adafruit PCA9685 PWM Servo Breakout
- 5.0V connected to 5V of Arduino UNO
- GND connected to GND of Arduino UNO
- SDA connected to A4 of Arduino UNO
- SCL connected to A5 of Arduino UNO
- OE connected to 5V of Arduino UNO
Code Documentation
Arduino UNO Code
/*
 * This Arduino sketch is designed to test the wiring of multiple servos
 * connected to an Adafruit PCA9685 PWM Servo Breakout board. The servos
 * will rotate back and forth to ensure that all connections are working
 * correctly.
 */

#include <Wire.h>
#include <Adafruit_PWMServoDriver.h>

Adafruit_PWMServoDriver pwm = Adafruit_PWMServoDriver();

void setup() {
  pwm.begin();
  pwm.setPWMFreq(60); // Analog servos run at ~60 Hz
}

void loop() {
  for (int pos = 0; pos <= 180; pos++) {
    setAllServos(pos);
    delay(15); // Wait for the servos to reach the position
  }
  for (int pos = 180; pos >= 0; pos--) {
    setAllServos(pos);
    delay(15); // Wait for the servos to reach the position
  }
}

void setAllServos(int pos) {
  int pulseLength = map(pos, 0, 180, 150, 600);
  pwm.setPWM(0, 0, pulseLength); // Servo 1
  pwm.setPWM(4, 0, pulseLength); // Servo 2
  pwm.setPWM(8, 0, pulseLength); // Servo 3
  pwm.setPWM(12, 0, pulseLength); // Servo 4
}
Adafruit PCA9685 PWM Servo Breakout Code
#include <Wire.h>
#include <Adafruit_PWMServoDriver.h>

Adafruit_PWMServoDriver pwm = Adafruit_PWMServoDriver();

void setup() {
  pwm.begin();
  pwm.setPWMFreq(60); // Analog servos run at ~60 Hz
}

void loop() {
  for (int pos = 0; pos <= 180; pos++) {
    setServoPosition(0, pos);
    delay(15); // Wait for the servo to reach the position
  }
  for (int pos = 180; pos >= 0; pos--) {
    setServoPosition(0, pos);
    delay(15); // Wait for the servo to reach the position
  }
}

void setServoPosition(int servoNum, int pos) {
  int pulseLength = map(pos, 0, 180, 150, 600);
  pwm.setPWM(servoNum, 0, pulseLength);
}
This documentation provides a comprehensive overview of the circuit, including the components used, their wiring details, and the code running on the microcontrollers.