Cirkit Designer
Your all-in-one circuit design IDE
Home /
Project Documentation
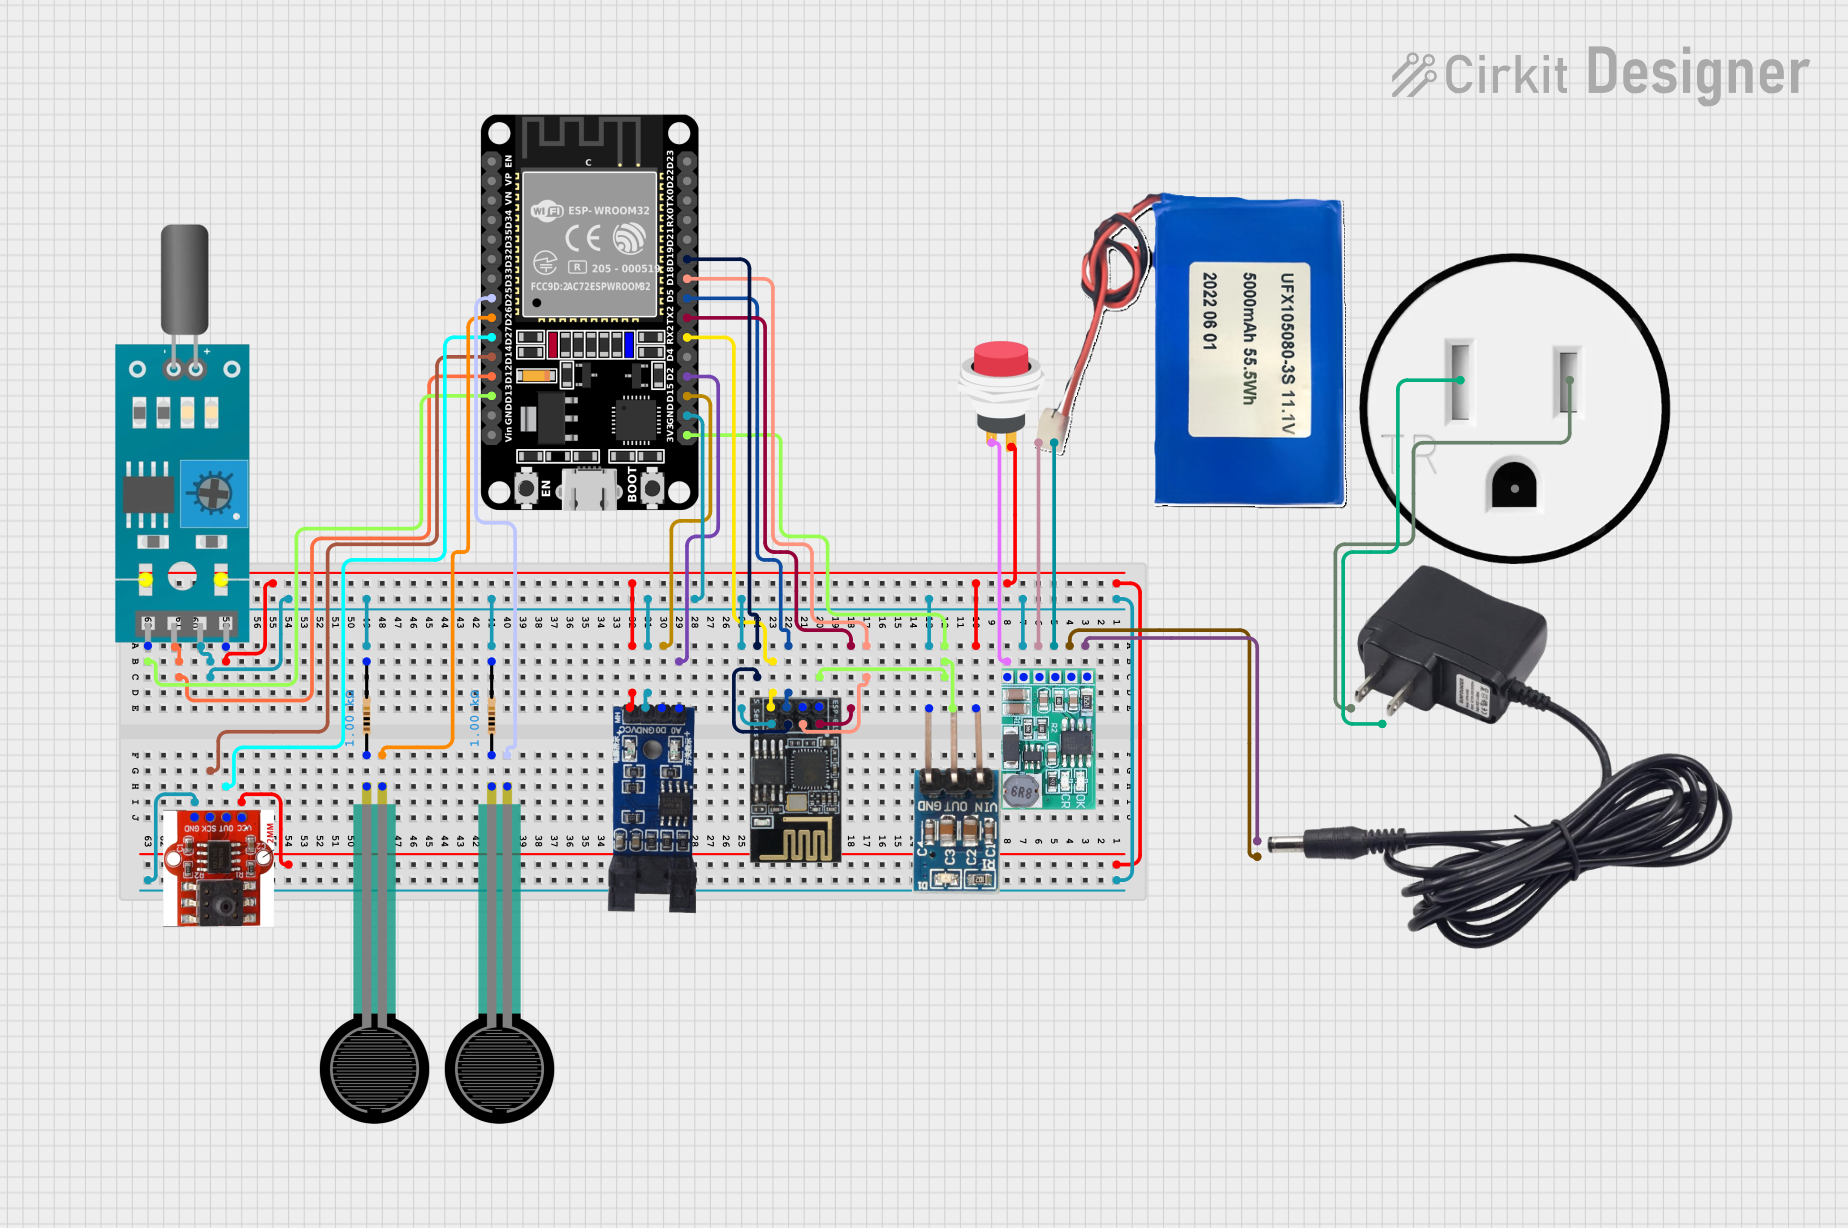
ESP32 and ESP8266 Wi-Fi Controlled Sensor Hub with Battery Backup
Circuit Documentation
Summary
This document provides a detailed overview of a circuit that includes various sensors, a WiFi module, a power management system, and an ESP32 microcontroller. The circuit is designed to read sensor data and transmit it over WiFi. The power management system ensures stable power supply to all components.
Component List
2Pin Push Switch
- Pins: Input +, Output +
- Description: A simple push-button switch.
- Purpose: Used to control the power flow in the circuit.
Air Pressure Module
- Pins: VCC, OUT, SCK, GND
- Description: Measures air pressure.
- Purpose: Provides air pressure data to the microcontroller.
Optical Encoder Sensor Module
- Pins: A0, D0, GND, VCC
- Description: Measures rotational position.
- Purpose: Provides rotational data to the microcontroller.
Charger + Boost Converter DD05CVSA
- Pins: VOUT, GND, BAT, VIN
- Description: Manages battery charging and boosts voltage.
- Purpose: Ensures stable power supply to the circuit.
Force Sensing Resistor
- Pins: pin 0, pin 1
- Description: Measures force applied.
- Purpose: Provides force data to the microcontroller.
Resistor (1000 Ohms)
- Pins: pin1, pin2
- Description: Limits current flow.
- Purpose: Used in series with force sensing resistors.
3.3V Regulator
- Pins: GND, OUT, Vin
- Description: Regulates voltage to 3.3V.
- Purpose: Provides stable 3.3V power supply.
WiFi Module ESP8266-01
- Pins: RX, GPIO0, GPIO2, GND, +3V3, Reset, CH-PD Chip power down, TX
- Description: WiFi communication module.
- Purpose: Enables WiFi connectivity.
Li-ion 5000mAh Battery
- Pins: 11.1V, GND
- Description: Rechargeable battery.
- Purpose: Provides power to the circuit.
12V Adapter
- Pins: VCC, GND
- Description: Converts AC to 12V DC.
- Purpose: Provides initial power to the circuit.
Tilt Sensor
- Pins: A0, D0, GND, VCC
- Description: Measures tilt angle.
- Purpose: Provides tilt data to the microcontroller.
120V Outlet
- Pins: AC Neutral, AC Hot, GND
- Description: Standard electrical outlet.
- Purpose: Provides AC power to the 12V adapter.
ESP32 (30 pin)
- Pins: EN, VP, VN, D34, D35, D32, D33, D25, D26, D27, D14, D12, D13, GND, Vin, D23, D22, TX0, RX0, D21, D19, D18, D5, TX2, RX2, D4, D2, D15, 3V3
- Description: Microcontroller with WiFi and Bluetooth capabilities.
- Purpose: Central processing unit of the circuit.
Wiring Details
2Pin Push Switch
- Input + connected to VOUT of Charger + Boost Converter DD05CVSA
- Output + connected to Vin of 3.3V Regulator
Air Pressure Module
- VCC connected to Vin of 3.3V Regulator
- OUT connected to D27 of ESP32
- SCK connected to D14 of ESP32
- GND connected to GND of Charger + Boost Converter DD05CVSA
Optical Encoder Sensor Module
- A0 connected to D2 of ESP32
- D0 connected to D15 of ESP32
- GND connected to GND of Charger + Boost Converter DD05CVSA
- VCC connected to Vin of 3.3V Regulator
Charger + Boost Converter DD05CVSA
- VIN connected to VCC of 12V Adapter
- GND connected to GND of 12V Adapter
- BAT connected to 11.1V of Li-ion 5000mAh Battery
- GND connected to GND of Li-ion 5000mAh Battery
- VOUT connected to Input + of 2Pin Push Switch
Force Sensing Resistor (Instance 1)
- pin 0 connected to D26 of ESP32
- pin 1 connected to pin1 of Resistor (Instance 1)
Force Sensing Resistor (Instance 2)
- pin 0 connected to D25 of ESP32
- pin 1 connected to pin1 of Resistor (Instance 2)
Resistor (Instance 1)
- pin1 connected to pin 1 of Force Sensing Resistor (Instance 1)
- pin2 connected to GND of Charger + Boost Converter DD05CVSA
Resistor (Instance 2)
- pin1 connected to pin 1 of Force Sensing Resistor (Instance 2)
- pin2 connected to GND of Charger + Boost Converter DD05CVSA
3.3V Regulator
- GND connected to GND of Charger + Boost Converter DD05CVSA
- OUT connected to +3V3 of WiFi Module ESP8266-01 and 3V3 of ESP32
- Vin connected to Output + of 2Pin Push Switch
WiFi Module ESP8266-01
- RX connected to TX2 of ESP32
- GPIO0 connected to D18 of ESP32
- GPIO2 connected to D19 of ESP32
- GND connected to GND of Charger + Boost Converter DD05CVSA
- +3V3 connected to OUT of 3.3V Regulator
- CH-PD Chip power down connected to D5 of ESP32
- TX connected to RX2 of ESP32
Li-ion 5000mAh Battery
- 11.1V connected to BAT of Charger + Boost Converter DD05CVSA
- GND connected to GND of Charger + Boost Converter DD05CVSA
12V Adapter
- VCC connected to VIN of Charger + Boost Converter DD05CVSA
- GND connected to GND of Charger + Boost Converter DD05CVSA
Tilt Sensor
- A0 connected to D13 of ESP32
- D0 connected to D12 of ESP32
- GND connected to GND of Charger + Boost Converter DD05CVSA
- VCC connected to Vin of 3.3V Regulator
120V Outlet
- AC Hot connected to VCC of 12V Adapter
- AC Neutral connected to GND of 12V Adapter
ESP32 (30 pin)
- EN - Not connected
- VP - Not connected
- VN - Not connected
- D34 - Not connected
- D35 - Not connected
- D32 - Not connected
- D33 - Not connected
- D25 connected to pin 0 of Force Sensing Resistor (Instance 2)
- D26 connected to pin 0 of Force Sensing Resistor (Instance 1)
- D27 connected to OUT of Air Pressure Module
- D14 connected to SCK of Air Pressure Module
- D12 connected to D0 of Tilt Sensor
- D13 connected to A0 of Tilt Sensor
- GND connected to GND of Charger + Boost Converter DD05CVSA
- Vin - Not connected
- D23 - Not connected
- D22 - Not connected
- TX0 - Not connected
- RX0 - Not connected
- **D21