
Circuit Documentation
Summary
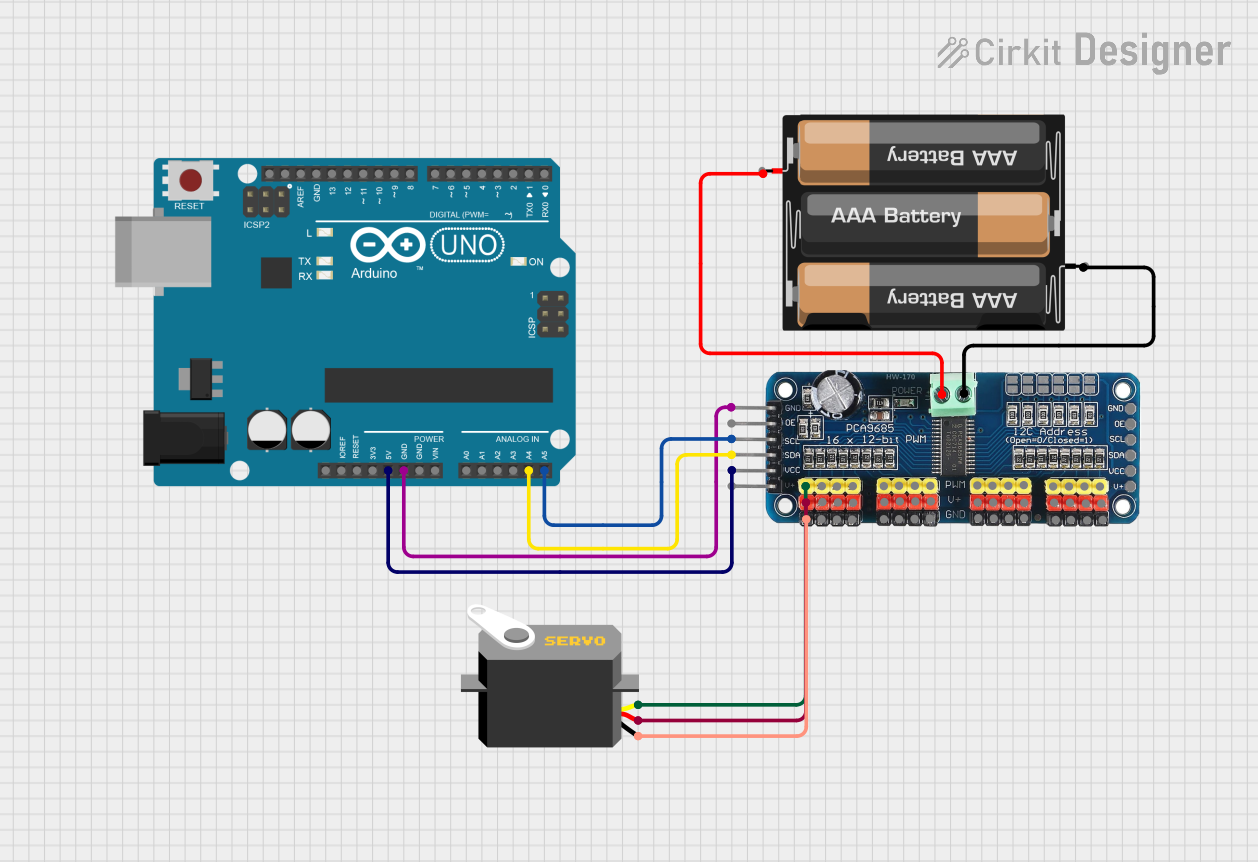
This circuit consists of an Arduino UNO microcontroller, a 16-Channel PWM Servo Driver, a Servo motor, and a 3xAA Battery pack. The Arduino UNO is used to control the Servo motor via the PWM Servo Driver. The 3xAA Battery pack provides additional power to the Servo Driver and the Servo motor.
Component List
Arduino UNO
- Description: A microcontroller board based on the ATmega328P.
- Pins: UNUSED, IOREF, Reset, 3.3V, 5V, GND, Vin, A0, A1, A2, A3, A4, A5, SCL, SDA, AREF, D13, D12, D11, D10, D9, D8, D7, D6, D5, D4, D3, D2, D1, D0
16-Channel PWM Servo Driver
- Description: A PWM driver that can control up to 16 servos.
- Pins: V+, VCC, SDA, SCL, OE, GND, Vin+, Vin-, PWM1, PWM2, PWM3, PWM4, PWM5, PWM6, PWM7, PWM8, PWM9, PWM10, PWM11, PWM12, PWM13, PWM14, PWM15, PWM16
Servo
- Description: A motor that can be controlled to move to a specific position.
- Pins: gnd, vcc, pulse
3xAA Battery
- Description: A battery pack that holds three AA batteries to provide power.
- Pins: VCC, GND
Wiring Details
Arduino UNO
- 5V: Connected to VCC of the 16-Channel PWM Servo Driver
- GND: Connected to GND of the 16-Channel PWM Servo Driver
- A4: Connected to SDA of the 16-Channel PWM Servo Driver
- A5: Connected to SCL of the 16-Channel PWM Servo Driver
16-Channel PWM Servo Driver
- VCC: Connected to 5V of the Arduino UNO
- GND: Connected to GND of the Arduino UNO
- SDA: Connected to A4 of the Arduino UNO
- SCL: Connected to A5 of the Arduino UNO
- Vin+: Connected to VCC of the 3xAA Battery
- Vin-: Connected to GND of the 3xAA Battery
- PWM1: Connected to pulse of the Servo
- GND: Connected to gnd of the Servo
- V+: Connected to vcc of the Servo
Servo
- pulse: Connected to PWM1 of the 16-Channel PWM Servo Driver
- gnd: Connected to GND of the 16-Channel PWM Servo Driver
- vcc: Connected to V+ of the 16-Channel PWM Servo Driver
3xAA Battery
- VCC: Connected to Vin+ of the 16-Channel PWM Servo Driver
- GND: Connected to Vin- of the 16-Channel PWM Servo Driver
Code Documentation
Arduino UNO Code
#include <Wire.h>
#include <Adafruit_PWMServoDriver.h>

// called this way, it uses the default address 0x40
Adafruit_PWMServoDriver pwm = Adafruit_PWMServoDriver();

#define SERVOMIN  150 // This is the 'minimum' pulse length count (out of 4096)
#define SERVOMAX  600 // This is the 'maximum' pulse length count (out of 4096)
#define USMIN  600 // This is the rounded 'minimum' microsecond length based on the minimum pulse of 150
#define USMAX  2400 // This is the rounded 'maximum' microsecond length based on the maximum pulse of 600
#define SERVO_FREQ 50 // Analog servos run at ~50 Hz updates

// our servo # counter
uint8_t servonum = 0;

void setup() {
  Serial.begin(9600);
  Serial.println("8 channel Servo test!");

  pwm.begin();

  pwm.setOscillatorFrequency(27000000);
  pwm.setPWMFreq(SERVO_FREQ);  // Analog servos run at ~50 Hz updates

  delay(10);
}

// You can use this function if you'd like to set the pulse length in seconds
// e.g. setServoPulse(0, 0.001) is a ~1 millisecond pulse width. It's not precise!
void setServoPulse(uint8_t n, double pulse) {
  double pulselength;

  pulselength = 1000000;   // 1,000,000 us per second
  pulselength /= SERVO_FREQ;   // Analog servos run at ~60 Hz updates
  Serial.print(pulselength); Serial.println(" us per period");
  pulselength /= 4096;  // 12 bits of resolution
  Serial.print(pulselength); Serial.println(" us per bit");
  pulse *= 1000000;  // convert input seconds to us
  pulse /= pulselength;
  Serial.println(pulse);
  pwm.setPWM(n, 0, pulse);
}

void loop() {
  // Drive each servo one at a time using setPWM()
  Serial.println(servonum);
  for (uint16_t pulselen = SERVOMIN; pulselen < SERVOMAX; pulselen++) {
    pwm.setPWM(servonum, 0, pulselen);
  }

  delay(500);
  for (uint16_t pulselen = SERVOMAX; pulselen > SERVOMIN; pulselen--) {
    pwm.setPWM(servonum, 0, pulselen);
  }

  delay(500);

  // Drive each servo one at a time using writeMicroseconds(), it's not precise due to calculation rounding!
  // The writeMicroseconds() function is used to mimic the Arduino Servo library writeMicroseconds() behavior.
  for (uint16_t microsec = USMIN; microsec < USMAX; microsec++) {
    pwm.writeMicroseconds(servonum, microsec);
  }

  delay(500);
  for (uint16_t microsec = USMAX; microsec > USMIN; microsec--) {
    pwm.writeMicroseconds(servonum, microsec);
  }

  delay(500);

  servonum++;
  if (servonum > 7) servonum = 0; // Testing the first 8 servo channels
}
This code initializes the 16-Channel PWM Servo Driver and controls the Servo motor connected to it. The Servo motor is driven through a series of pulse width modulation (PWM) signals to move it to different positions. The code cycles through the first 8 servo channels, driving each servo one at a time.