
Arduino UNO Based Ultrasonic Distance Measurement with I2C LCD Display
View and Edit Project In Cirkit Designer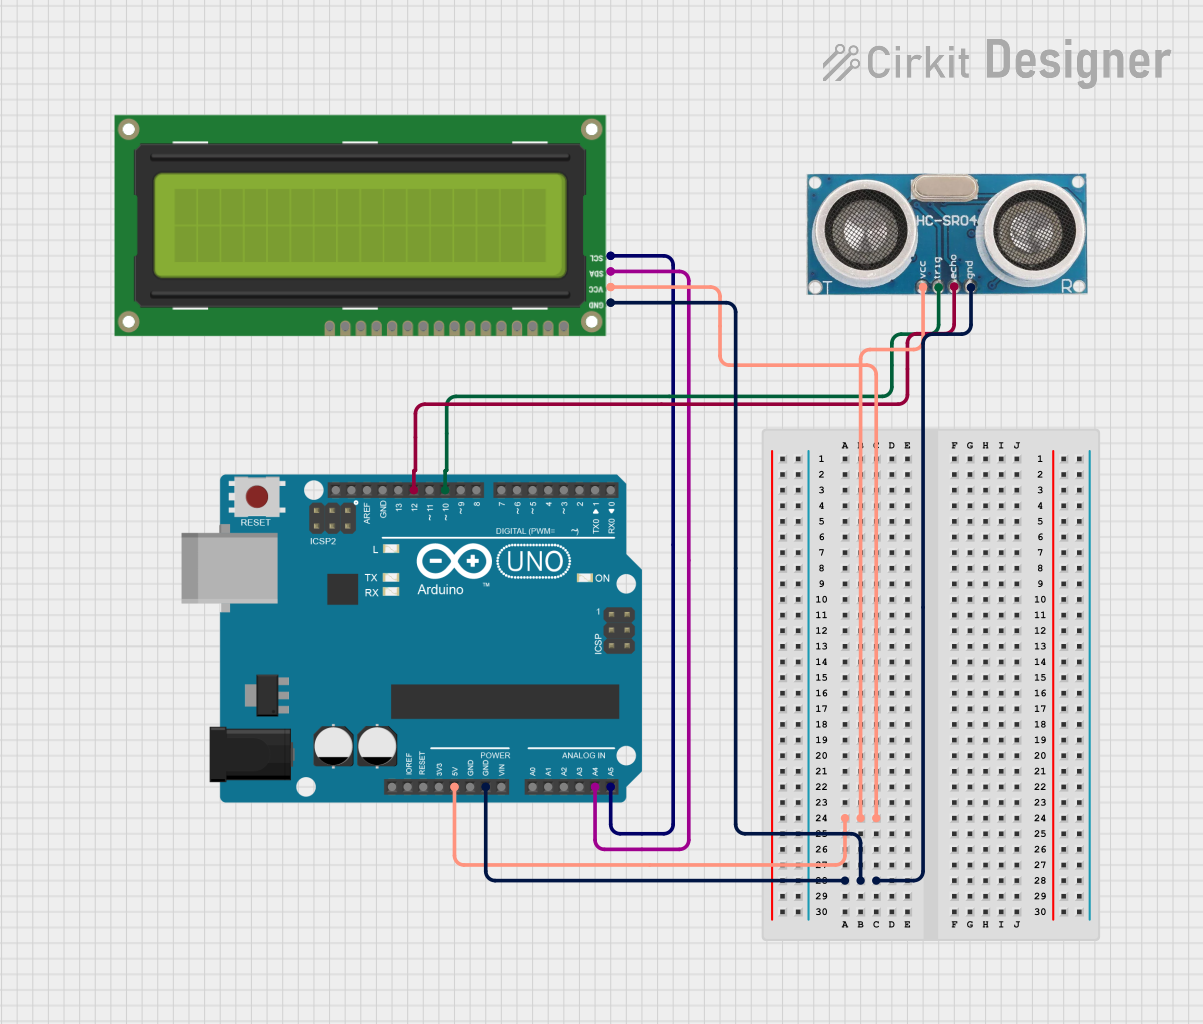
Circuit Documentation
Summary of the Circuit
This circuit integrates an Arduino UNO microcontroller with an Ultrasonic Sensor and an I2C LCD 16x2 Screen. The Arduino UNO serves as the central processing unit, controlling the Ultrasonic Sensor to measure distances and displaying the results on the LCD screen. The sensor is powered by the 5V output from the Arduino and communicates with the microcontroller via digital pins. The LCD screen is connected to the Arduino through the I2C bus, allowing for data to be displayed to the user.
Component List
Arduino UNO
- Description: A microcontroller board based on the ATmega328P.
- Pins: UNUSED, IOREF, Reset, 3.3V, 5V, GND, Vin, A0-A5, SCL, SDA, AREF, D0-D13.
- Purpose: Acts as the central processing unit for the circuit, interfacing with the Ultrasonic Sensor and the LCD screen.
Ultrasonic Sensor
- Description: A sensor that measures distance by emitting ultrasonic waves and measuring the time taken for the echo to return.
- Pins: +VCC, Trigger, Echo, GND.
- Purpose: Measures distances and sends the data to the Arduino UNO for processing.
I2C LCD 16x2 Screen
- Description: A 16x2 character LCD display that uses the I2C communication protocol.
- Pins: SCL, SDA, VCC (5V), GND, VDD, VO, RS, RW, E, D0-D7, BLA, BLK.
- Purpose: Displays information, such as distance measurements, to the user.
Wiring Details
Arduino UNO
- 5V connected to Ultrasonic Sensor +VCC and LCD Screen VCC (5V).
- GND connected to Ultrasonic Sensor GND and LCD Screen GND.
- D10 connected to Ultrasonic Sensor Trigger.
- D12 connected to Ultrasonic Sensor Echo.
- A4 connected to LCD Screen SDA.
- A5 connected to LCD Screen SCL.
Ultrasonic Sensor
- +VCC connected to Arduino UNO 5V.
- Trigger connected to Arduino UNO D10.
- Echo connected to Arduino UNO D12.
- GND connected to Arduino UNO GND.
I2C LCD 16x2 Screen
- SCL connected to Arduino UNO A5.
- SDA connected to Arduino UNO A4.
- VCC (5V) connected to Arduino UNO 5V.
- GND connected to Arduino UNO GND.
Documented Code
Arduino UNO Code (sketch.ino)
void setup() {
  // put your setup code here, to run once:

}

void loop() {
  // put your main code here, to run repeatedly:

}
Note: The provided code is a template and does not include specific functionality. It should be populated with the setup and loop functions to initialize the sensor and LCD, and to continuously read from the sensor and display the data on the LCD.