
Circuit Documentation
Summary
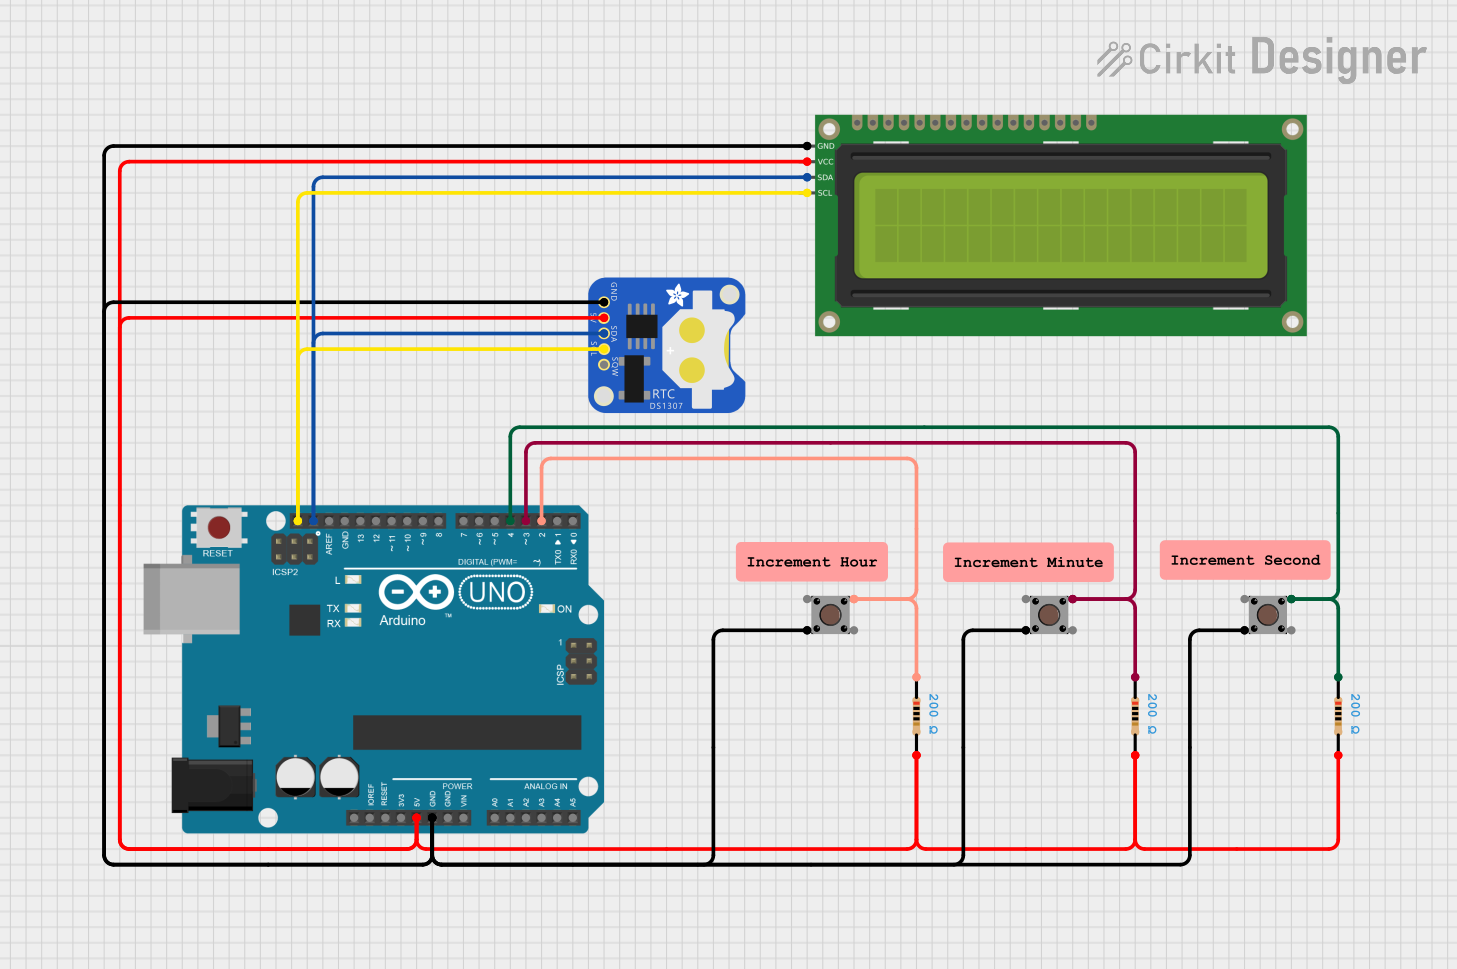
This circuit is designed to interface with a DS1307 Real-Time Clock (RTC) and a 16x2 I2C LCD display. It allows the user to set the time using three pushbuttons for hours, minutes, and seconds. The circuit utilizes an Arduino UNO as the microcontroller to manage the RTC and display the time on the LCD. Resistors are used to pull down the button inputs, ensuring stable readings.
Component List
1. 16x2 I2C LCD
- Description: A 16x2 character LCD that communicates via I2C protocol.
- Purpose: Displays the current date and time retrieved from the RTC.
2. DS1307 RTC
- Description: A Real-Time Clock module that keeps track of the current time and date.
- Purpose: Provides accurate timekeeping for the circuit.
3. Arduino UNO
- Description: A microcontroller board based on the ATmega328P.
- Purpose: Acts as the main controller for the circuit, managing the RTC and LCD.
4. Pushbutton
- Description: A momentary switch used to input time adjustments.
- Purpose: Allows the user to increment hours, minutes, and seconds.
5. Resistor
- Description: A passive electrical component that limits current flow.
- Purpose: Used as pull-down resistors for the pushbutton inputs to ensure stable readings.
Wiring Details
1. 16x2 I2C LCD
- GND: Connected to GND of Arduino UNO
- VCC: Connected to 5V of Arduino UNO
- SDA: Connected to SDA pin of Arduino UNO
- SCL: Connected to SCL pin of Arduino UNO
2. DS1307 RTC
- GND: Connected to GND of Arduino UNO
- 5V: Connected to 5V of Arduino UNO
- SDA: Connected to SDA pin of Arduino UNO
- SCL: Connected to SCL pin of Arduino UNO
3. Arduino UNO
- GND: Connected to GND of the circuit
- 5V: Connected to 5V of the circuit
- D2: Connected to Pin 1 (in) of Pushbutton (for seconds)
- D3: Connected to Pin 1 (in) of Pushbutton (for minutes)
- D4: Connected to Pin 1 (in) of Pushbutton (for hours)
4. Pushbutton (for seconds)
- Pin 1 (in): Connected to D2 of Arduino UNO
- Pin 4 (out): Connected to GND of DS1307 RTC
5. Pushbutton (for minutes)
- Pin 1 (in): Connected to D3 of Arduino UNO
- Pin 4 (out): Connected to GND of DS1307 RTC
6. Pushbutton (for hours)
- Pin 1 (in): Connected to D4 of Arduino UNO
- Pin 4 (out): Connected to GND of DS1307 RTC
7. Resistor (for seconds button)
- pin1: Connected to Pin 1 (in) of Pushbutton (for seconds)
- pin2: Connected to GND
8. Resistor (for minutes button)
- pin1: Connected to Pin 1 (in) of Pushbutton (for minutes)
- pin2: Connected to GND
9. Resistor (for hours button)
- pin1: Connected to Pin 1 (in) of Pushbutton (for hours)
- pin2: Connected to GND
Documented Code
#include <Wire.h>
#include <RTClib.h>
#include <LiquidCrystal_I2C.h>

// Initialize the RTC and LCD
RTC_DS1307 rtc;
LiquidCrystal_I2C lcd(0x27, 16, 2); // Adjust the I2C address if necessary

const int buttonHourPin = 2; // Pin where the hour button is connected
const int buttonMinutePin = 3; // Pin where the minute button is connected
const int buttonSecondPin = 4; // Pin where the second button is connected

unsigned long previousMillis = 0; // Stores the last time the display was updated
const long interval = 1000; // Interval at which to update the display (1 second)

void setup() {
  pinMode(12, OUTPUT);
  digitalWrite(12, LOW);
  pinMode(11, OUTPUT);
  digitalWrite(11, HIGH);

  // Initialize serial communication for debugging
  Serial.begin(9600);

  // Initialize the RTC
  if (!rtc.begin()) {
    Serial.println("Couldn't find RTC");
    while (1);
  }

  if (!rtc.isrunning()) {
    Serial.println("RTC is NOT running!");
    // Uncomment the following line to set the RTC to the current date & time
    // rtc.adjust(DateTime(F(__DATE__), F(__TIME__)));
  }

  // Initialize the LCD
  lcd.init();
  lcd.backlight();
  lcd.clear();

  // Initialize the button pins as input with internal pull-up resistor
  pinMode(buttonHourPin, INPUT_PULLUP);
  pinMode(buttonMinutePin, INPUT_PULLUP);
  pinMode(buttonSecondPin, INPUT_PULLUP);
}

void loop() {
  unsigned long currentMillis = millis();

  // Check if the hour button was pressed
  if (digitalRead(buttonHourPin) == LOW) {
    // Get the current time from the RTC
    DateTime now = rtc.now();

    // Increment the hours
    DateTime newTime = DateTime(now.year(), now.month(), now.day(), now.hour() + 1, now.minute(), now.second());
    rtc.adjust(newTime);

    newTime = rtc.now();

    // Update the display immediately
    updateDisplay(newTime);

    // Debounce delay
    delay(200);
  }

  // Check if the minute button was pressed
  if (digitalRead(buttonMinutePin) == LOW) {
    // Get the current time from the RTC
    DateTime now = rtc.now();

    // Increment the minutes
    DateTime newTime = DateTime(now.year(), now.month(), now.day(), now.hour(), now.minute() + 1, now.second());
    rtc.adjust(newTime);

    newTime = rtc.now();

    // Update the display immediately
    updateDisplay(newTime);

    // Debounce delay
    delay(200);
  }

  // Check if the second button was pressed
  if (digitalRead(buttonSecondPin) == LOW) {
    // Get the current time from the RTC
    DateTime now = rtc.now();

    // Increment the seconds
    DateTime newTime = DateTime(now.year(), now.month(), now.day(), now.hour(), now.minute(), now.second() + 1);
    rtc.adjust(newTime);

    newTime = rtc.now();

    // Update the display immediately
    updateDisplay(newTime);

    // Debounce delay
    delay(200);
  }

  // Check if it's time to update the display
  if (currentMillis - previousMillis >= interval) {
    previousMillis = currentMillis;

    // Get the current time from the RTC
    DateTime now = rtc.now();

    // Update the display with the current time
    updateDisplay(now);
  }
}

// Function to update the LCD display
void updateDisplay(DateTime now) {
  // Display the current date on the LCD
  lcd.setCursor(0, 0);
  lcd.print(now.year(), DEC);
  lcd.print('/');
  lcd.print(now.month(), DEC);
  lcd.print('/');
  lcd.print(now.day(), DEC);

  // Clear the second line before printing the new time
  lcd.setCursor(0, 1);
  lcd.print("                "); // 16 spaces to clear the line

  // Display the current time on the LCD
  lcd.setCursor(0, 1);
  lcd.print(now.hour(), DEC);
  lcd.print(':');
  lcd.print(now.minute(), DEC);
  lcd.print(':');
  lcd.print(now.second(), DEC);
}
This documentation provides a comprehensive overview of the circuit, detailing each component, its wiring, and the code used to operate the system.