Cirkit Designer
Your all-in-one circuit design IDE
Home /
Project Documentation
Arduino UNO Based Temperature-Controlled Relay with I2C LCD Display
Circuit Documentation
Summary
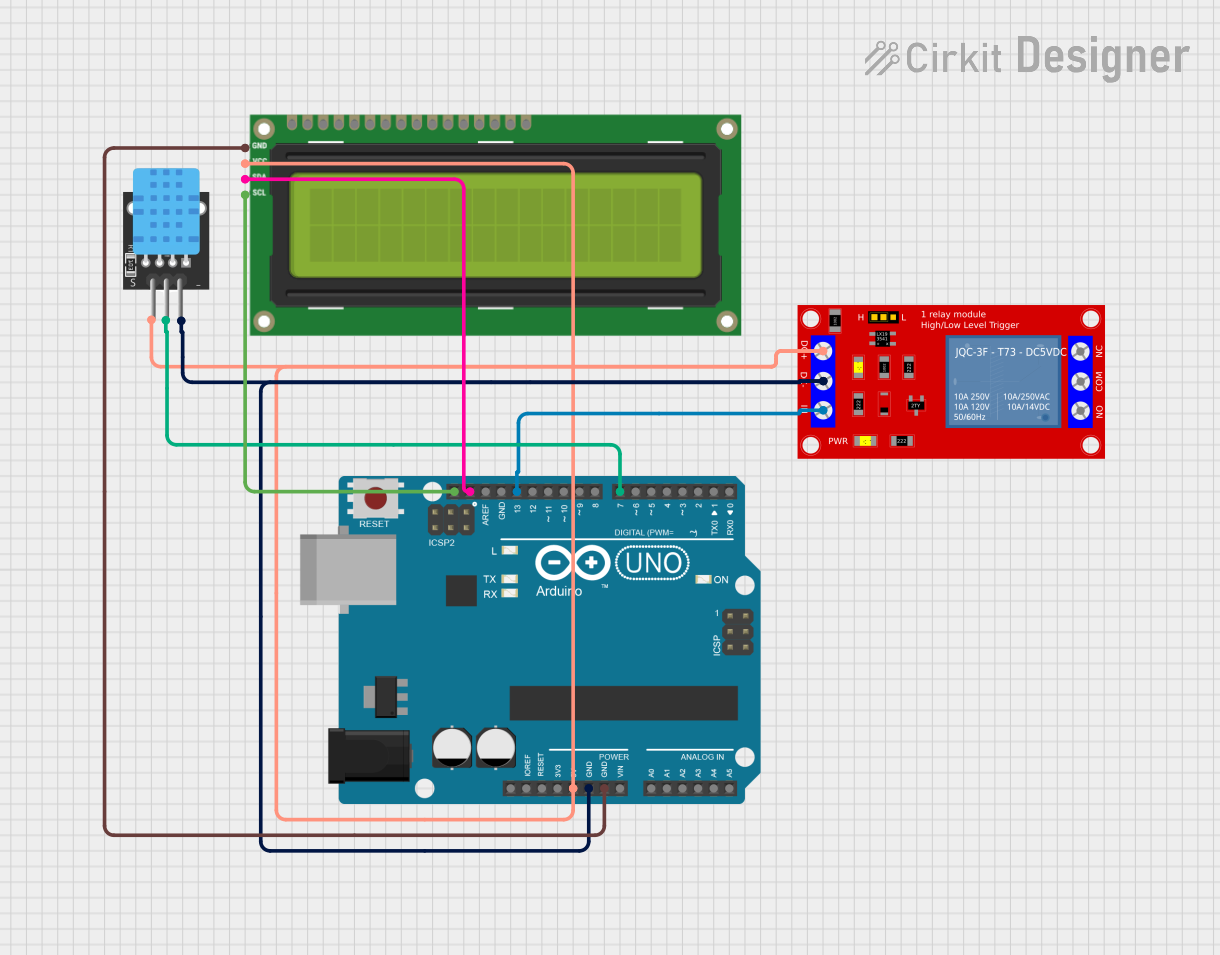
This circuit is designed to monitor temperature using a DHT11 sensor and control a relay based on the temperature readings. The temperature data is displayed on a 16x2 I2C LCD screen. The Arduino UNO serves as the central microcontroller unit to read sensor data, control the relay, and manage the display. The relay is activated when the temperature reaches or exceeds 36 degrees Celsius and is turned off when the temperature drops to 34 degrees Celsius or lower.
Component List
Arduino UNO
- Description: A microcontroller board based on the ATmega328P.
- Purpose: Acts as the central processing unit for the circuit, reading sensor data, controlling the relay, and updating the display.
1 Channel 5V Relay Module
- Description: An electromechanical switch that can be controlled by a digital signal.
- Purpose: Switches a higher power circuit on or off based on the temperature reading from the DHT11 sensor.
DHT11
- Description: A basic, ultra low-cost digital temperature and humidity sensor.
- Purpose: Measures the ambient temperature for the system to decide whether to activate the relay.
I2C LCD 16x2 Screen
- Description: A 16-character by 2-line display that communicates over the I2C protocol.
- Purpose: Displays the current temperature and the status of the relay.
Wiring Details
Arduino UNO
- 5V: Powers the DHT11 sensor, the I2C LCD screen, and the 5V Relay Module.
- GND: Common ground for the DHT11 sensor, the I2C LCD screen, and the 5V Relay Module.
- SCL: Connected to the SCL pin of the I2C LCD screen for I2C communication.
- SDA: Connected to the SDA pin of the I2C LCD screen for I2C communication.
- D13: Controls the IN pin of the 1 Channel 5V Relay Module.
- D7: Receives the signal from the DHT11 sensor.
1 Channel 5V Relay Module
- VCC+: Connected to the 5V output from the Arduino UNO.
- VCC- (GND): Connected to the ground (GND) on the Arduino UNO.
- IN: Controlled by the D13 pin on the Arduino UNO.
DHT11
- 5V: Powered by the 5V output from the Arduino UNO.
- GND: Connected to the ground (GND) on the Arduino UNO.
- S: Signal pin connected to the D7 pin on the Arduino UNO.
I2C LCD 16x2 Screen
- VCC (5V): Powered by the 5V output from the Arduino UNO.
- GND: Connected to the ground (GND) on the Arduino UNO.
- SCL: Connected to the SCL pin on the Arduino UNO for I2C communication.
- SDA: Connected to the SDA pin on the Arduino UNO for I2C communication.
Documented Code
/*
 * I2C Temperature Controller
 *
 * This Arduino Sketch reads temperature data from a DHT11 sensor and controls
 * a relay module based on the temperature. If the temperature is 36 degrees
 * Celsius or higher, the relay is turned on. If the temperature drops to 34
 * degrees Celsius or lower, the relay is turned off. The temperature and
 * relay status are displayed on a 16x2 I2C LCD screen.
 */
#include <Adafruit_Sensor.h>
#include <Wire.h>
#include <LiquidCrystal_I2C.h>
#include <DHT.h>

#define DHTPIN 7         // Define the pin connected to the DHT11 data pin
#define DHTTYPE DHT11    // Specify the type of DHT sensor
#define RELAY_PIN 13     // Define the pin controlling the relay module

DHT dht(DHTPIN, DHTTYPE);  // Initialize the DHT sensor
LiquidCrystal_I2C lcd(0x27, 16, 2);  // Initialize the LCD display with I2C address 0x27

void setup() {
  pinMode(RELAY_PIN, OUTPUT);  // Set the relay pin as an output
  lcd.init();                  // Initialize the LCD
  lcd.backlight();             // Turn on the backlight
  dht.begin();                 // Start the DHT sensor
}

void loop() {
  float temp = dht.readTemperature();  // Read the temperature from the DHT sensor
  if (isnan(temp)) {                   // Check if the reading failed
    lcd.clear();
    lcd.setCursor(0, 0);
    lcd.print("Error reading");
    lcd.setCursor(0, 1);
    lcd.print("temperature");
    return;
  }
  lcd.clear();
  lcd.setCursor(0, 0);
  lcd.print("Temp: ");
  lcd.print(temp);
  lcd.print(" C");
  if (temp >= 36) {                    // If the temperature is 36C or higher
    digitalWrite(RELAY_PIN, HIGH);     // Turn on the relay
    lcd.setCursor(0, 1);
    lcd.print("Status: ON ");
  } else if (temp <= 34) {             // If the temperature is 34C or lower
    digitalWrite(RELAY_PIN, LOW);      // Turn off the relay
    lcd.setCursor(0, 1);
    lcd.print("Status: OFF");
  }
  delay(2000);  // Wait for 2 seconds before reading again
}
This code is saved as sketch.ino and is intended to be uploaded to the Arduino UNO microcontroller.