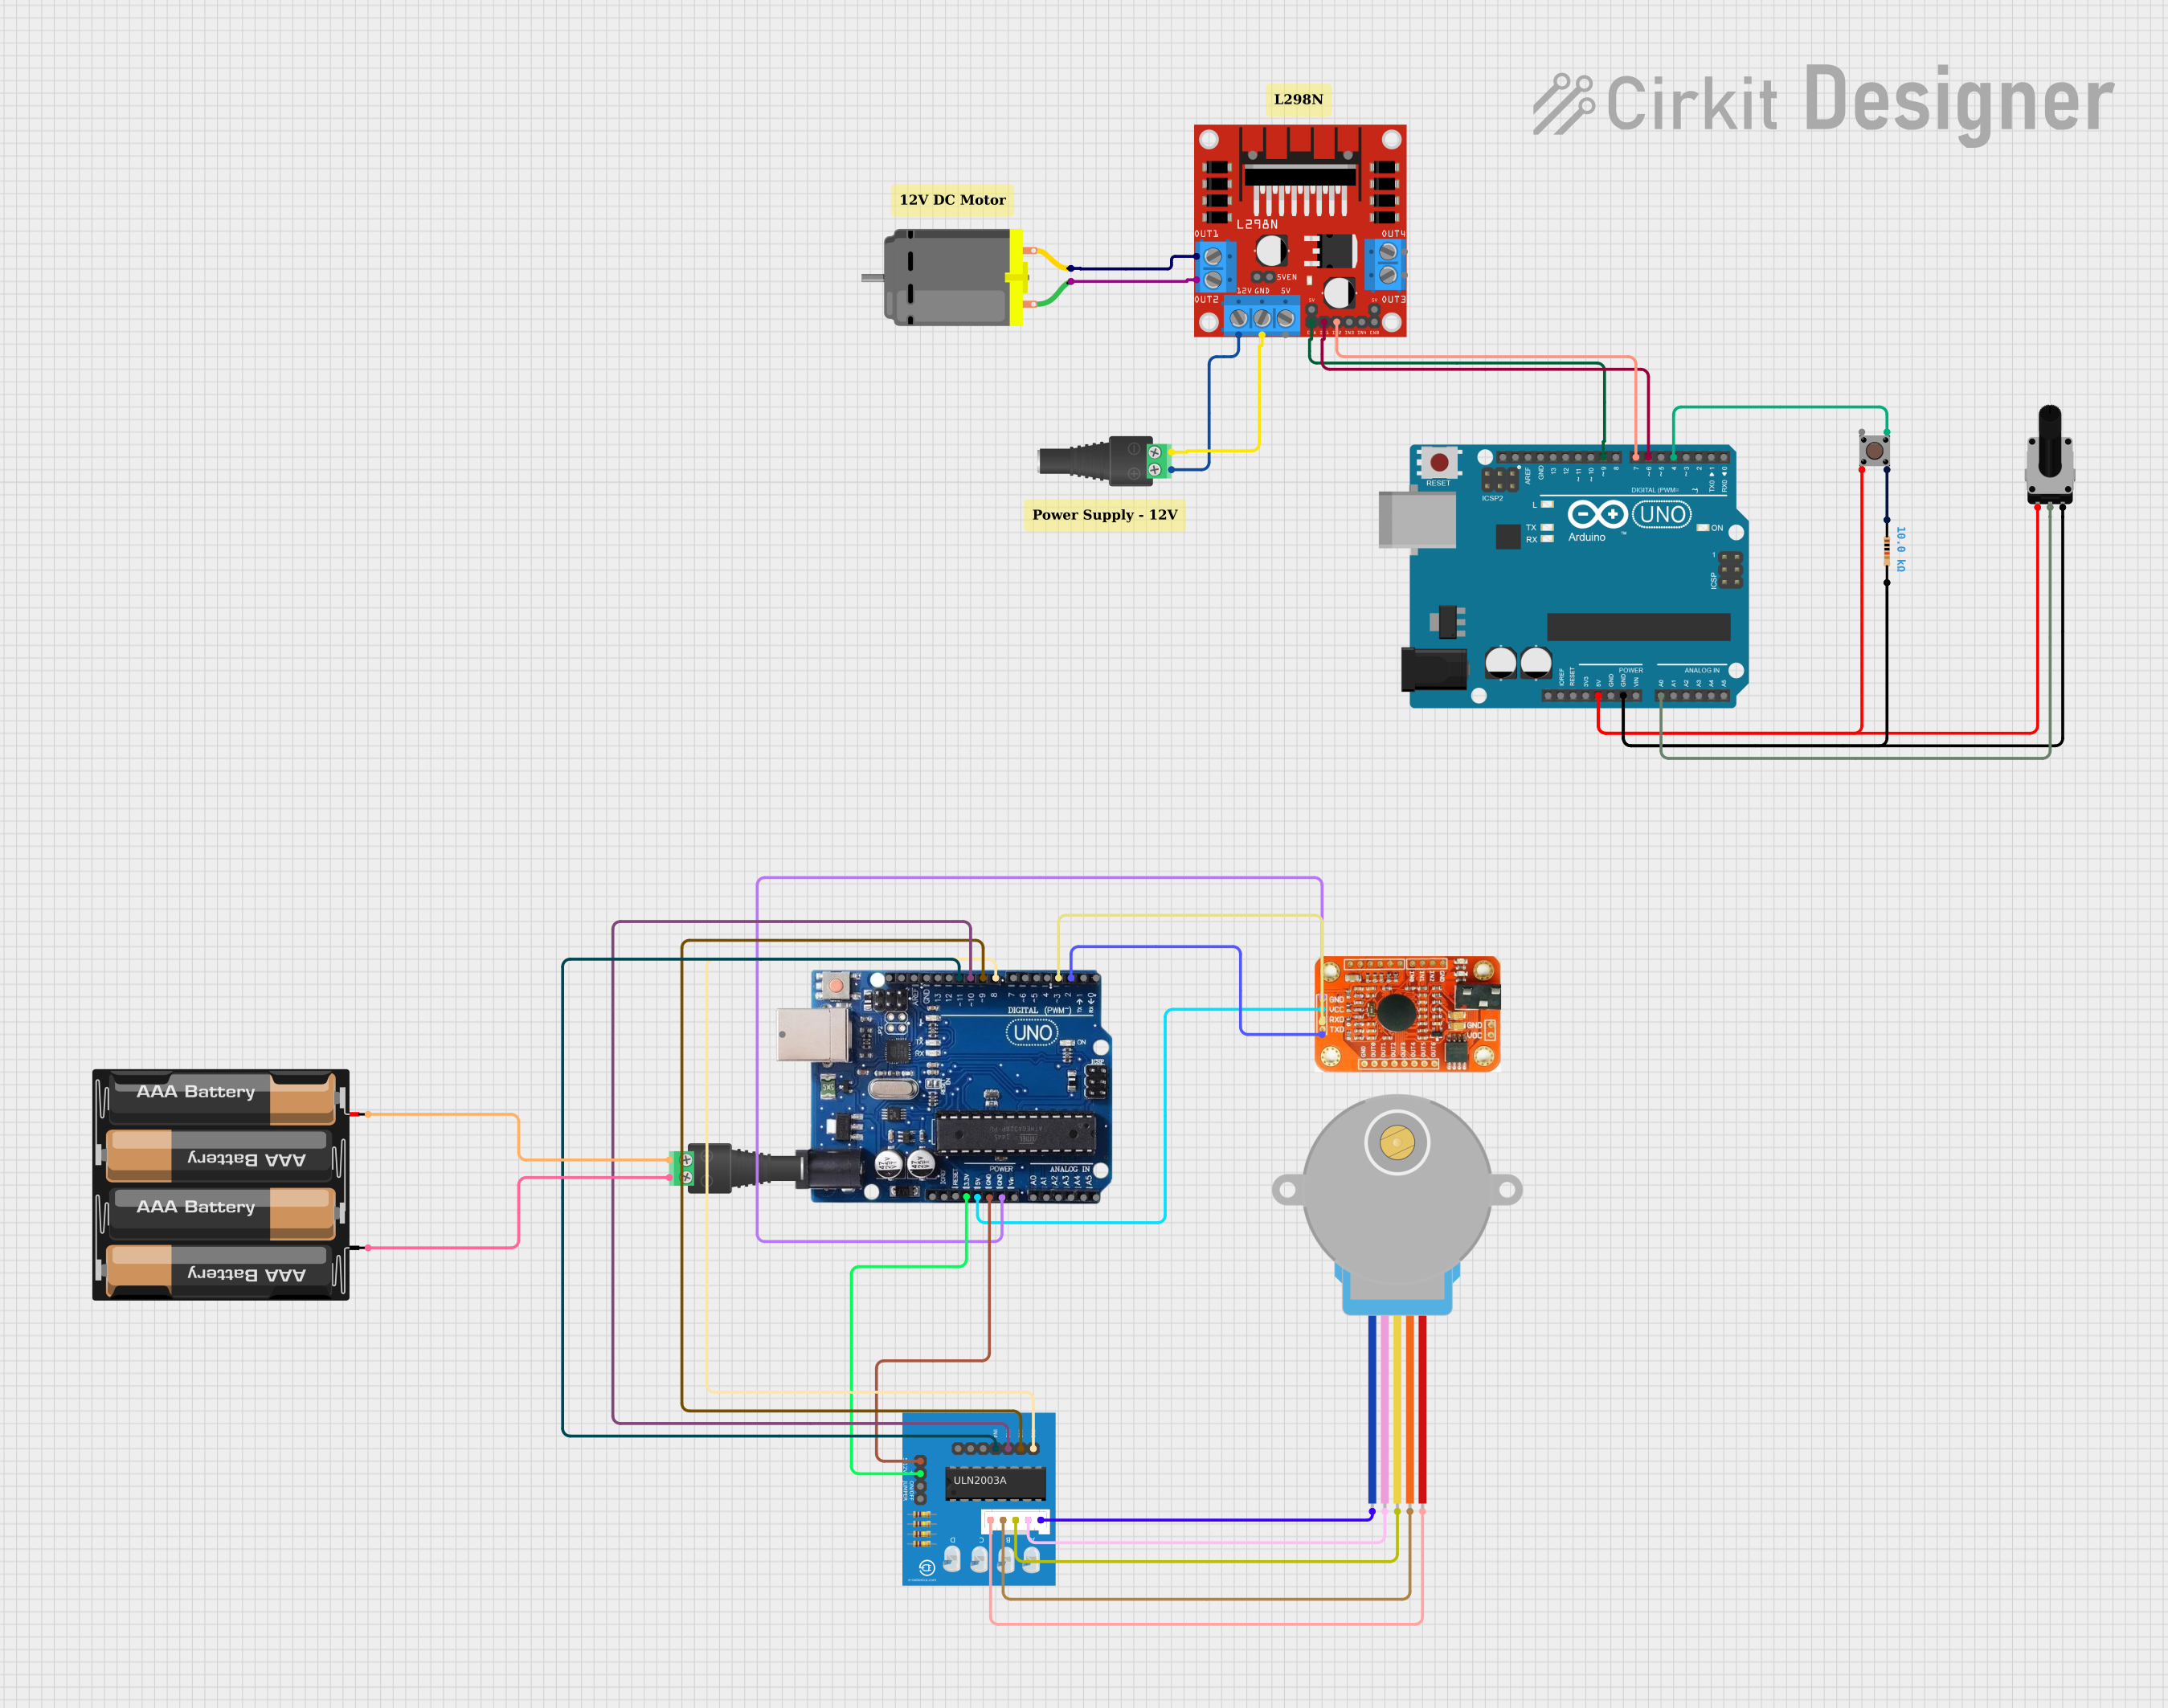
Arduino-Controlled DC Motor with Voice-Activated Stepper Motor and Pushbutton Speed Adjustment

Circuit Documentation
Summary
This circuit is designed to control a DC motor using an L298N motor driver, interfaced with an Arduino UNO microcontroller. The control inputs are provided by a pushbutton and a rotary potentiometer. The pushbutton toggles the motor on and off, while the potentiometer adjusts the motor's speed. Additionally, the circuit includes a voice recognition module and a 28BYJ-48 stepper motor controlled by a ULN2003A breakout board, both interfaced with an Arduino Uno R3. Power is supplied through a 2.1mm barrel jack connected to a 12V source and a 4 x AAA battery mount.
Component List
DC Motor
- A standard DC motor that converts electrical energy into mechanical rotation.
L298N DC Motor Driver
- A dual H-bridge motor driver that can drive two DC motors or one stepper motor.
2.1mm Barrel Jack with Terminal Block
- A connector for providing power to the circuit from an external source.
Pushbutton
- A momentary switch used to toggle the motor's power state.
Resistor
- A 10k Ohm resistor, likely used for pull-up or pull-down on the pushbutton.
Rotary Potentiometer
- A 10k Ohm potentiometer used to provide variable voltage for speed control.
Arduino UNO
- A microcontroller board based on the ATmega328P, used for controlling the motor driver and reading inputs.
Voice Recognition Module
- A module that can recognize voice commands and interface with a microcontroller.
ULN2003A Breakout Board
- A board with a ULN2003A Darlington transistor array, used to drive the stepper motor.
28BYJ-48 Stepper Motor
- A small, 5-wire, unipolar stepper motor.
4 x AAA Battery Mount
- A battery holder for four AAA batteries, providing power to the circuit.
Wiring Details
DC Motor
pin 1connected to L298NOUT2pin 2connected to L298NOUT1
L298N DC Motor Driver
OUT1,OUT2connected to DC Motor12Vconnected to 2.1mm Barrel JackPOSGNDconnected to 2.1mm Barrel JackNEGENAconnected to Arduino UNOD9IN1connected to Arduino UNOD6IN2connected to Arduino UNOD7
2.1mm Barrel Jack with Terminal Block
POSconnected to L298N12VNEGconnected to L298NGND
Pushbutton
Pin 3 (out)connected to Arduino UNOD4Pin 4 (out)connected to Resistorpin1Pin 2 (in)connected to Arduino UNO5V
Resistor
pin1connected to PushbuttonPin 4 (out)pin2connected to Arduino UNOGND
Rotary Potentiometer
leg1connected to Arduino UNO5Vwiperconnected to Arduino UNOA0leg2connected to Arduino UNOGND
Arduino UNO
D9connected to L298NENAD6connected to L298NIN1D7connected to L298NIN2D4connected to PushbuttonPin 3 (out)5Vconnected to PushbuttonPin 2 (in)GNDconnected to Resistorpin2A0connected to Rotary Potentiometerwiper
Voice Recognition Module
VCCconnected to Arduino Uno R35VGNDconnected to Arduino Uno R3GNDRDXconnected to Arduino Uno R33RTXconnected to Arduino Uno R32
ULN2003A Breakout Board
+5Vconnected to Arduino Uno R33.3V0Vconnected to Arduino Uno R3GNDIn 1toIn 4connected to Arduino Uno R3 pins8to11BLUE wiretoRED wireconnected to corresponding wires of 28BYJ-48 Stepper Motor
28BYJ-48 Stepper Motor
BLUEtoREDwires connected to corresponding wires on ULN2003A Breakout Board
4 x AAA Battery Mount
+connected to 2.1mm Barrel JackPOS-connected to 2.1mm Barrel JackNEG
Documented Code
/*
  Motor Control Sketch
  This Arduino sketch is designed to control a DC motor using an L298N motor driver.
  It reads input from a pushbutton and a potentiometer to toggle the motor on/off and control its speed.

  The pushbutton is used to start and stop the motor. When the button is pressed, the motor's
  state is toggled between on and off. A simple debounce mechanism is implemented to prevent
  misreading the pushbutton input.

  The potentiometer is used to adjust the motor speed. The analog reading from the potentiometer
  is mapped to a PWM value that controls the speed of the motor when it is on.

  Connections:
  - L298N ENA connected to Arduino Digital Pin 9 (motorEnablePin)
  - L298N IN1 connected to Arduino Digital Pin 6 (motorInput1)
  - L298N IN2 connected to Arduino Digital Pin 7 (motorInput2)
  - Pushbutton output connected to Arduino Digital Pin 4 (pushButtonPin)
  - Potentiometer wiper connected to Arduino Analog Pin A0 (potPin)

  The code assumes the pushbutton provides a HIGH signal when pressed.
*/

// Define the motor control pins
const int motorEnablePin = 9; // ENA on L298N connected to D9 on Arduino
const int motorInput1 = 6;    // IN1 on L298N connected to D6 on Arduino
const int motorInput2 = 7;    // IN2 on L298N connected to D7 on Arduino

// Define the pushbutton pin
const int pushButtonPin = 4;  // Pushbutton output connected to D4 on Arduino

// Define the potentiometer pin
const int potPin = A0;        // Potentiometer wiper connected to A0 on Arduino

// Variables to keep track of motor state and speed
bool motorEnabled = false;
int motorSpeed = 0;

void setup() {
  // Set the motor control pins as outputs
  pinMode(motorEnablePin, OUTPUT);
  pinMode(motorInput1, OUTPUT);
  pinMode(motorInput2, OUTPUT);

  // Set the pushbutton pin as an input
  pinMode(pushButtonPin, INPUT);

  // Initialize the motor control pins
  digitalWrite(motorEnablePin, LOW);
  digitalWrite(motorInput1, LOW);
  digitalWrite(motorInput2, LOW);
}

void loop() {
  // Read the pushbutton state
  bool buttonState = digitalRead(pushButtonPin);

  // If the button is pressed, toggle the motor state
  if (buttonState == HIGH) {
    motorEnabled = !motorEnabled;
    delay(200); // Debounce delay to prevent misreading the pushbutton input
  }

  // Read the potentiometer value
  int potValue = analogRead(potPin);
  // Map the potentiometer value to a motor speed (0-255)
  motorSpeed = map(potValue, 0, 1023, 0, 255);

  // Control the motor based on the motorEnabled state and motorSpeed
  if (motorEnabled) {
    // Set the motor to spin in one direction
    digitalWrite(motorInput1, HIGH);
    digitalWrite(motorInput2, LOW);
    // Set the motor speed using PWM
    analogWrite(motorEnablePin, motorSpeed);
  } else {
    // Turn off the motor
    digitalWrite(motorInput1, LOW);
    digitalWrite(motorInput2, LOW);
    analogWrite(motorEnablePin, 0);
  }
}
This code is associated with the Arduino UNO microcontroller and is responsible for controlling the DC motor through the L298N driver. It includes functionality for reading the state of a pushbutton and a potentiometer to toggle the motor's power and adjust its speed, respectively.