Cirkit Designer
Your all-in-one circuit design IDE
Home /
Project Documentation
Arduino-Controlled Fingerprint-Authenticated Solenoid Lock System
Circuit Documentation
Summary
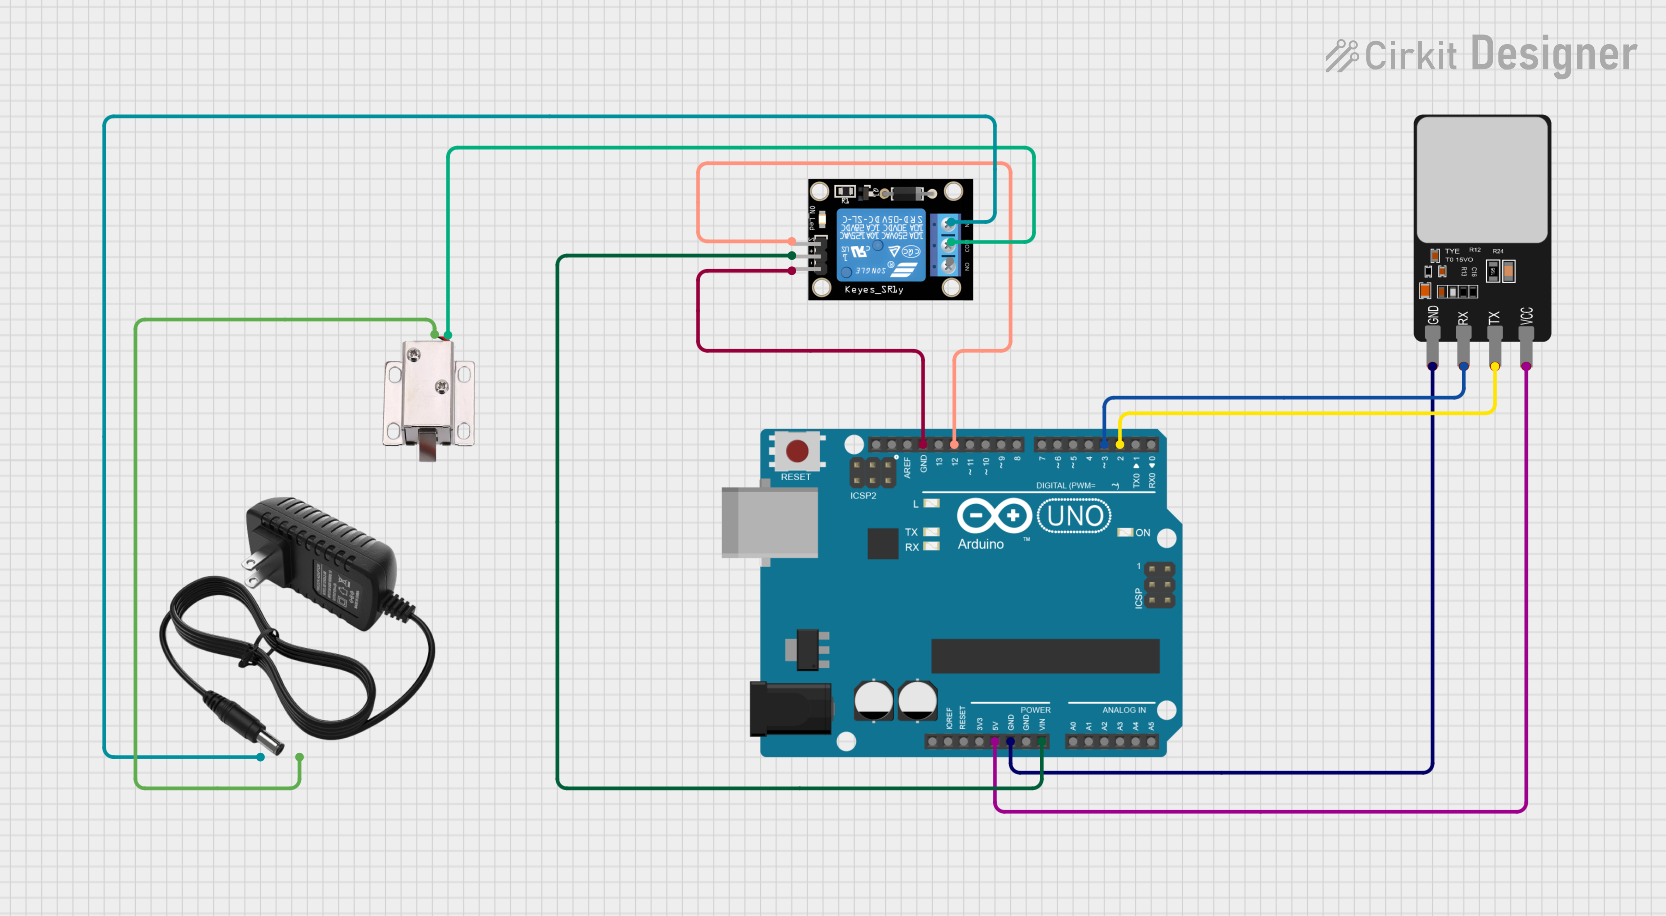
The circuit in question is designed to interface a fingerprint scanner with an Arduino UNO, which controls a 12V solenoid lock through a relay module. The Arduino UNO is powered by a 5V connection and controls the relay module via one of its digital pins. The relay module, in turn, switches the 12V power supply to the solenoid lock, which acts as the actuator in this system. The fingerprint scanner is used as an input device to trigger the lock mechanism.
Component List
Fingerprint Scanner
- Pins: VCC, TX, RX, GND
- Description: A biometric sensor that captures fingerprints for identification purposes.
Arduino UNO
- Pins: UNUSED, IOREF, Reset, 3.3V, 5V, GND, Vin, A0-A5, SCL, SDA, AREF, D0-D13
- Description: A microcontroller board based on the ATmega328P, widely used for prototyping and educational purposes.
12V Solenoid Lock
- Pins: VCC, GND
- Description: An electromagnetic lock that is actuated by applying a 12V power supply.
Relay Module 1 Channel
- Pins: S, 5V, GND, NC, COM, NO
- Description: An electronic switch that allows a low-power signal from the Arduino to control the high-power circuit for the solenoid lock.
12V Power Supply
- Pins: +, -
- Description: Provides the necessary 12V power to the solenoid lock through the relay module.
Wiring Details
Fingerprint Scanner
- VCC: Connected to Arduino UNO 5V
- TX: Connected to Arduino UNO D2
- RX: Connected to Arduino UNO D3
- GND: Connected to Arduino UNO GND
Arduino UNO
- 5V: Provides power to the Fingerprint Scanner
- D2: Receives TX from the Fingerprint Scanner
- D3: Sends RX to the Fingerprint Scanner
- GND: Common ground with Fingerprint Scanner
- Vin: Provides 5V to Relay Module
- D12: Controls the Relay Module signal pin
12V Solenoid Lock
- VCC: Connected to Relay Module COM
- GND: Connected to 12V Power Supply -
Relay Module 1 Channel
- S: Controlled by Arduino UNO D12
- 5V: Powered by Arduino UNO Vin
- GND: Common ground with Arduino UNO
- NC: Not connected in this circuit
- COM: Connected to 12V Solenoid Lock VCC
- NO: Not connected in this circuit
12V Power Supply
- +: Connected to Relay Module NC
- -: Provides ground to 12V Solenoid Lock
Documented Code
Arduino UNO Code (sketch.ino)
void setup() {
  // put your setup code here, to run once:

}

void loop() {
  // put your main code here, to run repeatedly:

}
Note: The provided code is a template and does not contain any functional code to operate the circuit. The user is expected to write the necessary code to read the fingerprint scanner and control the relay module to lock or unlock the solenoid lock.