
Circuit Documentation
Summary of the Circuit
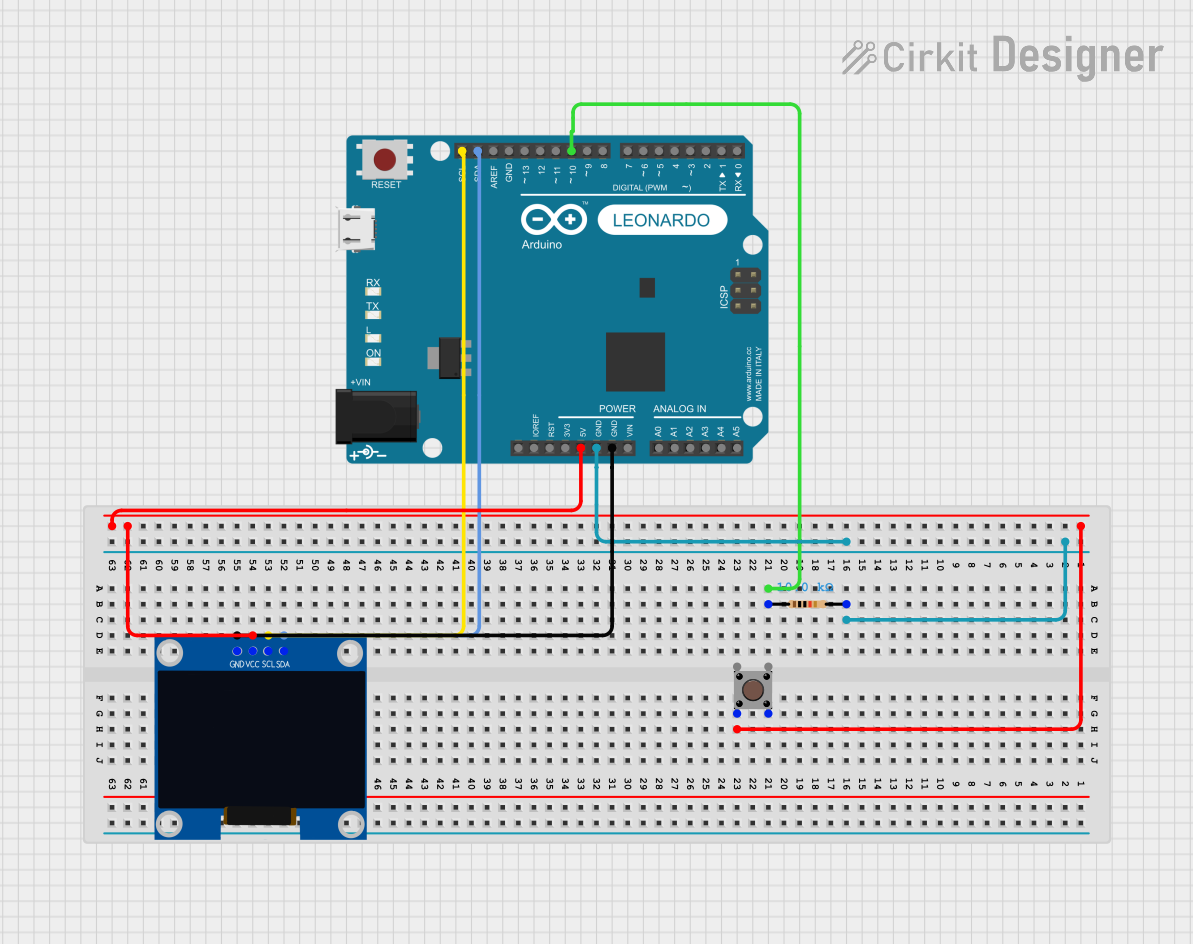
This circuit consists of an Arduino Leonardo microcontroller, a pushbutton, a resistor, and a 128x64 OLED display. The Arduino Leonardo is the central processing unit of the circuit, interfacing with the OLED display via I2C communication and monitoring the state of the pushbutton through one of its digital pins. The resistor is used to provide a pull-down for the pushbutton, ensuring a stable LOW signal when the button is not pressed. The OLED display is used to show various information and changes its content based on the pushbutton's state.
Component List
Pushbutton
- Description: A simple pushbutton switch that can be used to trigger events in the circuit.
- Pins: Pin 3 (out), Pin 4 (out), Pin 1 (in), Pin 2 (in)
Resistor
- Description: A passive two-terminal electrical component that implements electrical resistance as a circuit element.
- Value: 10,000 Ohms
- Pins: pin1, pin2
Arduino Leonardo (Rev3b)
- Description: A microcontroller board based on the ATmega32u4, with digital and analog I/O pins.
- Pins: D0/RX, D1/TX, D2/SDA, D3 PWM/SCL, D4/A6, D5 PWM, D6 PWM/A7, D7, n.c., IOREF, RESET, 3V3, 5V, GND, VIN, A0, A1, A2, A3, A4, A5, D8/A8, D9 PWM/A9, D10 PWM/A10, D11 PWM, D12/A11, D13 PWM, AREF, SDA, SCL
128x64 OLED Display (I2C IIC SPI Serial)
- Description: A small display that uses OLED technology, capable of showing graphics and text.
- Pins: GND, SDA, SCL, VCC
Wiring Details
Pushbutton
- Pin 2 (in) is connected to the VCC of the OLED Display and 5V of the Arduino Leonardo.
Resistor
- pin1 is connected to D10 PWM/A10 of the Arduino Leonardo.
- pin2 is connected to GND of the Arduino Leonardo.
Arduino Leonardo (Rev3b)
- GND is connected to pin2 of the Resistor and GND of the OLED Display.
- 5V is connected to Pin 2 (in) of the Pushbutton.
- D10 PWM/A10 is connected to pin1 of the Resistor.
- SDA is connected to SDA of the OLED Display.
- SCL is connected to SCL of the OLED Display.
128x64 OLED Display (I2C IIC SPI Serial)
- GND is connected to GND of the Arduino Leonardo.
- SDA is connected to SDA of the Arduino Leonardo.
- SCL is connected to SCL of the Arduino Leonardo.
- VCC is connected to Pin 2 (in) of the Pushbutton and 5V of the Arduino Leonardo.
Documented Code
#include <Arduino.h>
#include <U8g2lib.h>

#ifdef U8X8_HAVE_HW_SPI
#include <SPI.h>
#endif
#ifdef U8X8_HAVE_HW_I2C
#include <Wire.h>
#endif

U8G2_SH1106_128X64_NONAME_F_SW_I2C u8g2(U8G2_R0, /* clock=*/SCL, /* data=*/SDA, /* reset=*/U8X8_PIN_NONE);

int button = 10; // Button connected to D10
int menu = 1; // Variable to track the menu state

void setup() {
  u8g2.begin(); // Initialize the OLED display
  pinMode(button, INPUT); // Set the button pin as input
  Serial.begin(9600); // Start serial communication
  drawOverview(u8g2); // Draw the initial screen
}

void loop() {
  int pinState = digitalRead(button); // Read the state of the button

  if (pinState == 1) { // If the button is pressed
    menu++; // Increment the menu state
    if (menu > 2) { // If the menu state exceeds the number of menus, reset to 1
      menu = 1;
    }

    // Update the display based on the current menu state
    if (menu == 1) {
      drawOverview(u8g2);
    }
    if (menu == 2) {
      drawPlayerStats(u8g2);
    }
    delay(500); // Debounce delay
  }
}

// Function to draw the overview screen on the OLED display
void drawOverview(U8G2 & u8g2) {
  u8g2.clearBuffer(); // Clear the display buffer
  u8g2.setFont(u8g2_font_ncenB08_tr); // Set font
  u8g2.drawStr(10, 20, "current speed:"); // Draw text
  u8g2.drawStr(10, 35, "12 km/h"); // Draw text

  u8g2.setFont(u8g2_font_baby_tr); // Set font
  u8g2.drawStr(10, 55, "EXP:"); // Draw text
  u8g2.drawFrame(10, 60, 100, 4); // Draw a frame (for a progress bar)
  u8g2.drawBox(10, 60, 30, 4); // Draw a filled box (to represent progress)

  u8g2.sendBuffer(); // Send the buffer to the display
}

// Function to draw the player stats screen on the OLED display
void drawPlayerStats(U8G2 & u8g2) {
  u8g2.clearBuffer(); // Clear the display buffer
  u8g2.setFont(u8g2_font_baby_tr); // Set font
  u8g2.drawStr(10, 20, "Logged in as:"); // Draw text
  u8g2.drawStr(70, 20, "DasSaffe"); // Draw text
  u8g2.drawStr(10, 30, "Profile:"); // Draw text
  u8g2.drawStr(70, 30, "Cycling"); // Draw text
  u8g2.drawStr(10, 40, "Connection:"); // Draw text
  u8g2.drawStr(70, 40, "connected"); // Draw text
  u8g2.sendBuffer(); // Send the buffer to the display
}
This code is designed to run on the Arduino Leonardo microcontroller. It initializes an OLED display and reads the state of a pushbutton to toggle between different display screens. The display shows a speedometer and experience bar on one screen and user stats on another. The button's state is read, debounced, and used to switch between these screens.