
Arduino UNO-Based Multi-Button Input System with LED Indicator
View and Edit Project In Cirkit Designer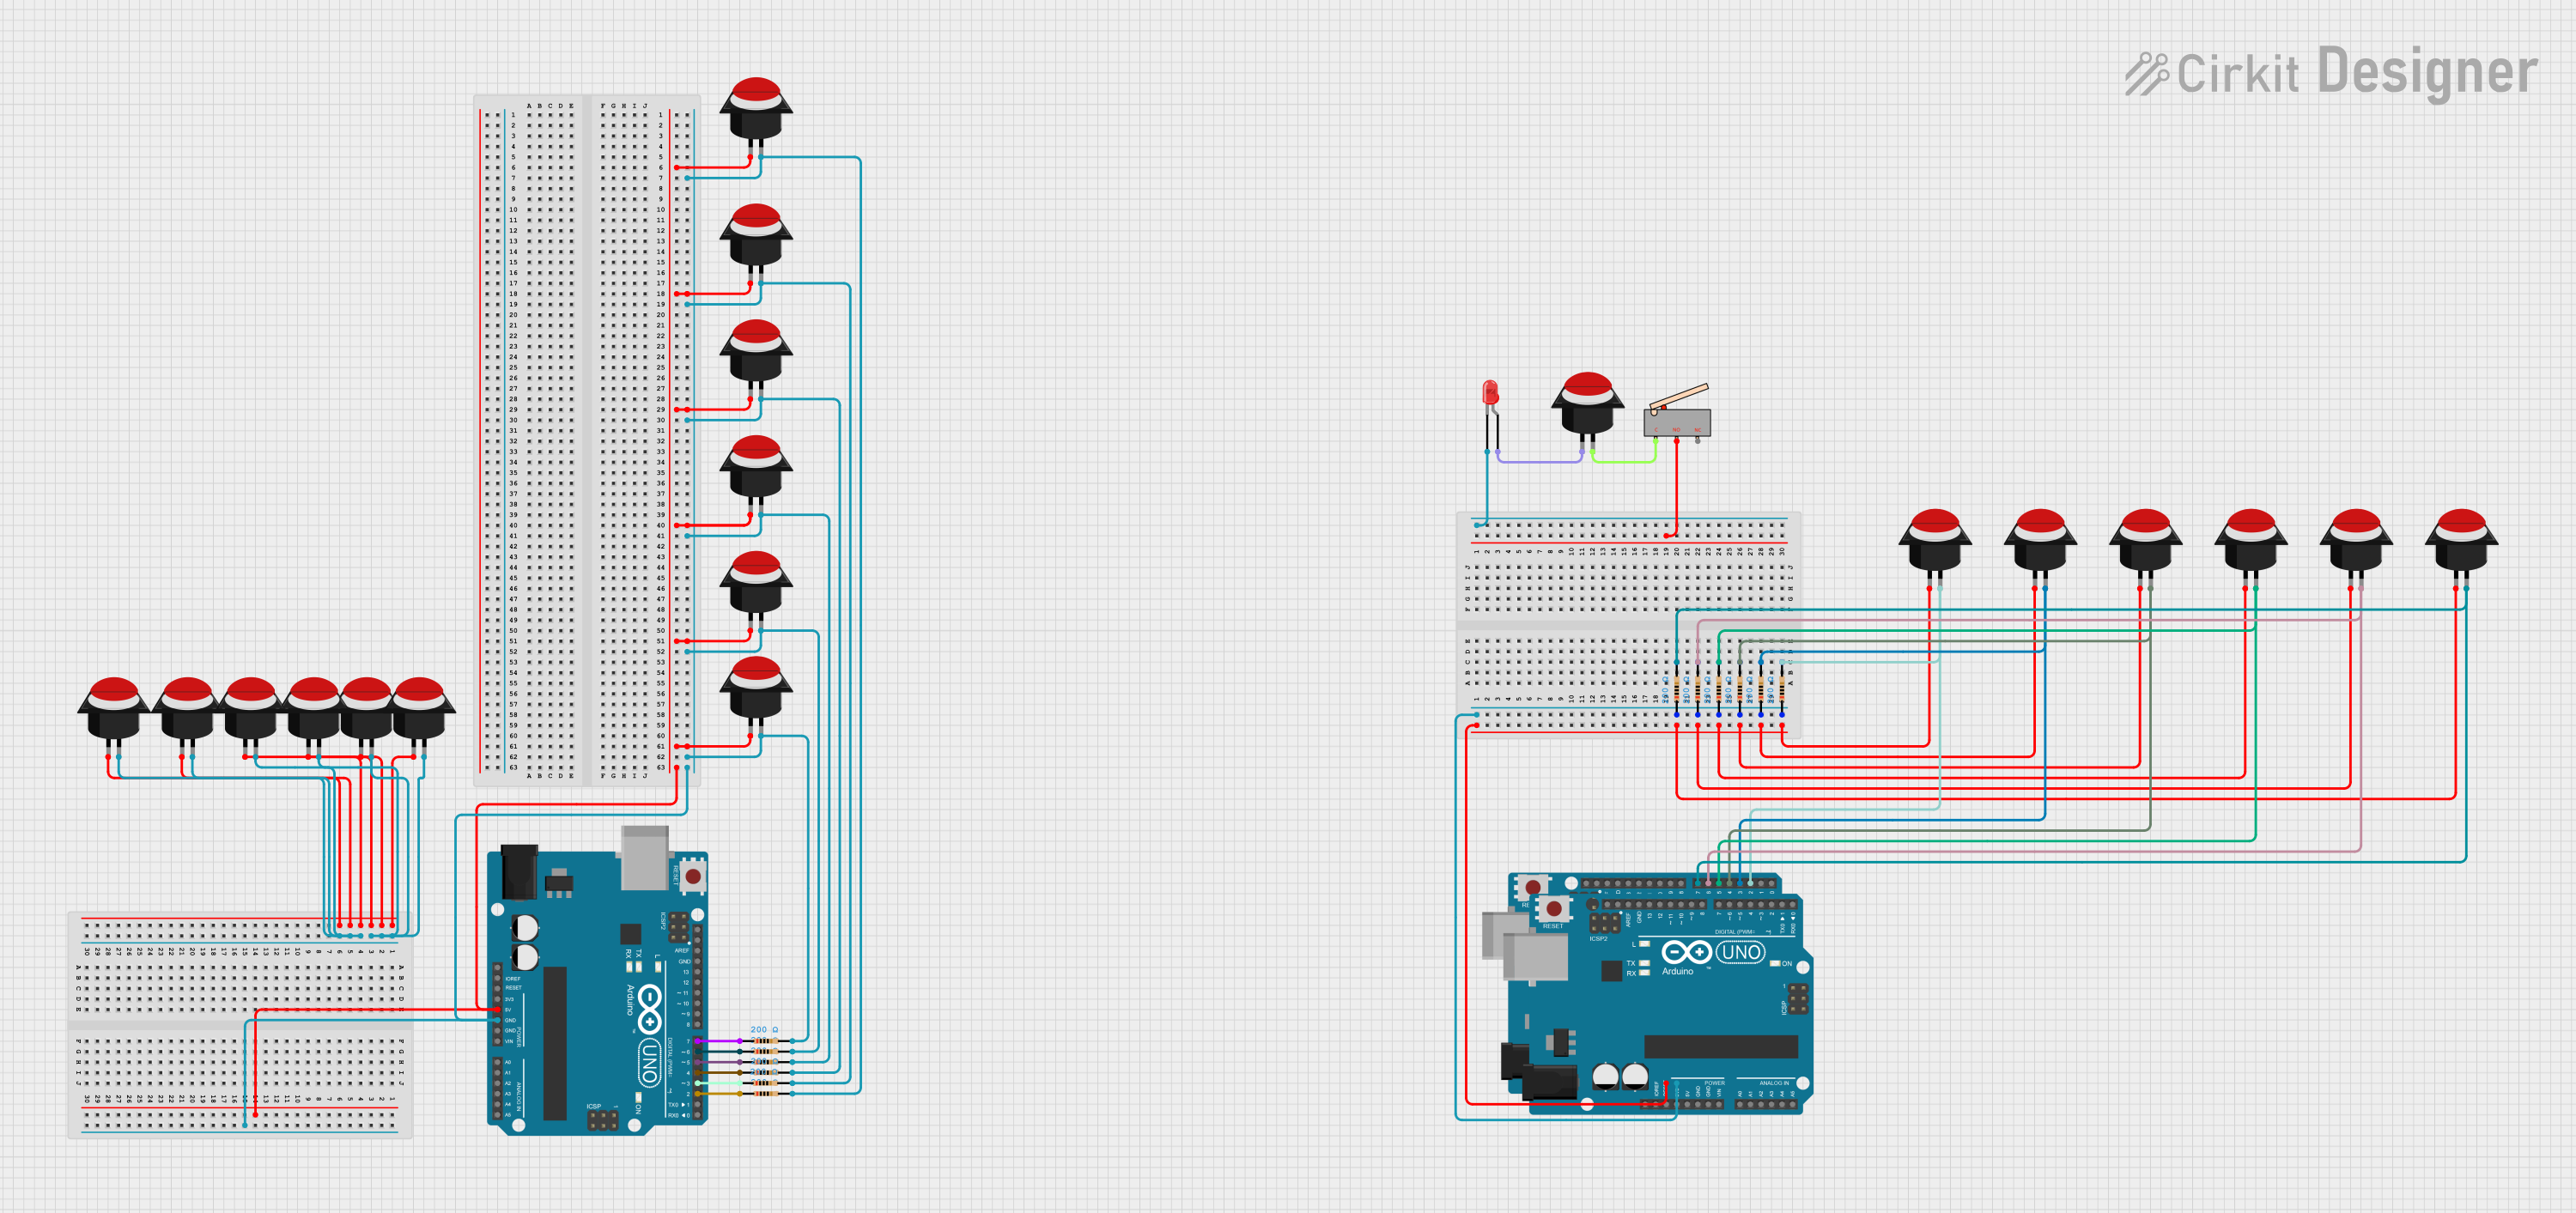
Circuit Documentation
Summary
This circuit involves multiple push buttons, resistors, and three Arduino UNO microcontrollers. The push buttons are connected to the digital pins of the Arduino boards through resistors. Additionally, there is a limit switch and an LED in the circuit. The circuit is designed to demonstrate basic input and output operations using push buttons and an LED.
Component List
Push Button Round
- Description: A simple push button switch.
- Pins: leg0, leg1
Arduino UNO
- Description: A microcontroller board based on the ATmega328P.
- Pins: UNUSED, IOREF, Reset, 3.3V, 5V, GND, Vin, A0, A1, A2, A3, A4, A5, SCL, SDA, AREF, D13, D12, D11, D10, D9, D8, D7, D6, D5, D4, D3, D2, D1, D0
Resistor
- Description: A resistor with a resistance of 200 Ohms.
- Pins: pin1, pin2
- Properties: Resistance = 200 Ohms
Limit switch
- Description: A switch that can be used to detect the presence or absence of an object.
- Pins: C, NO, NC
LED: Two Pin (red)
- Description: A red LED.
- Pins: cathode, anode
Wiring Details
Push Button Round
Push Button 1
- leg0: Connected to 5V of Arduino UNO
- leg1: Connected to pin2 of a 200 Ohm resistor, which is connected to D7 of Arduino UNO
Push Button 2
- leg0: Connected to 5V of Arduino UNO
- leg1: Connected to pin2 of a 200 Ohm resistor, which is connected to D6 of Arduino UNO
Push Button 3
- leg0: Connected to 5V of Arduino UNO
- leg1: Connected to pin2 of a 200 Ohm resistor, which is connected to D5 of Arduino UNO
Push Button 4
- leg0: Connected to 5V of Arduino UNO
- leg1: Connected to pin2 of a 200 Ohm resistor, which is connected to D4 of Arduino UNO
Push Button 5
- leg0: Connected to 5V of Arduino UNO
- leg1: Connected to pin2 of a 200 Ohm resistor, which is connected to D3 of Arduino UNO
Push Button 6
- leg0: Connected to 5V of Arduino UNO
- leg1: Connected to pin2 of a 200 Ohm resistor, which is connected to D2 of Arduino UNO
Push Button 7
- leg0: Connected to 5V of Arduino UNO
- leg1: Connected to pin2 of a 200 Ohm resistor, which is connected to D7 of another Arduino UNO
Push Button 8
- leg0: Connected to 5V of Arduino UNO
- leg1: Connected to pin2 of a 200 Ohm resistor, which is connected to D6 of another Arduino UNO
Push Button 9
- leg0: Connected to 5V of Arduino UNO
- leg1: Connected to pin2 of a 200 Ohm resistor, which is connected to D5 of another Arduino UNO
Push Button 10
- leg0: Connected to 5V of Arduino UNO
- leg1: Connected to pin2 of a 200 Ohm resistor, which is connected to D4 of another Arduino UNO
Push Button 11
- leg0: Connected to 5V of Arduino UNO
- leg1: Connected to pin2 of a 200 Ohm resistor, which is connected to D3 of another Arduino UNO
Push Button 12
- leg0: Connected to 5V of Arduino UNO
- leg1: Connected to pin2 of a 200 Ohm resistor, which is connected to D2 of another Arduino UNO
Push Button 13
- leg0: Connected to 5V of Arduino UNO
- leg1: Connected to pin2 of a 200 Ohm resistor, which is connected to D7 of the third Arduino UNO
Push Button 14
- leg0: Connected to 5V of Arduino UNO
- leg1: Connected to pin2 of a 200 Ohm resistor, which is connected to D6 of the third Arduino UNO
Push Button 15
- leg0: Connected to 5V of Arduino UNO
- leg1: Connected to pin2 of a 200 Ohm resistor, which is connected to D5 of the third Arduino UNO
Push Button 16
- leg0: Connected to 5V of Arduino UNO
- leg1: Connected to pin2 of a 200 Ohm resistor, which is connected to D4 of the third Arduino UNO
Push Button 17
- leg0: Connected to 5V of Arduino UNO
- leg1: Connected to pin2 of a 200 Ohm resistor, which is connected to D3 of the third Arduino UNO
Push Button 18
- leg0: Connected to 5V of Arduino UNO
- leg1: Connected to pin2 of a 200 Ohm resistor, which is connected to D2 of the third Arduino UNO
Arduino UNO
Arduino UNO 1
- D7: Connected to pin2 of a 200 Ohm resistor, which is connected to leg1 of Push Button 1
- D6: Connected to pin2 of a 200 Ohm resistor, which is connected to leg1 of Push Button 2
- D5: Connected to pin2 of a 200 Ohm resistor, which is connected to leg1 of Push Button 3
- D4: Connected to pin2 of a 200 Ohm resistor, which is connected to leg1 of Push Button 4
- D3: Connected to pin2 of a 200 Ohm resistor, which is connected to leg1 of Push Button 5
- D2: Connected to pin2 of a 200 Ohm resistor, which is connected to leg1 of Push Button 6
- 5V: Connected to leg0 of Push Buttons 1, 2, 3, 4, 5, 6
- GND: Connected to pin1 of all resistors connected to Push Buttons 1, 2, 3, 4, 5, 6
Arduino UNO 2
- D7: Connected to pin2 of a 200 Ohm resistor, which is connected to leg1 of Push Button 7
- D6: Connected to pin2 of a 200 Ohm resistor, which is connected to leg1 of Push Button 8
- D5: Connected to pin2 of a 200 Ohm resistor, which is connected to leg1 of Push Button 9
- D4: Connected to pin2 of a 200 Ohm resistor, which is connected to leg1 of Push Button 10
- D3: Connected to pin2 of a 200 Ohm resistor, which is connected to leg1 of Push Button 11
- D2: Connected to pin2 of a 200 Ohm resistor, which is connected to leg1 of Push Button 12
- 5V: Connected to leg0 of Push Buttons 7, 8, 9, 10, 11, 12
- GND: Connected to pin1 of all resistors connected to Push Buttons 7, 8, 9, 10, 11, 12
Arduino UNO 3
- D7: Connected to pin2 of a 200 Ohm resistor, which is connected to leg1 of Push Button 13
- D6: Connected to pin2 of a 200 Ohm resistor, which is connected to leg1 of Push Button 14
- D5: Connected to pin2 of a 200 Ohm resistor, which is connected to leg1 of Push Button 15
- D4: Connected to pin2 of a 200 Ohm resistor, which is connected to leg1 of Push Button 16
- D3: Connected to pin2 of a 200 Ohm resistor, which is connected to leg1 of Push Button 17
- D2: Connected to pin2 of a 200 Ohm resistor, which is connected to leg1 of Push Button 18
- 5V: Connected to leg0 of Push Buttons 13, 14, 15, 16, 17, 18
- GND: Connected to pin1 of all resistors connected to Push Buttons 13, 14, 15, 16, 17, 18
Resistor
- Resistor 1
- pin1: Connected to GND of Arduino UNO
- pin2: Connected to leg1 of Push Button