
Arduino-Controlled Smart Irrigation System with Distance Sensing and LCD Feedback
View and Edit Project In Cirkit Designer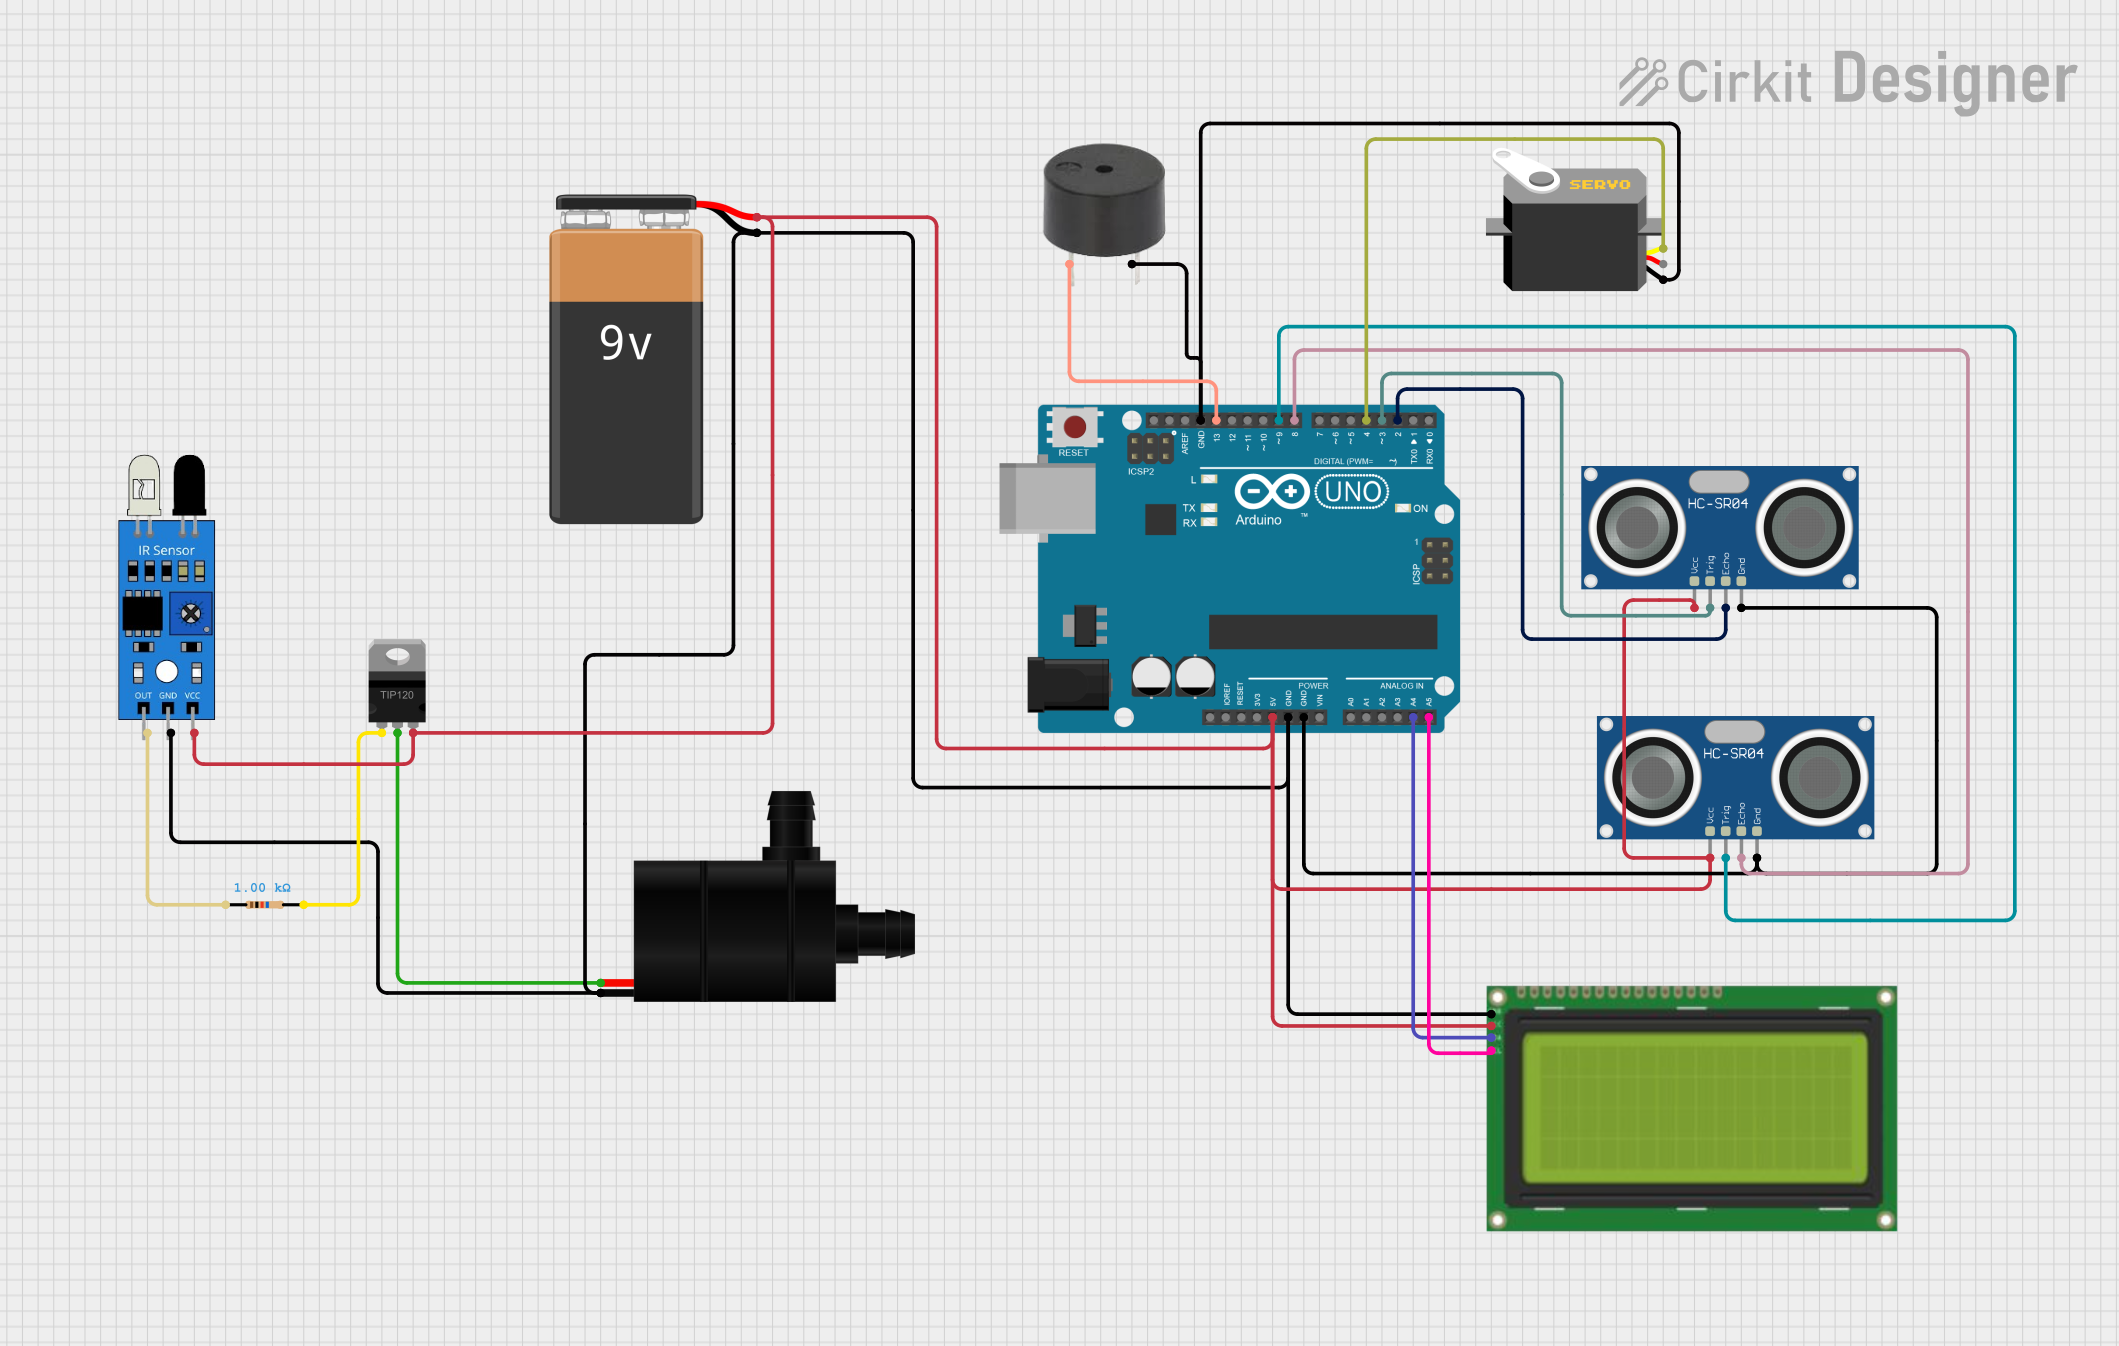
Circuit Documentation
Summary
This circuit is designed to interface various sensors and actuators with an Arduino UNO microcontroller. It includes input devices like IR and ultrasonic sensors, output devices such as a water pump, servo, buzzer, and an LCD display for user interface. The circuit is powered by a 9V battery and uses a TIP120 transistor to control the high-current device (water pump). The Arduino UNO serves as the central processing unit, running the embedded code to interact with the connected components.
Component List
Resistor
- Description: A standard resistor with a resistance value of 1000 Ohms.
- Purpose: Typically used for current limiting or voltage division.
TIP120 Hi-Current Darlington Transistor
- Description: A Darlington pair transistor capable of handling high current loads.
- Purpose: Used to switch high current loads like the water pump.
IR Sensor
- Description: An infrared sensor for detecting proximity or measuring distance.
- Purpose: Can be used for object detection or simple distance measurement.
Water Pump
- Description: A pump that moves water through it when powered.
- Purpose: To pump water when activated by the circuit.
Arduino UNO
- Description: A microcontroller board based on the ATmega328P.
- Purpose: Acts as the brain of the circuit, controlling the sensors and actuators.
9V Battery
- Description: A standard 9V battery.
- Purpose: Provides power to the circuit.
HC-SR04 Ultrasonic Sensor
- Description: An ultrasonic distance sensor that uses sonar to determine the distance to an object.
- Purpose: Used for precise distance measurements.
LCD 20x4 I2C
- Description: A 20x4 character LCD display with an I2C interface.
- Purpose: To display information to the user.
Servo
- Description: A rotary actuator or linear actuator that allows for precise control of angular or linear position.
- Purpose: To provide controlled movement as per the circuit's requirements.
Buzzer
- Description: An electronic buzzer that produces sound.
- Purpose: To provide audio feedback or alerts.
Wiring Details
Resistor
- Connected between the IR sensor output and the base of the TIP120 transistor.
TIP120 Hi-Current Darlington Transistor
- BASE: Connected to one end of the resistor.
- COLLECTOR: Connected to the VCC of the Water Pump.
- EMITTER: Common connection with the 5V lines of various components and the positive terminal of the 9V Battery.
IR Sensor
- OUT: Connected to one end of the resistor.
- GND: Common ground with other components.
- VCC: Common 5V line with other components.
Water Pump
- VCC: Connected to the COLLECTOR of the TIP120 transistor.
- GND: Common ground with other components.
Arduino UNO
- 5V & GND: Power distribution to various components.
- A4 (SDA): Connected to the SCA pin of the LCD 20x4 I2C.
- A5 (SCL): Connected to the SCL pin of the LCD 20x4 I2C.
- D13: Connected to the PIN of the buzzer.
- D9: Connected to the TRIG pin of one HC-SR04 Ultrasonic Sensor.
- D8: Connected to the ECHO pin of one HC-SR04 Ultrasonic Sensor.
- D4: Connected to the pulse pin of the Servo.
- D3: Connected to the TRIG pin of another HC-SR04 Ultrasonic Sensor.
- D2: Connected to the ECHO pin of another HC-SR04 Ultrasonic Sensor.
9V Battery
- +: Common 5V line with other components.
- -: Common ground with other components.
HC-SR04 Ultrasonic Sensor
- VCC: Common 5V line with other components.
- TRIG: Connected to the corresponding digital pins on the Arduino UNO.
- ECHO: Connected to the corresponding digital pins on the Arduino UNO.
- GND: Common ground with other components.
LCD 20x4 I2C
- GND: Common ground with other components.
- 5V: Common 5V line with other components.
- SCA: Connected to A4 (SDA) on the Arduino UNO.
- SCL: Connected to A5 (SCL) on the Arduino UNO.
Servo
- GND: Common ground with other components.
- VCC: Powered by the 5V line from the Arduino UNO.
- PULSE: Connected to D4 on the Arduino UNO.
Buzzer
- PIN: Connected to D13 on the Arduino UNO.
- GND: Common ground with other components.
Documented Code
void setup() {
  // put your setup code here, to run once:

}

void loop() {
  // put your main code here, to run repeatedly:

}
File: sketch.ino
This code template is a starting point for the Arduino UNO microcontroller. The setup() function is called once when the microcontroller is first powered on or reset. It is typically used to initialize variables, pin modes, start using libraries, etc. The loop() function is called repeatedly and contains the main logic of the code. The actual implementation details would be added to these functions based on the specific requirements of the circuit's operation.