
ATtiny85 and OLED Display Based Interactive Game with Buzzer and LED
View and Edit Project In Cirkit Designer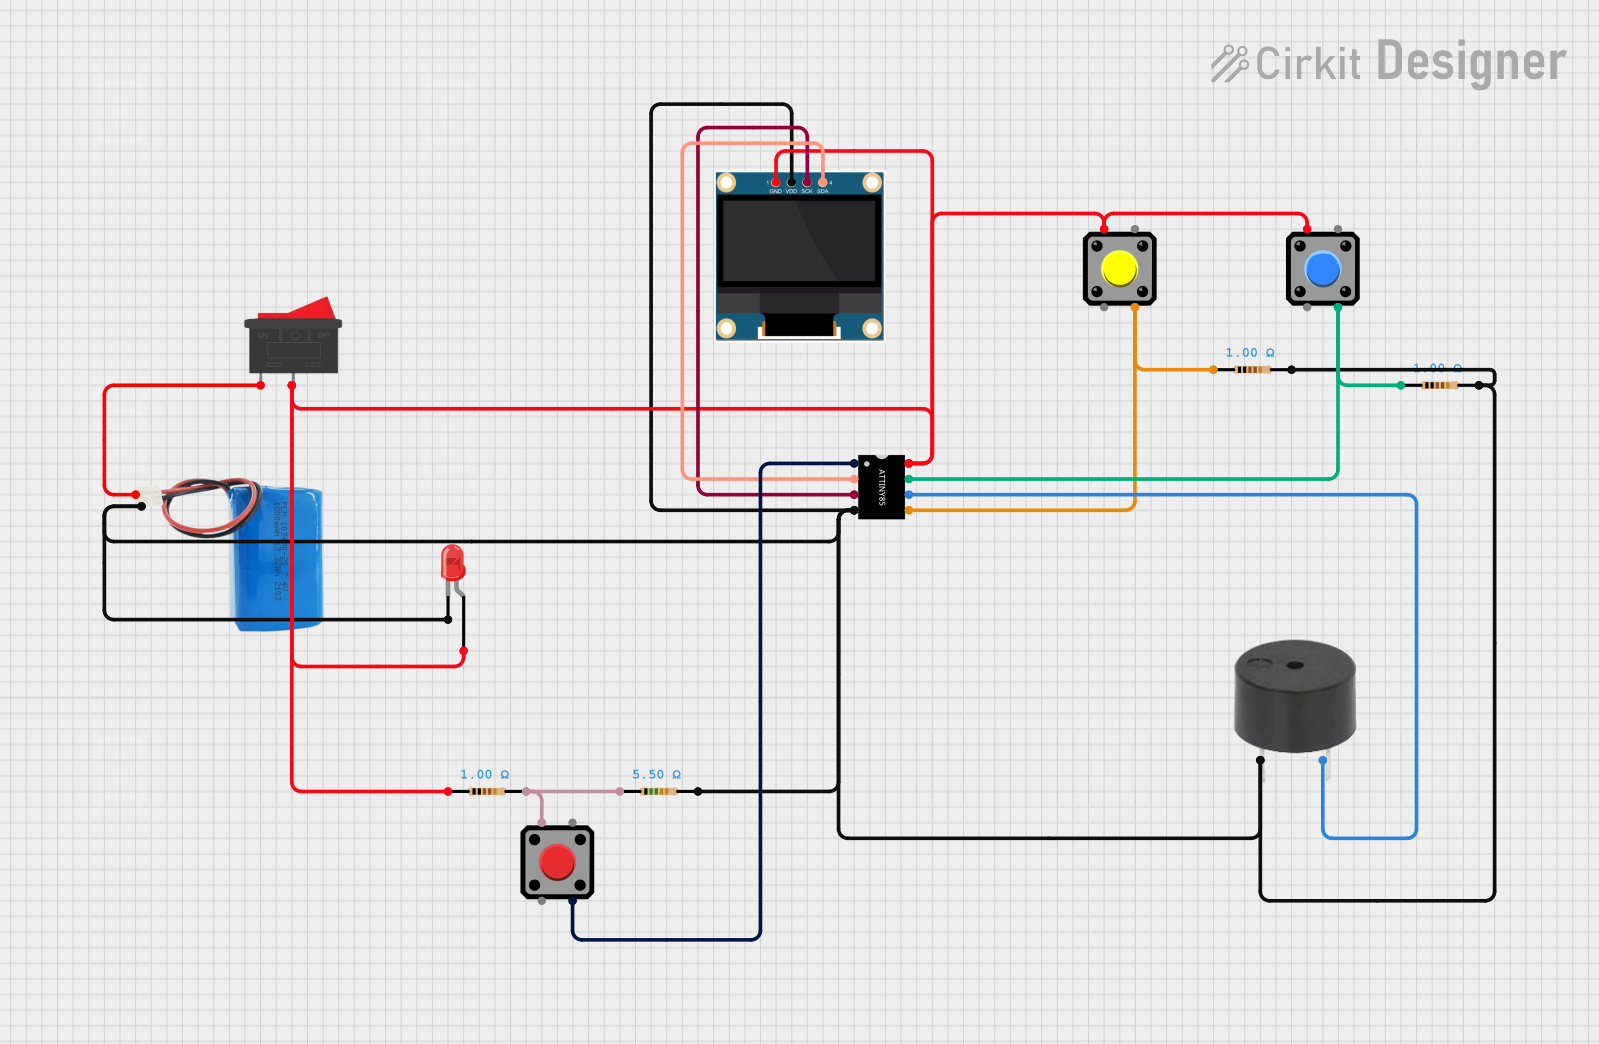
Circuit Documentation
Summary
This circuit is designed to control an OLED display, a buzzer, and an LED using an ATtiny85 microcontroller. The circuit also includes a rocker switch, pushbuttons, and resistors to manage the flow of current and user inputs. The OLED display shows a menu with options, and the pushbuttons allow the user to interact with the menu. The buzzer and LED provide audio and visual feedback, respectively.
Component List
5V Battery
- Pins: Positive, Negative
- Description: Provides power to the circuit.
LED: Two Pin (Red)
- Pins: Cathode, Anode
- Description: Provides visual feedback.
ATtiny85
- Pins: PB5, PB3, PB4, GND, Vcc, PB2, PB1, PB0
- Description: Microcontroller that controls the OLED display, buzzer, and LED.
0.96" OLED
- Pins: GND, VDD, SCK, SDA
- Description: Displays text and menu options.
Buzzer
- Pins: PIN, GND
- Description: Provides audio feedback.
Rocker Switch
- Pins: 1, 2
- Description: Controls the power supply to the circuit.
Red Pushbutton
- Pins: Pin 2, Pin 1, Pin 3, Pin 4
- Description: User input for interacting with the menu.
Pushbutton
- Pins: Pin 2, Pin 1, Pin 3, Pin 4
- Description: Additional user input for interacting with the menu.
Resistor (5.5 Ohms)
- Pins: Pin1, Pin2
- Description: Limits current flow.
Resistor (1 Ohm)
- Pins: Pin1, Pin2
- Description: Limits current flow.
Wiring Details
5V Battery
- Positive: Connected to pin 1 of the Rocker Switch.
- Negative: Connected to the cathode of the LED, PIN of the buzzer, GND of the ATtiny85, pin2 of the 5.5 Ohms resistor, pin2 of the 1 Ohm resistor, and VDD of the OLED.
LED: Two Pin (Red)
- Cathode: Connected to the negative pin of the 5V Battery.
- Anode: Connected to Vcc of the ATtiny85, pin 1 of the Pushbutton, pin 1 of the Rocker Switch, pin 1 of the additional Pushbutton, pin1 of the 1 Ohm resistor, and GND of the OLED.
ATtiny85
- PB5: Connected to pin 3 of the Red Pushbutton.
- PB3: Connected to SDA of the OLED.
- PB4: Connected to SCK of the OLED.
- GND: Connected to the negative pin of the 5V Battery.
- Vcc: Connected to the anode of the LED.
- PB2: Connected to pin 3 of the Pushbutton and pin1 of the 1 Ohm resistor.
- PB1: Connected to GND of the buzzer.
- PB0: Connected to pin1 of the 1 Ohm resistor and pin 3 of the additional Pushbutton.
0.96" OLED
- GND: Connected to the anode of the LED.
- VDD: Connected to the negative pin of the 5V Battery.
- SCK: Connected to PB4 of the ATtiny85.
- SDA: Connected to PB3 of the ATtiny85.
Buzzer
- PIN: Connected to the negative pin of the 5V Battery.
- GND: Connected to PB1 of the ATtiny85.
Rocker Switch
- Pin 1: Connected to the positive pin of the 5V Battery.
- Pin 2: Connected to the anode of the LED.
Red Pushbutton
- Pin 1: Connected to pin1 of the 5.5 Ohms resistor.
- Pin 3: Connected to PB5 of the ATtiny85.
Pushbutton
- Pin 1: Connected to the anode of the LED.
- Pin 3: Connected to PB2 of the ATtiny85 and pin1 of the 1 Ohm resistor.
Additional Pushbutton
- Pin 1: Connected to the anode of the LED.
- Pin 3: Connected to PB0 of the ATtiny85 and pin1 of the 1 Ohm resistor.
Resistor (5.5 Ohms)
- Pin1: Connected to pin 1 of the Red Pushbutton.
- Pin2: Connected to the negative pin of the 5V Battery.
Resistor (1 Ohm)
- Pin1: Connected to PB2 of the ATtiny85, pin 3 of the Pushbutton, and pin 3 of the additional Pushbutton.
- Pin2: Connected to the negative pin of the 5V Battery.
Code Documentation
ATtiny85 Code
/*
 * This Arduino Sketch initializes the OLED display, shows the text "DRAXION",
 * and then presents a menu with options "JEU" and "OPTION". If the "JEU"
 * option is selected, it will start the game on the ATtiny85 microcontroller.
 */

#include <Wire.h>
#include <Adafruit_GFX.h>
#include <Adafruit_SSD1306.h>

#define SCREEN_WIDTH 128
#define SCREEN_HEIGHT 64
#define OLED_RESET    -1
Adafruit_SSD1306 display(SCREEN_WIDTH, SCREEN_HEIGHT, &Wire, OLED_RESET);

#define BUTTON_PIN 2

void setup() {
  pinMode(BUTTON_PIN, INPUT);
  if(!display.begin(SSD1306_SWITCHCAPVCC, 0x3C)) {
    for(;;);
  }
  display.clearDisplay();
  display.setTextSize(1);
  display.setTextColor(SSD1306_WHITE);
  display.setCursor(0,0);
  display.println(F("DRAXION"));
  display.display();
  delay(2000);
  showMenu();
}

void showMenu() {
  display.clearDisplay();
  display.setCursor(0,0);
  display.println(F("1. JEU"));
  display.println(F("2. OPTION"));
  display.display();
}

void loop() {
  if(digitalRead(BUTTON_PIN) == HIGH) {
    startGame();
  }
}

void startGame() {
  // Code to start the game on ATtiny85
}
OLED Code
/*
 * This Arduino Sketch initializes the OLED display, shows the text "DRAXION",
 * and then presents a menu with options "JEU" and "OPTION". If the "JEU"
 * option is selected, it will start the game on the ATtiny85 microcontroller.
 */

#include <Wire.h>
#include <Adafruit_GFX.h>
#include <Adafruit_SSD1306.h>

#define SCREEN_WIDTH 128
#define SCREEN_HEIGHT 64
#define OLED_RESET    -1
Adafruit_SSD1306 display(SCREEN_WIDTH, SCREEN_HEIGHT, &Wire, OLED_RESET);

#define BUTTON_PIN 2

void setup() {
  pinMode(BUTTON_PIN, INPUT);
  if(!display.begin(SSD1306_SWITCHCAPVCC, 0x3C)) {
    for(;;);
  }
  display.clearDisplay();
  display.setTextSize(1);
  display.setTextColor(SSD1306_WHITE);
  display.setCursor(0,0);
  display.println(F("DRAXION"));
  display.display();
  delay(2000);
  showMenu();
}

void showMenu() {
  display.clearDisplay();
  display.setCursor(0,0);
  display.println(F("1. JEU"));
  display.println(F("2. OPTION"));
  display.display();
}

void loop() {
  if(digitalRead(BUTTON_PIN) == HIGH) {
    startGame();
  }
}

void startGame() {
  // Code to start the game on ATtiny85
}
This documentation provides a comprehensive overview of the circuit, including the components used, their wiring details, and the code running on the microcontrollers.