
Arduino UNO Distance Measurement and Display with I2C LCD and LED Indicators
View and Edit Project In Cirkit Designer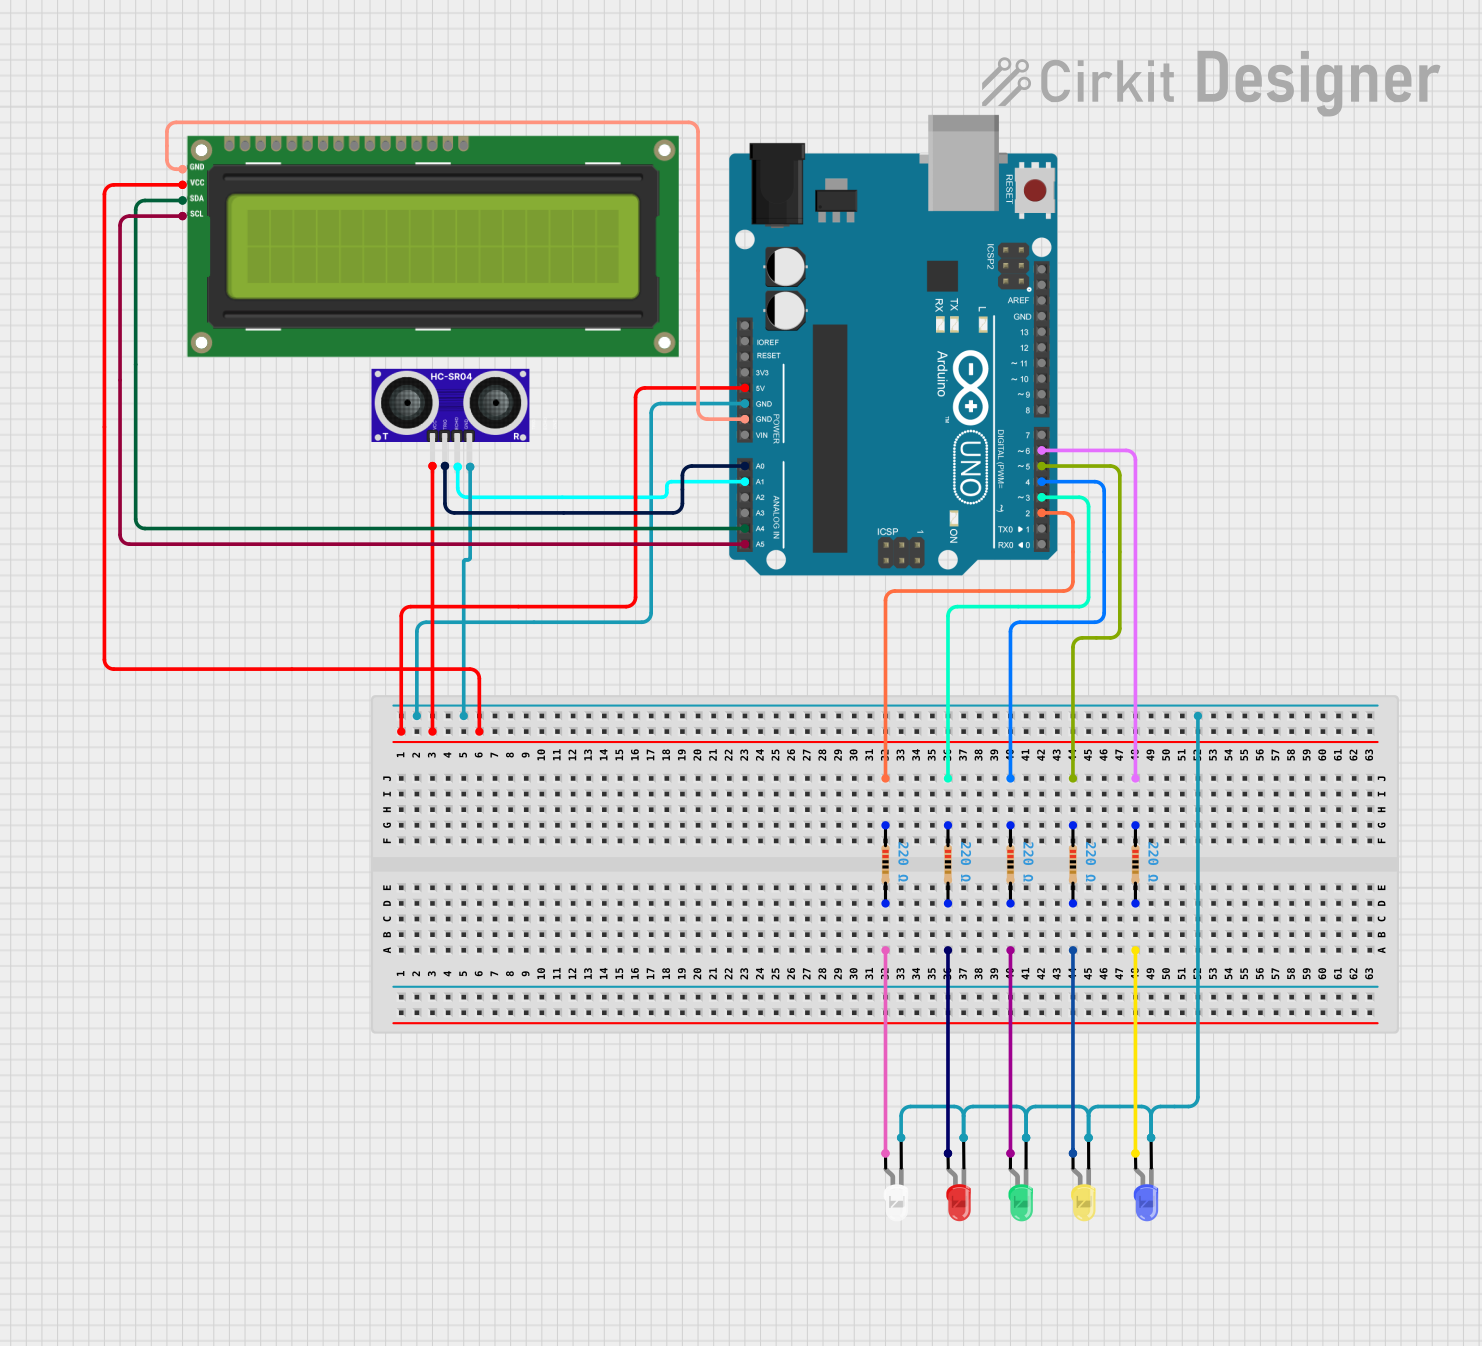
Circuit Documentation
Summary
The circuit in question is designed to measure distance using an HC-SR04 ultrasonic sensor and display the measured distance on an I2C LCD 16x2 screen. It also includes a series of LEDs that light up at different distance thresholds. The Arduino UNO serves as the central microcontroller unit, controlling the sensor, the display, and the LEDs. The LEDs are connected through individual resistors to limit the current and protect the LEDs.
Component List
Arduino UNO
- Microcontroller board based on the ATmega328P
- It has 14 digital input/output pins, 6 analog inputs, a 16 MHz quartz crystal, a USB connection, a power jack, an ICSP header, and a reset button.
I2C LCD 16x2 Screen
- A 16x2 character LCD display with an I2C interface module.
- It displays two lines of 16 characters each.
HC-SR04 Ultrasonic Sensor
- An ultrasonic distance sensor capable of measuring distances from 2cm to 400cm.
- It operates on a 5V supply and provides an echo signal proportional to the distance measured.
LEDs (Red, Green, Yellow, White, Blue)
- Standard two-pin LEDs in various colors.
- Used to indicate different distance thresholds as measured by the ultrasonic sensor.
Resistors (220 Ohms)
- Five resistors each with a resistance of 220 Ohms.
- Used to limit the current through the LEDs to safe levels.
Wiring Details
Arduino UNO
- 5V and GND are used to power the HC-SR04 sensor and the I2C LCD screen.
- A0 is connected to the TRIG pin of the HC-SR04 sensor.
- A1 is connected to the ECHO pin of the HC-SR04 sensor.
- A4 (SDA) and A5 (SCL) are connected to the corresponding SDA and SCL pins of the I2C LCD screen.
- Digital pins D2, D3, D4, D5, and D6 are connected to the anodes of the LEDs through 220 Ohm resistors.
I2C LCD 16x2 Screen
- VCC (5V) and GND are connected to the 5V and GND pins of the Arduino UNO.
- SDA and SCL are connected to the A4 and A5 pins of the Arduino UNO.
HC-SR04 Ultrasonic Sensor
- VCC is connected to the 5V pin of the Arduino UNO.
- GND is connected to the GND pin of the Arduino UNO.
- TRIG is connected to the A0 pin of the Arduino UNO.
- ECHO is connected to the A1 pin of the Arduino UNO.
LEDs (Red, Green, Yellow, White, Blue)
- The anode of each LED is connected to a digital pin (D2 to D6) on the Arduino UNO through a 220 Ohm resistor.
- The cathode of each LED is connected to the GND pin of the Arduino UNO.
Resistors (220 Ohms)
- One end of each resistor is connected to a digital pin (D2 to D6) on the Arduino UNO.
- The other end of each resistor is connected to the anode of the corresponding LED.
Documented Code
#include <Wire.h>
#include <LiquidCrystal_I2C.h>

LiquidCrystal_I2C lcd(0x27, 16, 2);
//ULTRASONIC SENSOR
#define trigPin A0 // Sensor Trig pin
#define echoPin A1 // Sensor Echo pin
//LED
#define led1 2 // LED for 5 inch
#define led2 3 // LED for 7 inch
#define led3 4 // LED for 9 inch
#define led4 5 // LED for 11 inch
#define led5 6 // LED for 12 inch

long distanceInch;

void setup() {
  pinMode(trigPin, OUTPUT);
  pinMode(echoPin, INPUT);
  pinMode(led1, OUTPUT);
  pinMode(led2, OUTPUT);
  pinMode(led3, OUTPUT);
  pinMode(led4, OUTPUT);
  pinMode(led5, OUTPUT);

  lcd.init();
  lcd.backlight();
  lcd.clear();
  lcd.setCursor(0, 0);
  lcd.print("   WAIT LANG");
  delay(2000);
  lcd.clear();
  lcd.setCursor(0, 0);  // Set LCD
  lcd.print("Distance:"); // Print Message on First Row
  lcd.setCursor(0, 1);
  lcd.print("Distance:");
}

void loop() {
  long duration, distance;
  digitalWrite(trigPin, LOW);
  delayMicroseconds(2);
  digitalWrite(trigPin, HIGH);
  delayMicroseconds(10);
  digitalWrite(trigPin, LOW);
  duration = pulseIn(echoPin, HIGH);
  distance = (duration / 2) / 29.1;
  distanceInch = duration * 0.0133 / 2;

  lcd.setCursor(9, 0);
  lcd.print("                ");
  lcd.setCursor(9, 0);
  lcd.print(distance); // Print measured distance
  lcd.print(" cm");  // Print your units.
  lcd.setCursor(9, 1);
  lcd.print("                "); // Print blanks to clear the row
  lcd.setCursor(9, 1);
  lcd.print(distanceInch);
  lcd.print(" inch");  // Print your units.

  // Control LEDs based on distance
  digitalWrite(led1, distanceInch <= 8 ? HIGH : LOW);
  digitalWrite(led2, distanceInch <= 16 ? HIGH : LOW);
  digitalWrite(led3, distanceInch <= 24 ? HIGH : LOW);
  digitalWrite(led4, distanceInch <= 32 ? HIGH : LOW);
  digitalWrite(led5, distanceInch <= 40 ? HIGH : LOW);

  delay(500); // Delay for half a second
}
This code initializes the LCD and ultrasonic sensor in the setup() function. In the loop() function, it triggers the ultrasonic sensor to measure distance, calculates the distance in centimeters and inches, and displays the results on the LCD. It also controls the LEDs based on the measured distance, lighting them up at different thresholds.