
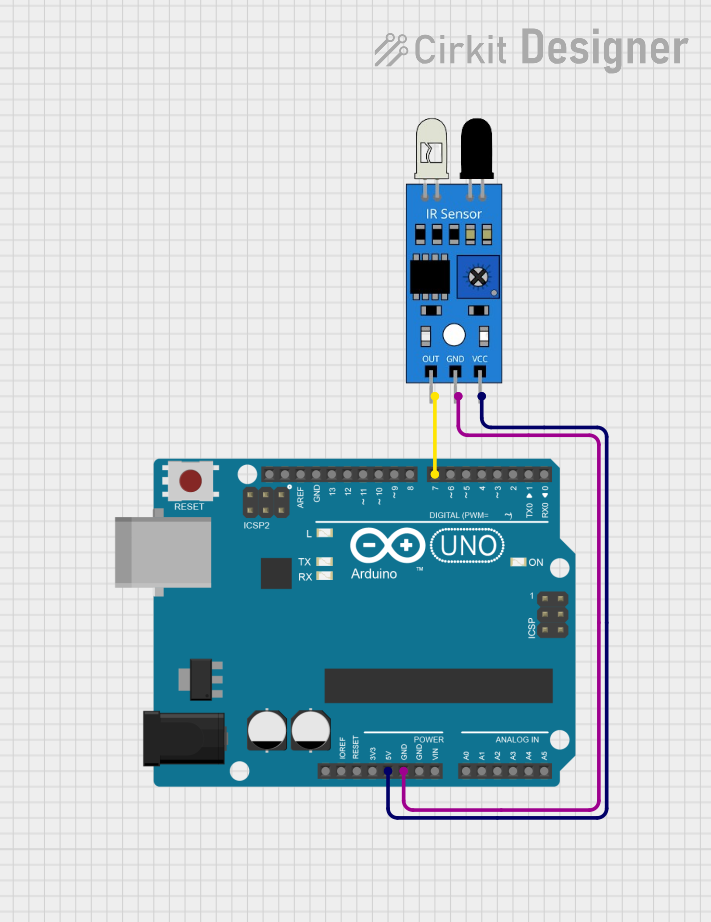
Circuit Documentation
Summary of the Circuit
The circuit in question consists of an Arduino UNO microcontroller board interfaced with an infrared (IR) sensor. The IR sensor is used to detect the presence of objects or motion based on the infrared radiation emitted or reflected by the objects. The Arduino UNO reads the output from the IR sensor and can be programmed to perform actions based on the sensor's readings.
Component List
Arduino UNO
- Description: A microcontroller board based on the ATmega328P. It has 14 digital input/output pins, 6 analog inputs, a 16 MHz quartz crystal, a USB connection, a power jack, an ICSP header, and a reset button.
- Purpose: Acts as the central processing unit of the circuit, reading sensor data and executing embedded code to perform tasks.
IR Sensor
- Description: A sensor that detects infrared light, commonly used in proximity or motion detection applications.
- Purpose: To detect the presence or absence of objects or motion and provide a digital signal to the Arduino UNO.
Wiring Details
Arduino UNO
- Digital Pin 7 (D7): Connected to the output pin of the IR sensor to read the digital signal.
- Ground (GND): Connected to the ground pin of the IR sensor to establish a common ground reference.
- 5V Pin: Supplies power to the IR sensor by connecting to its VCC pin.
IR Sensor
- Output (out): Sends the digital signal to the Arduino UNO's digital pin 7 (D7).
- Ground (gnd): Connected to the Arduino UNO's ground (GND) pin.
- Power (vcc): Receives power from the Arduino UNO's 5V pin.
Documented Code
Arduino UNO Code (sketch.ino)
void setup() {
  // put your setup code here, to run once:

}

void loop() {
  // put your main code here, to run repeatedly:

}
The provided code is a template with empty setup() and loop() functions. The setup() function is intended to contain initialization code that runs once when the Arduino is powered on or reset. The loop() function is meant to contain the main logic of the program, which runs repeatedly as long as the Arduino is powered.
Additional Notes
- The code for the Arduino UNO is currently a placeholder and needs to be filled in with logic to read the IR sensor's output and perform actions based on the sensor's state.
- The IR sensor's output can be read using a digital read function on pin D7 of the Arduino UNO.
- The behavior of the circuit will be determined by the logic implemented within the
loop()function of the Arduino code.
This documentation provides an overview of the circuit's components, their wiring, and the initial code structure for the Arduino UNO. Further development of the embedded code is required to achieve the desired functionality of the circuit.