Cirkit Designer
Your all-in-one circuit design IDE
Home /
Project Documentation
Arduino-Powered Rain-Responsive Motor Control with Piezoelectric and Solar Energy Harvesting

Circuit Documentation
Summary
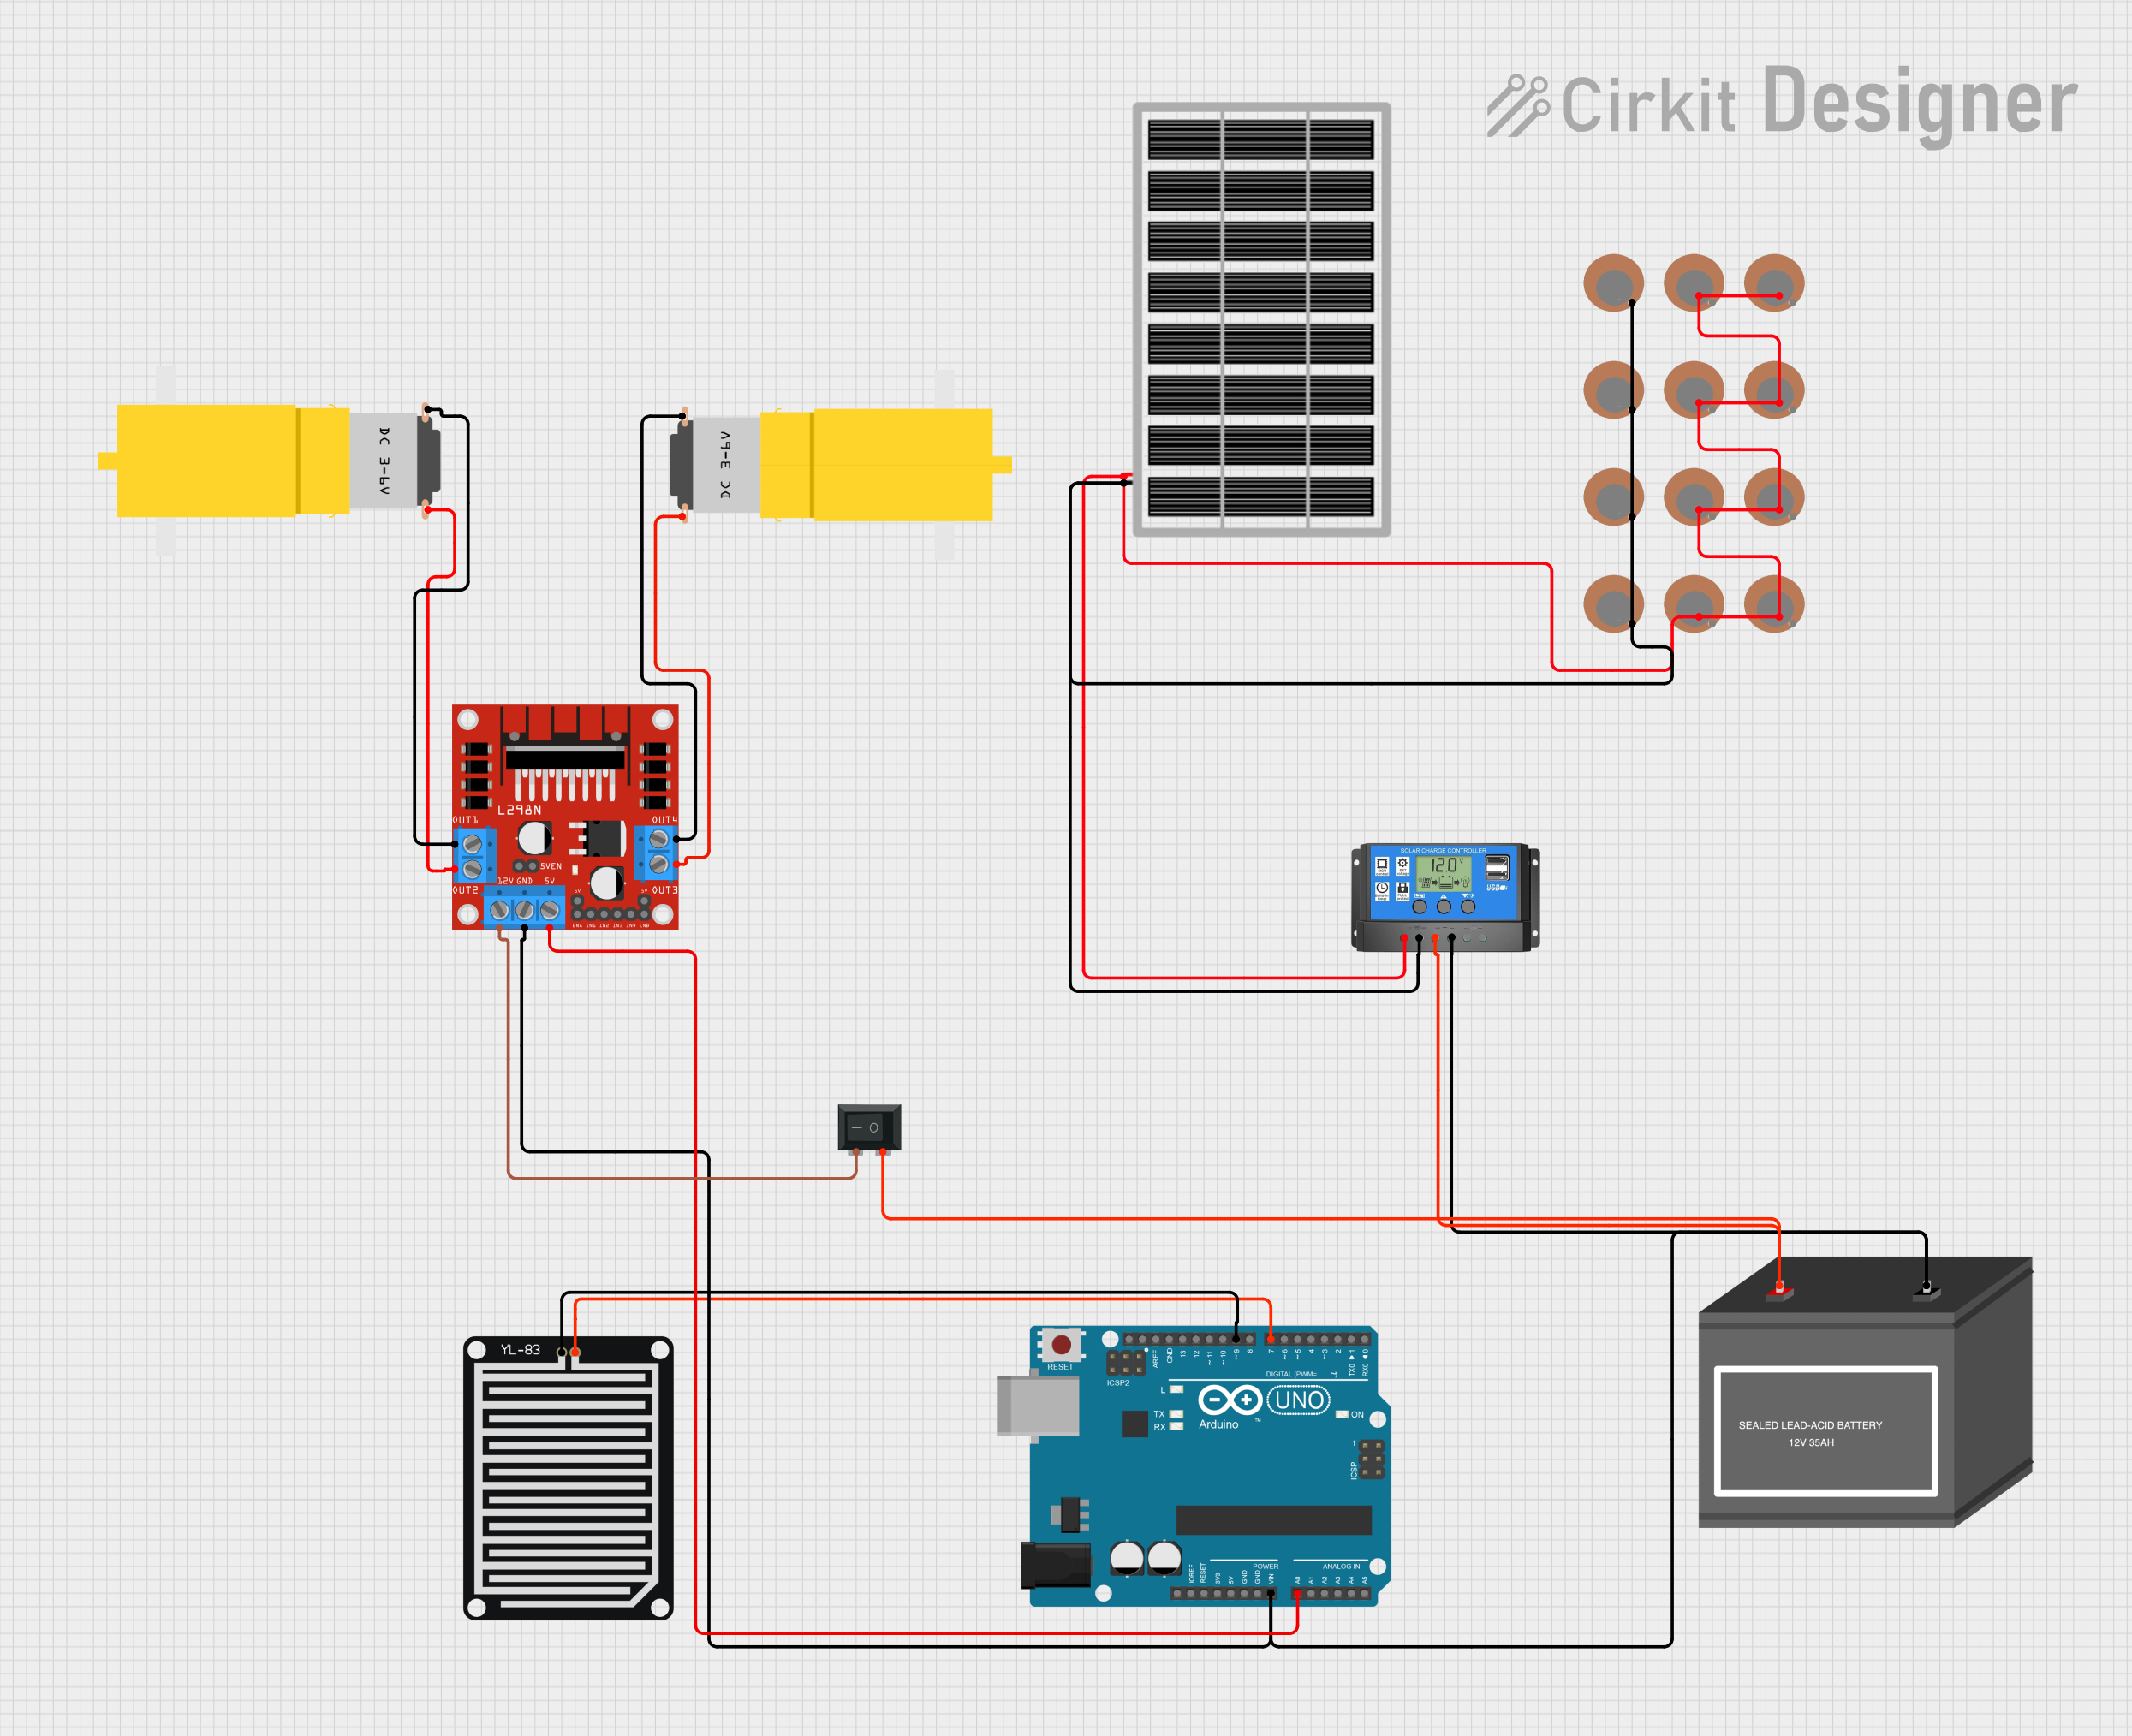
This circuit is designed as an Arduino-based combined piezoelectric and solar PV energy harvesting system. It includes a rain sensor for detecting precipitation, a motor drive module for controlling motors, a solar charge controller for managing the energy harvested from the solar panel, and a 12V battery for energy storage. The system is capable of stopping the motors when rain is detected and monitors the piezo sensors and solar panel for energy harvesting.
Component List
Arduino UNO
- Microcontroller board based on the ATmega328P
- Features digital I/O pins, analog input pins, and various power pins
YL-83 Rain Sensor - Detection Board
- Detects raindrops and provides a digital signal output
L298N DC Motor Driver
- Dual H-bridge motor driver capable of driving two DC motors or one stepper motor
Motor Amarillo Motorreductor Hobby (x2)
- Yellow hobby gear motors for driving mechanical loads
Solar Panel
- Photovoltaic panel for converting solar energy into electrical energy
Solar Charge Controller
- Manages the power flow from the solar panel to the battery and load
Piezo Sensor (x10)
- Converts mechanical stress into an electrical charge, used for energy harvesting
12V Battery (Mini)
- Provides energy storage for the harvested energy
Rocker Switch (SPST)
- Single Pole Single Throw switch used to control the power flow from the battery
Wiring Details
Arduino UNO
Vinconnected to the 12V battery negative terminal, L298N GND, and Solar Charge Controller Battery -A0connected to L298N 5VD9connected to YL-83 Rain Sensor POSD7connected to YL-83 Rain Sensor NEG
YL-83 Rain Sensor - Detection Board
POSconnected to Arduino UNO D9NEGconnected to Arduino UNO D7
L298N DC Motor Driver
GNDconnected to 12V Battery -, Arduino UNO Vin, and Solar Charge Controller Battery -5Vconnected to Arduino UNO A0OUT1connected to Motor Amarillo Motorreductor Hobby GNDOUT2connected to Motor Amarillo Motorreductor Hobby VCC12Vconnected to Rocker Switch 2OUT3connected to Motor Amarillo Motorreductor Hobby GNDOUT4connected to Motor Amarillo Motorreductor Hobby VCC
Motor Amarillo Motorreductor Hobby
- One motor's
GNDconnected to L298N OUT1,VCCconnected to L298N OUT2 - Another motor's
GNDconnected to L298N OUT3,VCCconnected to L298N OUT4
Solar Panel
GNDconnected to all Piezo Sensors -, Solar Charge Controller Solar Cell -VCCconnected to all Piezo Sensors +, Solar Charge Controller Solar Cell +
Solar Charge Controller
Solar Cell +connected to Solar Panel VCC and all Piezo Sensors +Solar Cell -connected to Solar Panel GND and all Piezo Sensors -Battery +connected to 12V Battery + and Rocker Switch 1Battery -connected to 12V Battery -, Arduino UNO Vin, and L298N GND
Piezo Sensors
- All
+pins connected together and to Solar Panel VCC, Solar Charge Controller Solar Cell + - All
-pins connected together and to Solar Panel GND, Solar Charge Controller Solar Cell -
12V Battery (Mini)
+connected to Rocker Switch 1, Solar Charge Controller Battery +-connected to Arduino UNO Vin, L298N GND, and Solar Charge Controller Battery -
Rocker Switch (SPST)
1connected to 12V Battery +2connected to L298N 12V
Documented Code
Arduino UNO Code (sketch.ino)
/*
 * Arduino Based Combined Piezoelectric and Solar PV Energy Harvesting System
 * with Rain Sensor, Motor Drive Module, Solar Charger Controller, Switch, and
 * 12V Battery Storage
 *
 * This code reads the rain sensor and controls the motor driver accordingly.
 * It also monitors the piezo sensors and solar panel for energy harvesting.
 */

// Pin definitions
const int rainSensorPin = 7; // Rain sensor connected to D7
const int motorEnablePin = 9; // Motor driver enable pin connected to D9
const int motorControlPin1 = 2; // Motor control pin 1 connected to D2
const int motorControlPin2 = 3; // Motor control pin 2 connected to D3

void setup() {
  // Initialize motor control pins as outputs
  pinMode(motorControlPin1, OUTPUT);
  pinMode(motorControlPin2, OUTPUT);
  // Initialize rain sensor pin as input
  pinMode(rainSensorPin, INPUT);
  // Initialize motor enable pin as output
  pinMode(motorEnablePin, OUTPUT);
  // Start with motors disabled
  digitalWrite(motorEnablePin, LOW);
}

void loop() {
  // Read the rain sensor value
  int rainSensorValue = digitalRead(rainSensorPin);
  if (rainSensorValue == HIGH) {
    // If rain is detected, stop the motors
    stopMotors();
  } else {
    // If no rain, run the motors
    runMotors();
  }
  delay(1000); // Wait for 1 second before next check
}

void stopMotors() {
  digitalWrite(motorEnablePin, LOW);
  digitalWrite(motorControlPin1, LOW);
  digitalWrite(motorControlPin2, LOW);
}

void runMotors() {
  digitalWrite(motorEnablePin, HIGH);
  digitalWrite(motorControlPin1, HIGH);
  digitalWrite(motorControlPin2, LOW);
}
(Note: The provided code for other microcontroller instances appears to be duplicates or irrelevant to their respective components, hence only the Arduino UNO code is documented here.)