
Arduino UNO and L298N Motor Driver-Based Battery-Powered Robotic Car with IR Sensors
View and Edit Project In Cirkit Designer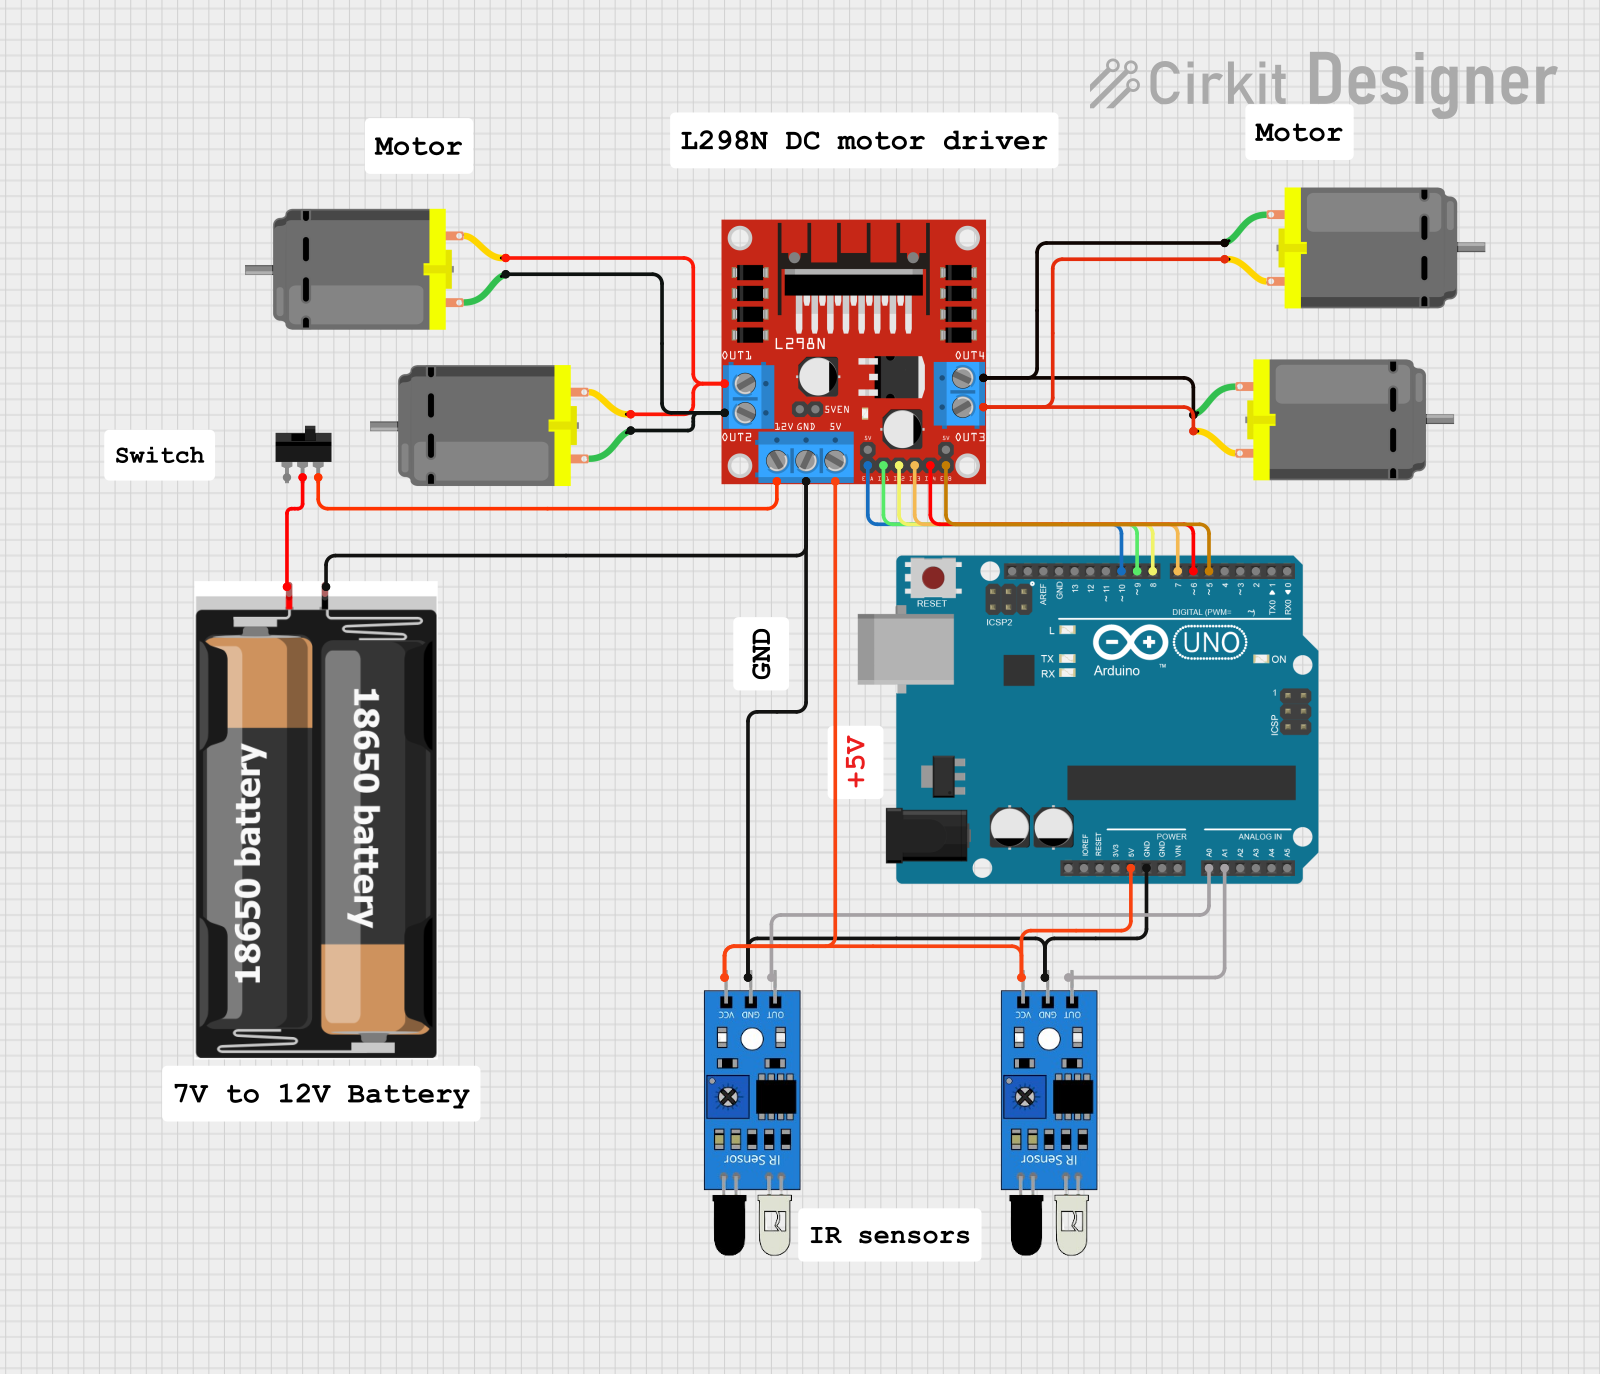
Circuit Documentation
Summary
This circuit involves an Arduino UNO microcontroller, an L298N DC motor driver, two IR sensors, four DC motors, a toggle switch, and a 2x 18650 battery pack. The Arduino UNO controls the motor driver, which in turn drives the DC motors. The IR sensors provide input to the Arduino, and the toggle switch controls the power from the battery pack.
Component List
Arduino UNO
- Description: A microcontroller board based on the ATmega328P.
- Pins: UNUSED, IOREF, Reset, 3.3V, 5V, GND, Vin, A0, A1, A2, A3, A4, A5, SCL, SDA, AREF, D13, D12, D11, D10, D9, D8, D7, D6, D5, D4, D3, D2, D1, D0
L298N DC Motor Driver
- Description: A dual H-Bridge motor driver that allows control of two DC motors.
- Pins: OUT1, OUT2, 12V, GND, 5V, OUT3, OUT4, 5V-ENA-JMP-I, 5V-ENA-JMP-O, +5V-J1, +5V-J2, ENA, IN1, IN2, IN3, IN4, ENB
2x 18650 Battery Pack
- Description: A battery pack holding two 18650 lithium-ion batteries.
- Pins: vcc, gnd
IR Sensor
- Description: An infrared sensor used for obstacle detection.
- Pins: out, gnd, vcc
DC Motor
- Description: A simple DC motor.
- Pins: pin 1, pin 2
Toggle Switch
- Description: A switch used to control the power supply.
- Pins: L1, COM, L2
Wiring Details
Arduino UNO
- 5V: Connected to 5V pin of L298N DC motor driver and vcc pins of both IR sensors.
- GND: Connected to GND pin of L298N DC motor driver, gnd pins of both IR sensors, and gnd pin of 2x 18650 battery pack.
- A0: Connected to out pin of the first IR sensor.
- A1: Connected to out pin of the second IR sensor.
- D10: Connected to ENA pin of L298N DC motor driver.
- D9: Connected to IN1 pin of L298N DC motor driver.
- D8: Connected to IN2 pin of L298N DC motor driver.
- D7: Connected to IN3 pin of L298N DC motor driver.
- D6: Connected to IN4 pin of L298N DC motor driver.
- D5: Connected to ENB pin of L298N DC motor driver.
L298N DC Motor Driver
- 5V: Connected to 5V pin of Arduino UNO and vcc pins of both IR sensors.
- GND: Connected to GND pin of Arduino UNO, gnd pins of both IR sensors, and gnd pin of 2x 18650 battery pack.
- ENA: Connected to D10 pin of Arduino UNO.
- IN1: Connected to D9 pin of Arduino UNO.
- IN2: Connected to D8 pin of Arduino UNO.
- IN3: Connected to D7 pin of Arduino UNO.
- IN4: Connected to D6 pin of Arduino UNO.
- ENB: Connected to D5 pin of Arduino UNO.
- OUT1: Connected to pin 2 of the first and third DC motors.
- OUT2: Connected to pin 1 of the first and third DC motors.
- OUT3: Connected to pin 2 of the second and fourth DC motors.
- OUT4: Connected to pin 1 of the second and fourth DC motors.
- 12V: Connected to L2 pin of the toggle switch.
2x 18650 Battery Pack
- vcc: Connected to COM pin of the toggle switch.
- gnd: Connected to GND pin of L298N DC motor driver, GND pin of Arduino UNO, and gnd pins of both IR sensors.
IR Sensor (First)
- out: Connected to A0 pin of Arduino UNO.
- gnd: Connected to GND pin of L298N DC motor driver, GND pin of Arduino UNO, and gnd pin of 2x 18650 battery pack.
- vcc: Connected to 5V pin of L298N DC motor driver and 5V pin of Arduino UNO.
IR Sensor (Second)
- out: Connected to A1 pin of Arduino UNO.
- gnd: Connected to GND pin of L298N DC motor driver, GND pin of Arduino UNO, and gnd pin of 2x 18650 battery pack.
- vcc: Connected to 5V pin of L298N DC motor driver and 5V pin of Arduino UNO.
DC Motor (First)
- pin 1: Connected to OUT2 pin of L298N DC motor driver.
- pin 2: Connected to OUT1 pin of L298N DC motor driver.
DC Motor (Second)
- pin 1: Connected to OUT4 pin of L298N DC motor driver.
- pin 2: Connected to OUT3 pin of L298N DC motor driver.
DC Motor (Third)
- pin 1: Connected to OUT2 pin of L298N DC motor driver.
- pin 2: Connected to OUT1 pin of L298N DC motor driver.
DC Motor (Fourth)
- pin 1: Connected to OUT4 pin of L298N DC motor driver.
- pin 2: Connected to OUT3 pin of L298N DC motor driver.
Toggle Switch
- L2: Connected to 12V pin of L298N DC motor driver.
- COM: Connected to vcc pin of 2x 18650 battery pack.
Documented Code
Arduino UNO Code (sketch.ino)
void setup() {
  // put your setup code here, to run once:

}

void loop() {
  // put your main code here, to run repeatedly:

}
Arduino UNO Documentation (documentation.txt)