
Arduino Nano-Based Battery-Powered Robotic System with RFID and Ultrasonic Sensors
View and Edit Project In Cirkit Designer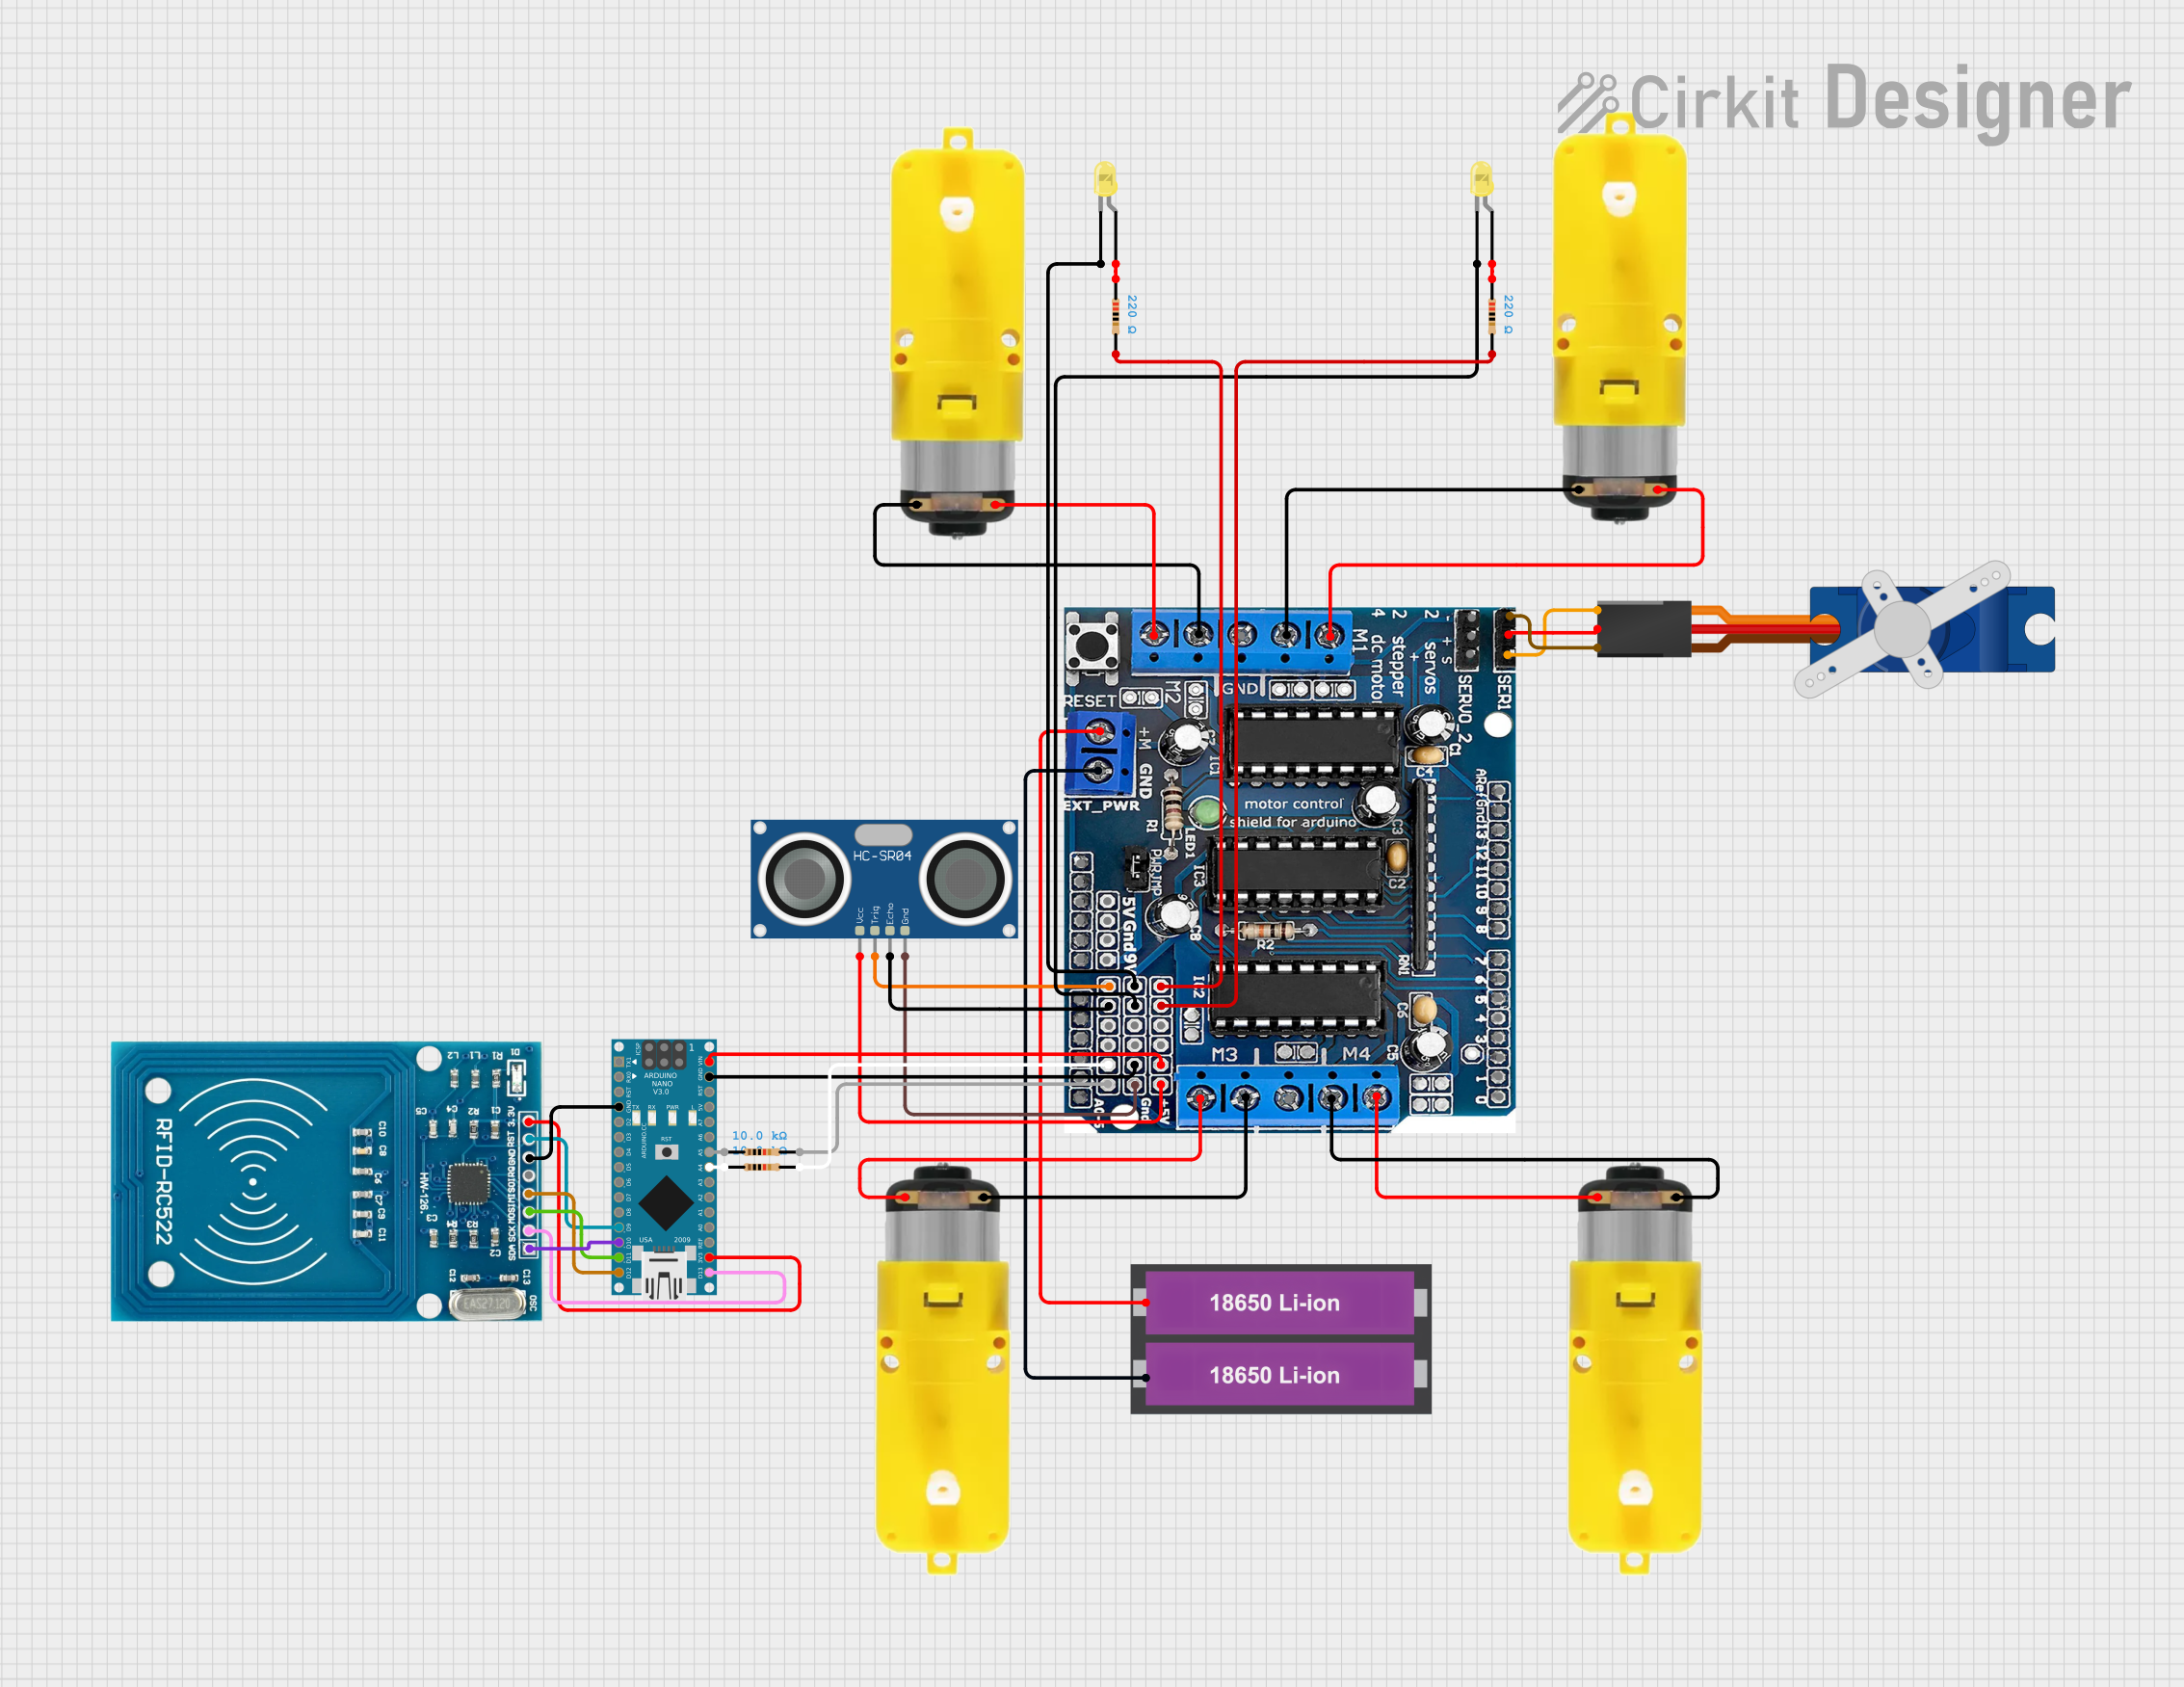
Circuit Documentation
Summary
This document provides a detailed overview of a circuit that includes various components such as motors, sensors, a microcontroller, and other electronic parts. The circuit is designed to interface with an Arduino Nano, which controls the operation of the connected components. The document includes a component list, wiring details, and the embedded code used in the microcontroller.
Component List
Motor with reducer
- Pins: 3 - 6 VCC, GND
- Description: A motor with an integrated reducer to control speed and torque.
HC-SR04 Ultrasonic Sensor
- Pins: VCC, TRIG, ECHO, GND
- Description: An ultrasonic sensor used for distance measurement.
18650 Li-ion Battery x 2
- Pins: +, -
- Description: A pair of 18650 Li-ion batteries for power supply.
L293D
- Pins: 5V, GND, +, Servo1, Servo2, RX/DO, TX/D1, 9V, A0, A1, A2, A3, A4/SDA, A5/SCL, VIN, 3.3V, RESET, D2, D3, D4, D5, D6, D7, D8, D9, D10, D11, D12, D13
- Description: A motor driver IC used to control motors.
Tower Pro SG90 servo
- Pins: Signal, +5V, GND
- Description: A small servo motor used for precise control of angular position.
Arduino Nano
- Pins: D1/TX, D0/RX, RESET, GND, D2, D3, D4, D5, D6, D7, D8, D9, D10, D11/MOSI, D12/MISO, VIN, 5V, A7, A6, A5, A4, A3, A2, A1, A0, AREF, 3V3, D13/SCK
- Description: A small, complete, and breadboard-friendly microcontroller board.
RFID-RC522
- Pins: VCC (3.3V), RST, GND, IRQ, MISO, MOSI, SCK, SDA
- Description: An RFID reader module used for reading RFID tags.
Resistor (220 Ohms)
- Pins: pin1, pin2
- Description: A resistor with a resistance of 220 Ohms.
Resistor (10k Ohms)
- Pins: pin1, pin2
- Description: A resistor with a resistance of 10k Ohms.
LED: Two Pin (yellow)
- Pins: cathode, anode
- Description: A yellow LED with two pins.
Wiring Details
Motor with reducer
- Pin 3 - 6 VCC connected to L293D +
- Pin GND connected to L293D GND
HC-SR04 Ultrasonic Sensor
- Pin VCC connected to L293D 5V
- Pin TRIG connected to L293D A0
- Pin ECHO connected to L293D A1
- Pin GND connected to L293D GND
18650 Li-ion Battery x 2
- Pin + connected to L293D +
- Pin - connected to L293D GND
L293D
- Pin 5V connected to Arduino Nano VIN
- Pin GND connected to Arduino Nano GND
- Pin + connected to 18650 Li-ion Battery x 2 +
- Pin Servo1 connected to Tower Pro SG90 servo Signal
- Pin A0 connected to HC-SR04 Ultrasonic Sensor TRIG
- Pin A1 connected to HC-SR04 Ultrasonic Sensor ECHO
- Pin A4/SDA connected to Resistor (10k Ohms) pin2
- Pin A5/SCL connected to Resistor (220 Ohms) pin2
Tower Pro SG90 servo
- Pin Signal connected to L293D Servo1
- Pin +5V connected to L293D 5V
- Pin GND connected to L293D GND
Arduino Nano
- Pin GND connected to RFID-RC522 GND
- Pin D9 connected to RFID-RC522 RST
- Pin D10 connected to RFID-RC522 SDA
- Pin D11/MOSI connected to RFID-RC522 MOSI
- Pin D12/MISO connected to RFID-RC522 MISO
- Pin VIN connected to L293D 5V
- Pin 3V3 connected to RFID-RC522 VCC (3.3V)
- Pin D13/SCK connected to RFID-RC522 SCK
- Pin A5 connected to Resistor (220 Ohms) pin1
- Pin A4 connected to Resistor (10k Ohms) pin1
RFID-RC522
- Pin GND connected to Arduino Nano GND
- Pin RST connected to Arduino Nano D9
- Pin SDA connected to Arduino Nano D10
- Pin MOSI connected to Arduino Nano D11/MOSI
- Pin MISO connected to Arduino Nano D12/MISO
- Pin VCC (3.3V) connected to Arduino Nano 3V3
- Pin SCK connected to Arduino Nano D13/SCK
Resistor (220 Ohms)
- Pin pin1 connected to Arduino Nano A5
- Pin pin2 connected to L293D A5/SCL
Resistor (10k Ohms)
- Pin pin1 connected to Arduino Nano A4
- Pin pin2 connected to L293D A4/SDA
LED: Two Pin (yellow)
- Pin cathode connected to L293D GND
- Pin anode connected to Resistor (220 Ohms) pin1
Code Documentation
Arduino Nano Code
void setup() {
  // put your setup code here, to run once:

}

void loop() {
  // put your main code here, to run repeatedly:

}
This code is a basic template for the Arduino Nano. The setup() function is used to initialize any settings or configurations, and the loop() function contains the main code that runs repeatedly. Currently, both functions are empty and can be filled with the necessary logic to control the components connected to the Arduino Nano.