
ESP32-Based Eye Pressure Monitor with OLED Display and Multiple Sensors
View and Edit Project In Cirkit Designer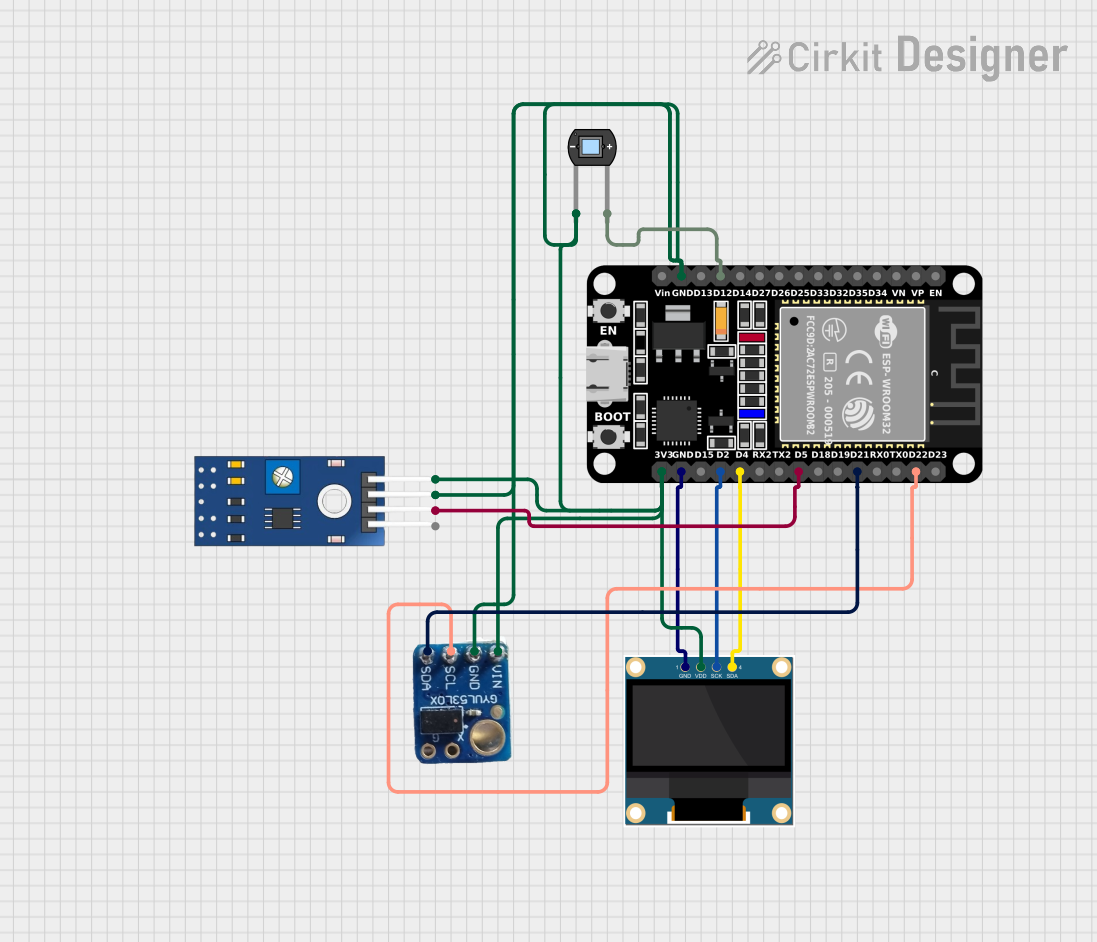
Circuit Documentation
Summary
The circuit in question is designed to monitor eye deformation and pressure using a combination of sensors, including a photodiode, a TCRT 5000 IR sensor, and a VL53L0X sensor. The data collected from these sensors is processed by an ESP32 microcontroller and displayed on a 0.96" OLED screen. The circuit is powered by the ESP32's 3.3V output, and the ground connections are shared among the components. The ESP32 also handles communication with the OLED display and the VL53L0X sensor via I2C protocol, while the photodiode and IR sensor are connected to the ESP32's analog and digital pins, respectively.
Component List
- ESP32 (30 pin): A microcontroller with Wi-Fi and Bluetooth capabilities, featuring a variety of digital and analog I/O pins.
- 0.96" OLED: A small display that uses the I2C protocol for communication, suitable for displaying sensor readings and messages.
- Photodiode: A light-sensitive component that generates a voltage proportional to the light intensity it detects.
- VL53L0X: A time-of-flight sensor that measures distances by sending out a laser and timing how long it takes to return.
- TCRT 5000 IR SENSOR: An infrared sensor that detects the presence of objects or changes in a surface by emitting and receiving IR light.
Wiring Details
ESP32 (30 pin)
- D12: Connected to the anode of the Photodiode.
- GND: Common ground shared with VL53L0X, TCRT 5000 IR SENSOR, and 0.96" OLED.
- 3V3: Powers the VL53L0X, TCRT 5000 IR SENSOR, and 0.96" OLED.
- D22 (SCL): I2C clock line connected to the VL53L0X's SCL pin.
- D21 (SDA): I2C data line connected to the VL53L0X's SDA pin.
- D5: Connected to the digital output (DO) of the TCRT 5000 IR SENSOR.
- D4 (SDA): I2C data line connected to the 0.96" OLED's SDA pin.
- D2 (SCK): I2C clock line connected to the 0.96" OLED's SCK pin.
0.96" OLED
- GND: Connected to the common ground.
- VDD: Powered by the ESP32's 3V3 output.
- SCK: Connected to the ESP32's D2 pin.
- SDA: Connected to the ESP32's D4 pin.
Photodiode
- Cathode: Connected to the common ground.
- Anode: Connected to the ESP32's D12 pin.
VL53L0X
- Vin: Powered by the ESP32's 3V3 output.
- GND: Connected to the common ground.
- SCL: Connected to the ESP32's D22 pin.
- SDA: Connected to the ESP32's D21 pin.
TCRT 5000 IR SENSOR
- VCC: Powered by the ESP32's 3V3 output.
- GND: Connected to the common ground.
- DO: Connected to the ESP32's D5 pin.
- AO: Not connected in this circuit.
Documented Code
ESP32 (30 pin) Code
/*
 * This Arduino Sketch reads data from a photodiode, TCRT 5000 IR sensor, and
 * VL53L0X sensor to determine eye deformation and pressure. The results are
 * displayed on a 0.96" OLED display. Safety features and calibration are
 * included.
 */

#include <Wire.h>
#include <Adafruit_GFX.h>
#include <Adafruit_SSD1306.h>
#include <VL53L0X.h>

#define SCREEN_WIDTH 128
#define SCREEN_HEIGHT 64
#define OLED_RESET    -1
Adafruit_SSD1306 display(SCREEN_WIDTH, SCREEN_HEIGHT, &Wire, OLED_RESET);

VL53L0X sensor;

const int photodiodePin = 12;
const int irSensorPin = 5;

int photodiodeBaseline = 0;
int irSensorBaseline = 0;
int distanceBaseline = 0;

void setup() {
  // Initialize serial communication
  Serial.begin(115200);

  // Initialize OLED display
  if(!display.begin(SSD1306_SWITCHCAPVCC, 0x3C)) {
    Serial.println(F("SSD1306 allocation failed"));
    for(;;);
  }
  display.display();
  delay(2000);
  display.clearDisplay();

  // Initialize VL53L0X sensor
  Wire.begin();
  sensor.init();
  sensor.setTimeout(500);
  sensor.startContinuous();

  // Initialize photodiode and IR sensor pins
  pinMode(photodiodePin, INPUT);
  pinMode(irSensorPin, INPUT);

  // Calibrate sensors
  calibrateSensors();
}

void loop() {
  // Read photodiode value
  int photodiodeValue = analogRead(photodiodePin);

  // Read IR sensor value
  int irSensorValue = digitalRead(irSensorPin);

  // Read distance from VL53L0X sensor
  int distance = sensor.readRangeContinuousMillimeters();

  // Convert distance to mmHg (example conversion, adjust as needed)
  float pressure = distance * 0.1; // Placeholder conversion factor

  // Determine eye pressure status
  String eyePressureStatus;
  if (pressure < 10) {
    eyePressureStatus = "Low";
  } else if (pressure <= 21) {
    eyePressureStatus = "Normal";
  } else {
    eyePressureStatus = "High";
  }

  // Safety feature: Check for sensor errors
  if (sensor.timeoutOccurred()) {
    eyePressureStatus = "Sensor Error";
  }

  // Display results on OLED
  display.clearDisplay();
  display.setTextSize(1);
  display.setTextColor(SSD1306_WHITE);
  display.setCursor(0, 0);
  display.print("Photodiode: ");
  display.println(photodiodeValue);
  display.print("IR Sensor: ");
  display.println(irSensorValue);
  display.print("Distance: ");
  display.print(distance);
  display.println(" mm");
  display.print("Pressure: ");
  display.print(pressure);
  display.println(" mmHg");
  display.print("Eye Pressure: ");
  display.println(eyePressureStatus);
  display.display();

  // Delay before next loop
  delay(1000);
}

void calibrateSensors() {
  // Calibrate photodiode
  photodiodeBaseline = analogRead(photodiodePin);
  // Calibrate IR sensor
  irSensorBaseline = digitalRead(irSensorPin);
  // Calibrate VL53L0X sensor
  distanceBaseline = sensor.readRangeContinuousMillimeters();
  delay(1000); // Allow time for calibration
}
Photodiode Code
The photodiode does not have associated code as it is a passive component. Its output is read by the ESP32's analog pin D12.
void setup() {
  // put your setup code here, to run once:

}

void loop() {
  // put your main code here, to run repeatedly:

}
(Note: The above code is a placeholder as the photodiode does not require specific code for operation; it is directly read by the ESP32 microcontroller.)