
Arduino UNO IR-Controlled Robotic Car with H-Bridge and DC Motors
View and Edit Project In Cirkit Designer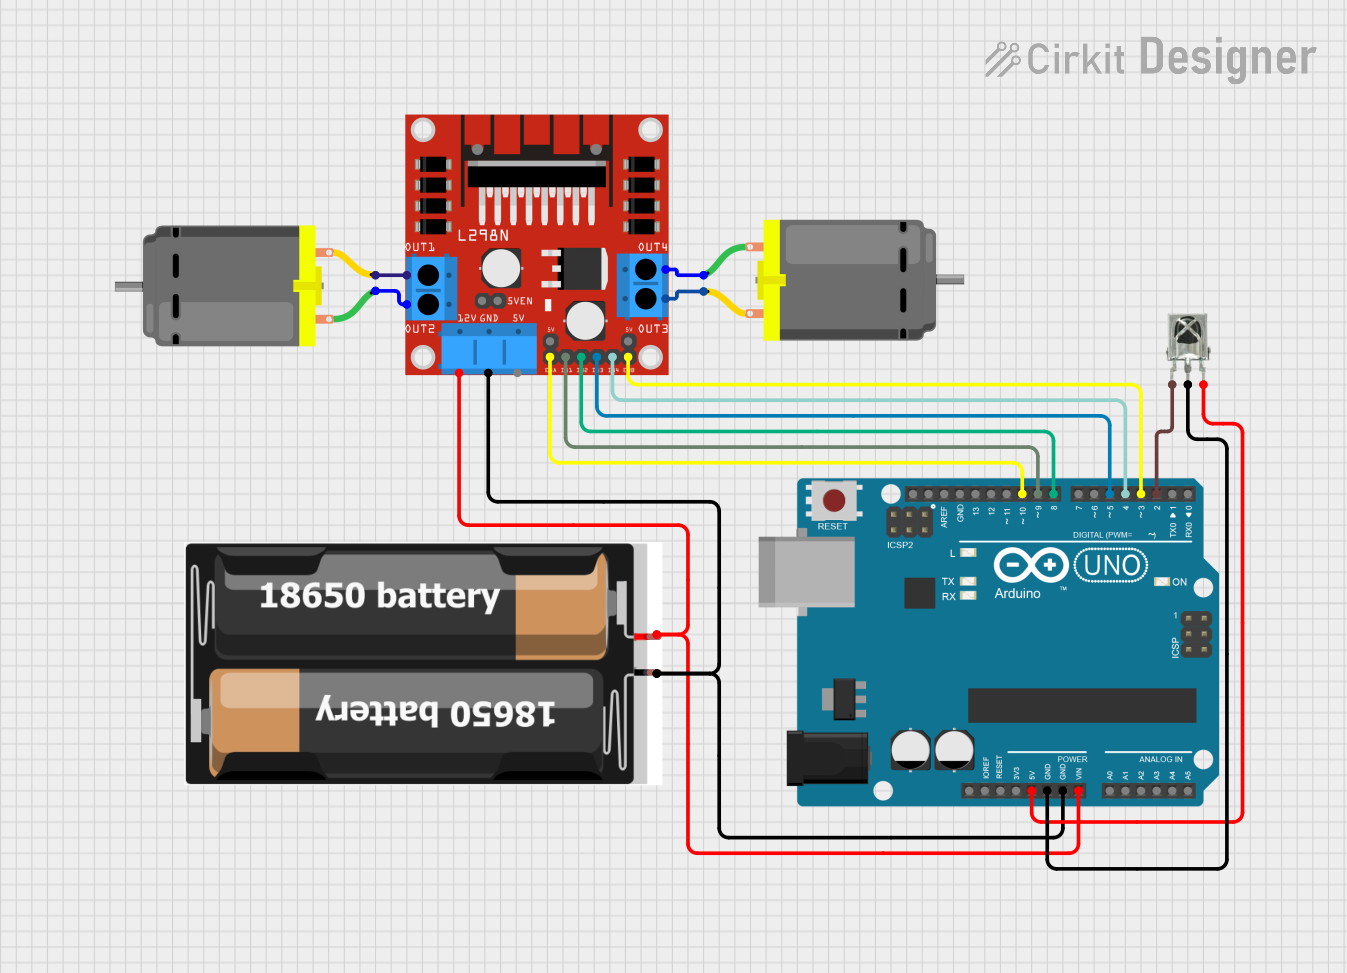
Circuit Documentation
Summary
This document provides a detailed overview of a circuit designed to control a robot using an IR remote. The circuit includes an Arduino UNO microcontroller, an H-Bridge motor driver, two DC motors, an IR receiver, and a battery pack. The Arduino UNO processes IR signals to control the motors via the H-Bridge.
Component List
Arduino UNO
- Description: A microcontroller board based on the ATmega328P.
- Pins: UNUSED, IOREF, Reset, 3.3V, 5V, GND, Vin, A0, A1, A2, A3, A4, A5, SCL, SDA, AREF, D13, D12, D11, D10, D9, D8, D7, D6, D5, D4, D3, D2, D1, D0
Puente H carrito
- Description: An H-Bridge motor driver used to control the direction and speed of DC motors.
- Pins: OUT1, OUT2, OUT3, OUT4, 12V, GND, 5V, ENA, IN1, IN2, IN3, IN4, ENB, 5VEN
DC Motor (Motor 1)
- Description: A DC motor used for driving the robot.
- Pins: pin 1, pin 2
DC Motor (Motor 2)
- Description: A second DC motor used for driving the robot.
- Pins: pin 1, pin 2
2x 18650 Battery Pack
- Description: A battery pack consisting of two 18650 batteries.
- Pins: vcc, gnd
VS1838B IR Receiver
- Description: An IR receiver module used to receive signals from an IR remote.
- Pins: OUT, GND, VCC
Wiring Details
Arduino UNO
- 5V connected to VCC of VS1838B IR Receiver
- GND connected to GND of VS1838B IR Receiver, GND of Puente H carrito, and gnd of 2x 18650 Battery Pack
- Vin connected to 12V of Puente H carrito and vcc of 2x 18650 Battery Pack
- D10 connected to ENA of Puente H carrito
- D9 connected to IN1 of Puente H carrito
- D8 connected to IN2 of Puente H carrito
- D5 connected to IN3 of Puente H carrito
- D4 connected to IN4 of Puente H carrito
- D3 connected to ENB of Puente H carrito
- D2 connected to OUT of VS1838B IR Receiver
Puente H carrito
- GND connected to GND of Arduino UNO and gnd of 2x 18650 Battery Pack
- 12V connected to Vin of Arduino UNO and vcc of 2x 18650 Battery Pack
- ENA connected to D10 of Arduino UNO
- IN1 connected to D9 of Arduino UNO
- IN2 connected to D8 of Arduino UNO
- IN3 connected to D5 of Arduino UNO
- IN4 connected to D4 of Arduino UNO
- ENB connected to D3 of Arduino UNO
- OUT1 connected to pin 2 of DC Motor (Motor 2)
- OUT2 connected to pin 1 of DC Motor (Motor 2)
- OUT3 connected to pin 2 of DC Motor (Motor 1)
- OUT4 connected to pin 1 of DC Motor (Motor 1)
DC Motor (Motor 1)
- pin 1 connected to OUT4 of Puente H carrito
- pin 2 connected to OUT3 of Puente H carrito
DC Motor (Motor 2)
- pin 1 connected to OUT2 of Puente H carrito
- pin 2 connected to OUT1 of Puente H carrito
2x 18650 Battery Pack
- vcc connected to 12V of Puente H carrito and Vin of Arduino UNO
- gnd connected to GND of Puente H carrito and GND of Arduino UNO
VS1838B IR Receiver
- VCC connected to 5V of Arduino UNO
- GND connected to GND of Arduino UNO
- OUT connected to D2 of Arduino UNO
Documented Code
/*
Sterowanie robotem za pomocą pilota IR.
*/

#include <IRremote.h>

// Definicje pinów
const int motorA1 = 9;
const int motorA2 = 8;
const int motorB1 = 5;
const int motorB2 = 4;
const int enableA = 10;
const int enableB = 3;
const int irReceiverPin = 2;

// Definicje kodów IR - Car mp3
const long IR_FORWARD = 0xB946FF00; // Przykładowy kod IR dla przycisku "Forward"
const long IR_BACKWARD = 0xEA15FF00; // Przykładowy kod IR dla przycisku "Backward"
const long IR_LEFT = 0xBB44FF00; // Przykładowy kod IR dla przycisku "Left"
const long IR_RIGHT = 0xBC43FF00; // Przykładowy kod IR dla przycisku "Right"
const long IR_STOP = 0xBF40FF00; // Przykładowy kod IR dla przycisku "Stop"

IRrecv irrecv(irReceiverPin);
decode_results results;

// Funkcje do sterowania silnikami
void moveForward() {
  digitalWrite(motorA1, HIGH);
  digitalWrite(motorA2, LOW);
  digitalWrite(motorB1, HIGH);
  digitalWrite(motorB2, LOW);
}

void moveBackward() {
  digitalWrite(motorA1, LOW);
  digitalWrite(motorA2, HIGH);
  digitalWrite(motorB1, LOW);
  digitalWrite(motorB2, HIGH);
}

void turnRight() {
  digitalWrite(motorA1, LOW);
  digitalWrite(motorA2, HIGH);
  digitalWrite(motorB1, HIGH);
  digitalWrite(motorB2, LOW);
}

void turnLeft() {
  digitalWrite(motorA1, HIGH);
  digitalWrite(motorA2, LOW);
  digitalWrite(motorB1, LOW);
  digitalWrite(motorB2, HIGH);
}

void stopMotors() {
  digitalWrite(motorA1, LOW);
  digitalWrite(motorA2, LOW);
  digitalWrite(motorB1, LOW);
  digitalWrite(motorB2, LOW);
}

void setup() {
  // Ustawienie pinów
  pinMode(motorA1, OUTPUT);
  pinMode(motorA2, OUTPUT);
  pinMode(motorB1, OUTPUT);
  pinMode(motorB2, OUTPUT);
  pinMode(enableA, OUTPUT);
  pinMode(enableB, OUTPUT);

  // Włączenie silników
  analogWrite(enableA, 255);
  analogWrite(enableB, 255);

  // Inicjalizacja odbiornika IR
  irrecv.enableIRIn();
}

void loop() {
  if (irrecv.decode()) {
    long irCode = irrecv.decodedIRData.decodedRawData;
    switch (irCode) {
      case IR_FORWARD:
        moveForward();
        break;
      case IR_BACKWARD:
        moveBackward();
        break;
      case IR_LEFT:
        turnLeft();
        break;
      case IR_RIGHT:
        turnRight();
        break;
      case IR_STOP:
        stopMotors();
        break;
    }
    irrecv.resume(); // Przygotowanie do odbioru następnego sygnału
  }
}
This code is designed to control the robot using an IR remote. The Arduino UNO reads the IR signals and controls the motors via the H-Bridge to move the robot forward, backward, left, right, or stop.