
Arduino UNO-Based Fire and Smoke Detection System with LCD Display
View and Edit Project In Cirkit Designer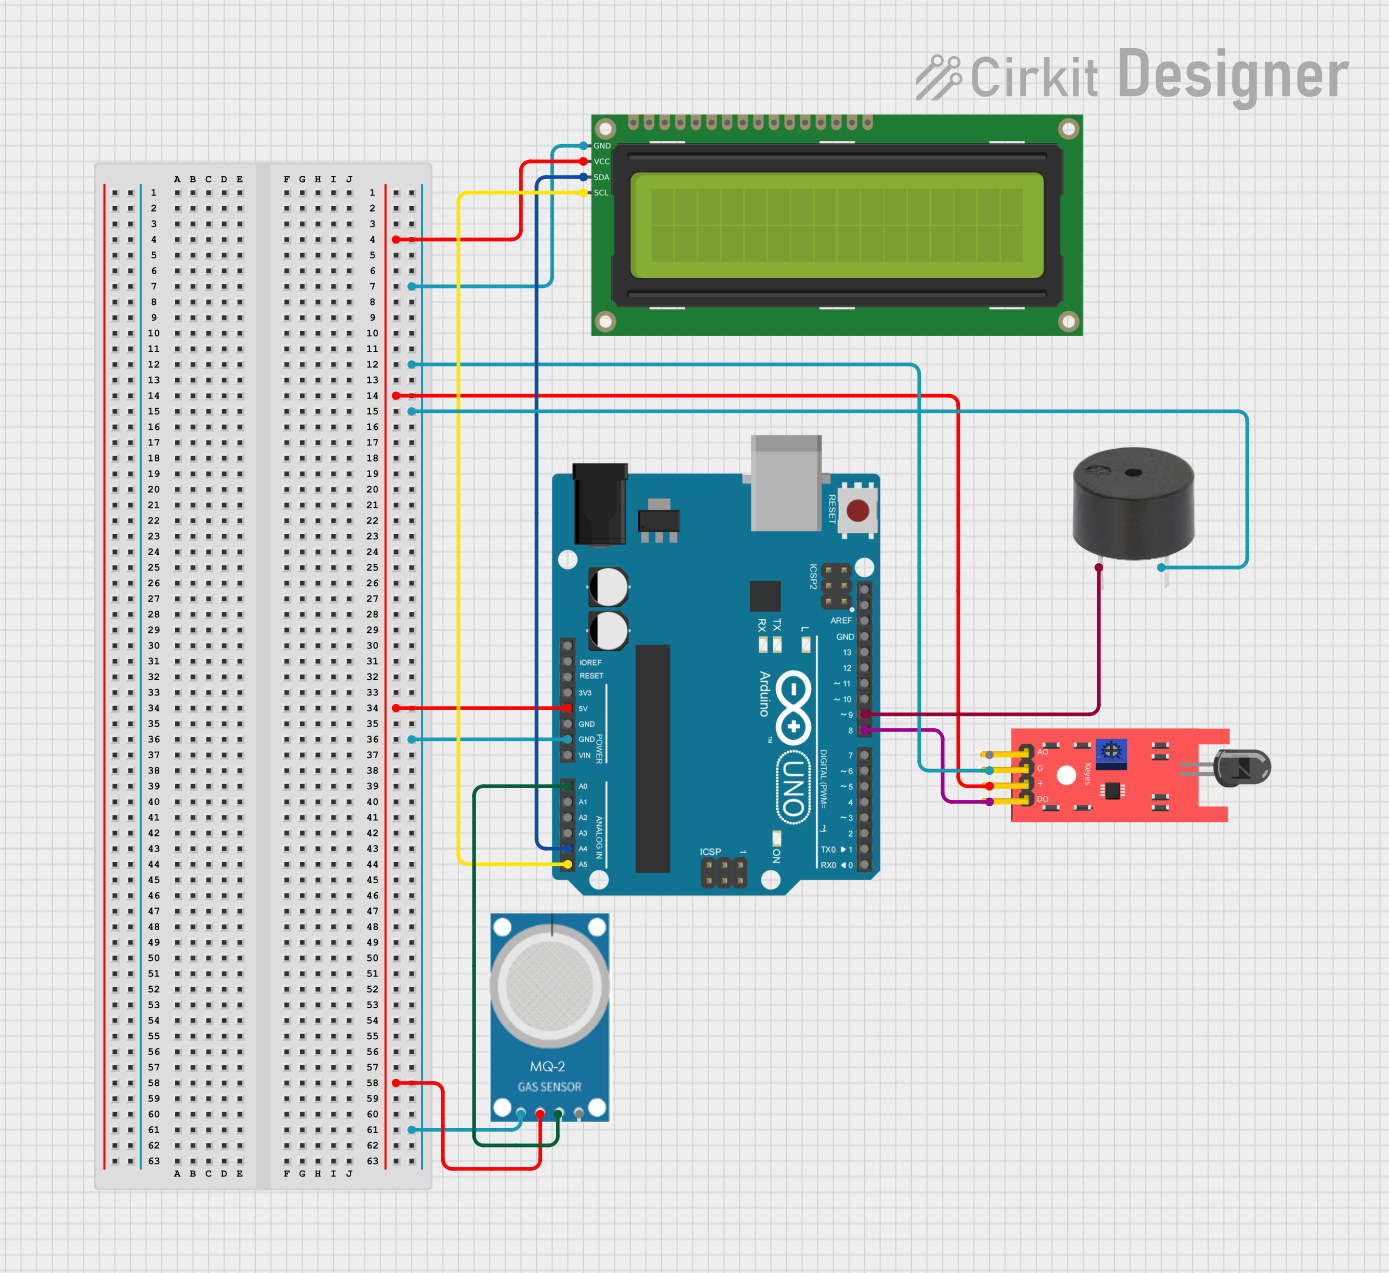
Circuit Documentation
Summary
This circuit is designed to detect gas and flame presence using an MQ-2 gas sensor and a KY-026 flame sensor. The data from these sensors is processed by an Arduino UNO, which then displays the status on a 16x2 I2C LCD. Additionally, a buzzer is used to provide audible alerts in case of detected threats.
Component List
Arduino UNO
- Description: A microcontroller board based on the ATmega328P.
- Pins: UNUSED, IOREF, Reset, 3.3V, 5V, GND, Vin, A0, A1, A2, A3, A4, A5, SCL, SDA, AREF, D13, D12, D11, D10, D9, D8, D7, D6, D5, D4, D3, D2, D1, D0
MQ-2 Gas Sensor
- Description: A sensor for detecting gas leaks (e.g., LPG, i-butane, propane, methane, alcohol, hydrogen, smoke).
- Pins: GND, VCC, ANALOG, Digital
KY-026 Flame Sensor
- Description: A sensor for detecting flame or light source in the wavelength range of 760nm to 1100nm.
- Pins: A0, GND, VCC, D0
16x2 I2C LCD
- Description: A 16x2 character LCD display with I2C interface.
- Pins: GND, VCC, SDA, SCL
Buzzer
- Description: A simple piezoelectric buzzer for sound alerts.
- Pins: PIN, GND
Wiring Details
Arduino UNO
- 5V: Connected to VCC of 16x2 I2C LCD, KY-026 Flame Sensor, and MQ-2 Gas Sensor.
- GND: Connected to GND of 16x2 I2C LCD, KY-026 Flame Sensor, MQ-2 Gas Sensor, and Buzzer.
- A0: Connected to ANALOG pin of MQ-2 Gas Sensor.
- A4: Connected to SDA pin of 16x2 I2C LCD.
- A5: Connected to SCL pin of 16x2 I2C LCD.
- D8: Connected to D0 pin of KY-026 Flame Sensor.
- D9: Connected to PIN of Buzzer.
MQ-2 Gas Sensor
- VCC: Connected to 5V of Arduino UNO.
- GND: Connected to GND of Arduino UNO.
- ANALOG: Connected to A0 of Arduino UNO.
KY-026 Flame Sensor
- VCC: Connected to 5V of Arduino UNO.
- GND: Connected to GND of Arduino UNO.
- D0: Connected to D8 of Arduino UNO.
16x2 I2C LCD
- VCC: Connected to 5V of Arduino UNO.
- GND: Connected to GND of Arduino UNO.
- SDA: Connected to A4 of Arduino UNO.
- SCL: Connected to A5 of Arduino UNO.
Buzzer
- PIN: Connected to D9 of Arduino UNO.
- GND: Connected to GND of Arduino UNO.
Code Documentation
#include <Wire.h>
#include <LiquidCrystal_I2C.h>

#define gasPin A0
#define flamePin 8

LiquidCrystal_I2C lcd(0x27, 16, 2);
int gasVal = 0;
int flameVal = 0;

void setup() {
  lcd.begin(16, 2);
  lcd.backlight();

  Serial.begin(9600);

  pinMode(gasPin, INPUT);
  pinMode(flamePin, INPUT);

  lcd.setCursor(0, 0);
  lcd.print("System Ready");
  delay(2000);
  lcd.clear();
}

void loop() {
  gasVal = analogRead(gasPin);
  flameVal = digitalRead(flamePin);

  if (gasVal > 300 && flameVal == LOW) {
    alert("Fire & Smoke!");
  } else if (gasVal > 500) {
    alert("Smoke Alert!");
  } else if (flameVal == LOW) {
    alert("Fire Alert!");
  } else {
    noAlert();
  }

  delay(500);
}

void alert(const char* message) {
  lcd.clear();
  lcd.setCursor(0, 0);
  lcd.print(message);
}

void noAlert() {
  lcd.clear();
  lcd.setCursor(0, 0);
  lcd.print("No Threats");
}
This code initializes the LCD and sets up the pins for the gas and flame sensors. In the main loop, it reads the sensor values and displays appropriate messages on the LCD based on the sensor readings. The alert function is used to display alert messages, while the noAlert function displays a "No Threats" message when no danger is detected.