
Circuit Documentation
Summary
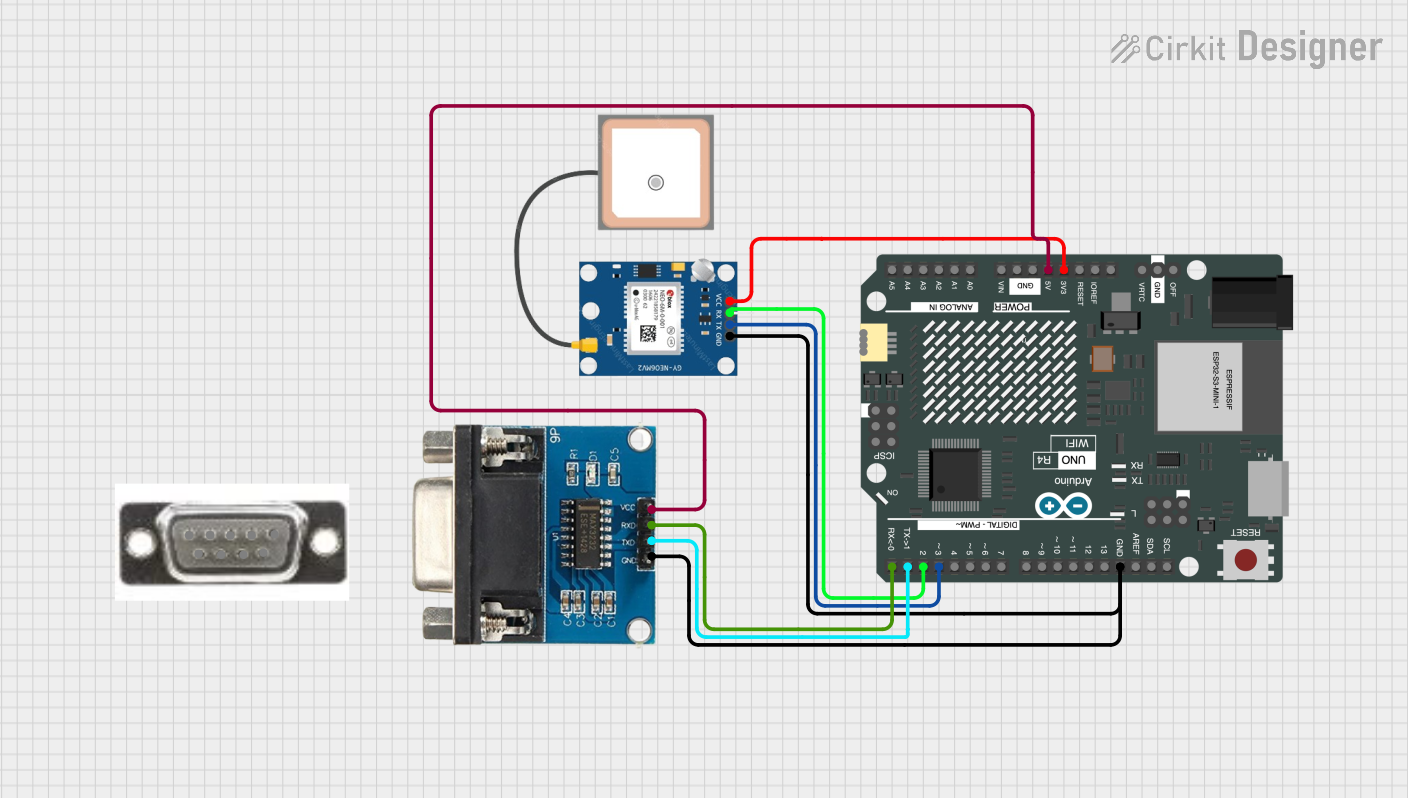
This circuit integrates an Arduino UNO R4 WiFi with a GPS NEO 6M module and a MAX 3232 MODULE for serial communication. The Arduino UNO R4 WiFi serves as the central processing unit, handling Wi-Fi connectivity, data processing, and communication with the OpenAI API to generate LED matrix patterns. The GPS NEO 6M module provides location data, while the MAX 3232 MODULE facilitates RS-232 serial communication, likely with a computer or another serial device.
Component List
Arduino UNO R4 WiFi
- Description: A microcontroller board based on the ATmega328P with integrated Wi-Fi capabilities.
- Pins: OFF, GND, VRTC, IIC0_SCL, IIC0_SDA, 3V3, GPIO 41, GPIO 0, GPIO 42, GPIO 43, GPIO 44, BOOT, IOREF, RESET, 5V, VIN, A0, A1, A2, A3, A4, A5, RSPCKA, CIPO, COPI, D0/RX, D1/TX, D2, D3, D4, D5, D6, D7, D8, D9, D10, D11, D12, D13, AREF, SDA, SCL.
GPS NEO 6M
- Description: A compact GPS module capable of providing accurate location data.
- Pins: VCC, RX, TX, GND.
MAX 3232 MODULE
- Description: An RS-232 driver/receiver module that facilitates serial communication.
- Pins: Gnd, TxD, RxD, Vcc.
Connecteur Sub-D Mâle 9 pins
- Description: A 9-pin male D-sub connector, commonly used for serial connections.
- Pins: 5 Gnd Ground, 4 DTR Data Terminal Ready, 3 RXD Receive Data, 02 TXD Transmit Data, 01 DCD Data Carrier Detect, 09 RI Ring Indicator, 08 RTS Request To Send, 07 CTS Clear to Send, 06 DSR Data Set Ready.
Wiring Details
Arduino UNO R4 WiFi
- 3V3 connected to GPS NEO 6M VCC
- 5V connected to MAX 3232 MODULE Vcc
- GND connected to MAX 3232 MODULE Gnd and GPS NEO 6M GND
- D0/RX connected to MAX 3232 MODULE RxD
- D1/TX connected to MAX 3232 MODULE TxD
- D2 connected to GPS NEO 6M RX
- D3 connected to GPS NEO 6M TX
GPS NEO 6M
- VCC connected to Arduino UNO R4 WiFi 3V3
- RX connected to Arduino UNO R4 WiFi D2
- TX connected to Arduino UNO R4 WiFi D3
- GND connected to Arduino UNO R4 WiFi GND
MAX 3232 MODULE
- Vcc connected to Arduino UNO R4 WiFi 5V
- RxD connected to Arduino UNO R4 WiFi D0/RX
- TxD connected to Arduino UNO R4 WiFi D1/TX
- Gnd connected to Arduino UNO R4 WiFi GND
Documented Code
Arduino UNO R4 WiFi Code (sketch.ino)
/**
 * @file sketch.ino
 *
 * This Arduino sketch connects to Wi-Fi and sends a request to the OpenAI API
 * to generate a pattern for the built-in LED matrix. It then displays the pattern
 * on the LED matrix.
 *
 * Before using:
 * - Enter your Wi-Fi SSID and password.
 * - Create an OpenAI API key and enter it in the code.
 */

// To use ArduinoGraphics APIs, please include BEFORE Arduino_LED_Matrix
#include "ArduinoGraphics.h"
#include "Arduino_LED_Matrix.h"
#include "WiFiS3.h"
#include "WiFiSSLClient.h"
#include "IPAddress.h"
#include "ArduinoJson.h"

// WiFi credentials
#define SECRET_SSID "Insert network name (SSID)"
#define SECRET_PASS "Insert network password"

char ssid[] = SECRET_SSID;  // your network SSID (name)
char pass[] = SECRET_PASS;  // your network password (use for WPA, or use as key for WEP)

int status = WL_IDLE_STATUS;
char server[] = "api.openai.com";

WiFiSSLClient client;

// OpenAI API Key
const char* openai_api_key = "Insert Open AI API Key";

// LED Matrix
ArduinoLEDMatrix matrix;

String userRequest = "";

/* -------------------------------------------------------------------------- */
void setup() {
/* -------------------------------------------------------------------------- */
  Serial.begin(9600);
  matrix.begin();

  // check for the WiFi module:
  if (WiFi.status() == WL_NO_MODULE) {
    Serial.println("Communication with WiFi module failed!");
    // don't continue
    while (true);
  }

  String fv = WiFi.firmwareVersion();
  if (fv < WIFI_FIRMWARE_LATEST_VERSION) {
    Serial.println("Please upgrade the firmware");
  }

  // attempt to connect to WiFi network:
  while (status != WL_CONNECTED) {
    Serial.print("Attempting to connect to SSID: ");
    Serial.println(ssid);
    status = WiFi.begin(ssid, pass);
    delay(10000);  // wait 10 seconds for connection
  }

  printWifiStatus();

  // Prompt user for input
  Serial.println("Please enter what you want to draw on the LED matrix:");
  while (userRequest == "") {
    if (Serial.available() > 0) {
      userRequest = Serial.readStringUntil('\n');
      userRequest.trim();
    }
  }

  Serial.println("\nStarting connection to OpenAI API...");
  // Connect to the OpenAI API server using TLS on port 443:
  if (client.connect(server, 443)) {
    Serial.println("Connected to OpenAI API server");

    // Prepare the OpenAI API request:
    String requestBody = "{"
    "\"model\":\"gpt-4o\","
    "\"messages\":[{"
        "\"role\":\"user\","
        "\"content\":\"Generate a 8 row x 12 column LED matrix pattern based on the following request: " + userRequest + ". The pattern should be a JSON object with a 8x12 grid of '0' and '1' characters, where '0' means the LED is off and '1' means the LED is on. Here is the JSON format: START_JSON{\"pattern\": [[\"0\", \"1\", ...], [\"1\", \"0\", ...], ...]}END_JSON\""
    "}],"
    "\"max_tokens\":2000"
    "}";
    // Send the HTTP POST request:
    client.println("POST /v1/chat/completions HTTP/1.1");
    client.println("Host: api.openai.com");
    client.println("Authorization: Bearer " + String(openai_api_key));
    client.println("Content-Type: application/json");
    client.print("Content-Length: ");
    client.println(requestBody.length());
    client.println();  // end of headers
    client.println(requestBody);  // send JSON body
  }
}

void read_response() {
  bool jsonStarted = false;
  String jsonResponse = "";
  String jsonString = "";

  while (client.available()) {
    String line = client.readStringUntil('\n');

    // Skip chunk size lines (e.g., "219")
    if (line.length() > 0 && isHexadecimalDigit(line[0])) {
      continue;
    }

    if (line == "\r") {
      // This is the end of the headers, the JSON body starts next
      jsonStarted = true;
    } else if (jsonStarted) {
      jsonResponse += line;
    }
  }

  Serial.println(jsonResponse);

  // Now that we have the full response, let's extract the JSON object
  int jsonStartIndex = jsonResponse.indexOf("START_JSON");
  int jsonEndIndex = jsonResponse.indexOf("END_JSON");

  if (jsonStartIndex != -1 && jsonEndIndex != -1) {
    jsonString = jsonResponse.substring(jsonStartIndex + 10, jsonEndIndex);
  }

  // Print the extracted JSON string for debugging
  Serial.println("Extracted JSON String:");
  Serial.println(jsonString);

  // Now that we have the JSON string, let's parse it
  if (jsonString.length() > 0) {
    // Clean up the JSON string (remove escape sequences, etc.)
    jsonString.replace("\\n", "");
    jsonString.replace("\\\"", "\"");

    Serial.println("Cleaned JSON String:");
    Serial.println(jsonString);

    // Parse JSON response
    DynamicJsonDocument doc(2048);
    DeserializationError error = deserializeJson(doc, jsonString);

    if (!error) {
      // Extract the pattern from the assistant's message
      JsonArray patternArray = doc["pattern"].as<JsonArray>();
      Serial.println("Pattern received:");

      // Print the pattern to the serial monitor
      for (int y = 0; y < 8; y++) {
        JsonArray row = patternArray[y].as<JsonArray>();
        for (int x = 0; x < 12; x++) {
          Serial.print(row[x].as<const char*>());
        }