
Arduino UNO Controlled TM1637 Display and SG90 Servo Motor Interface
View and Edit Project In Cirkit Designer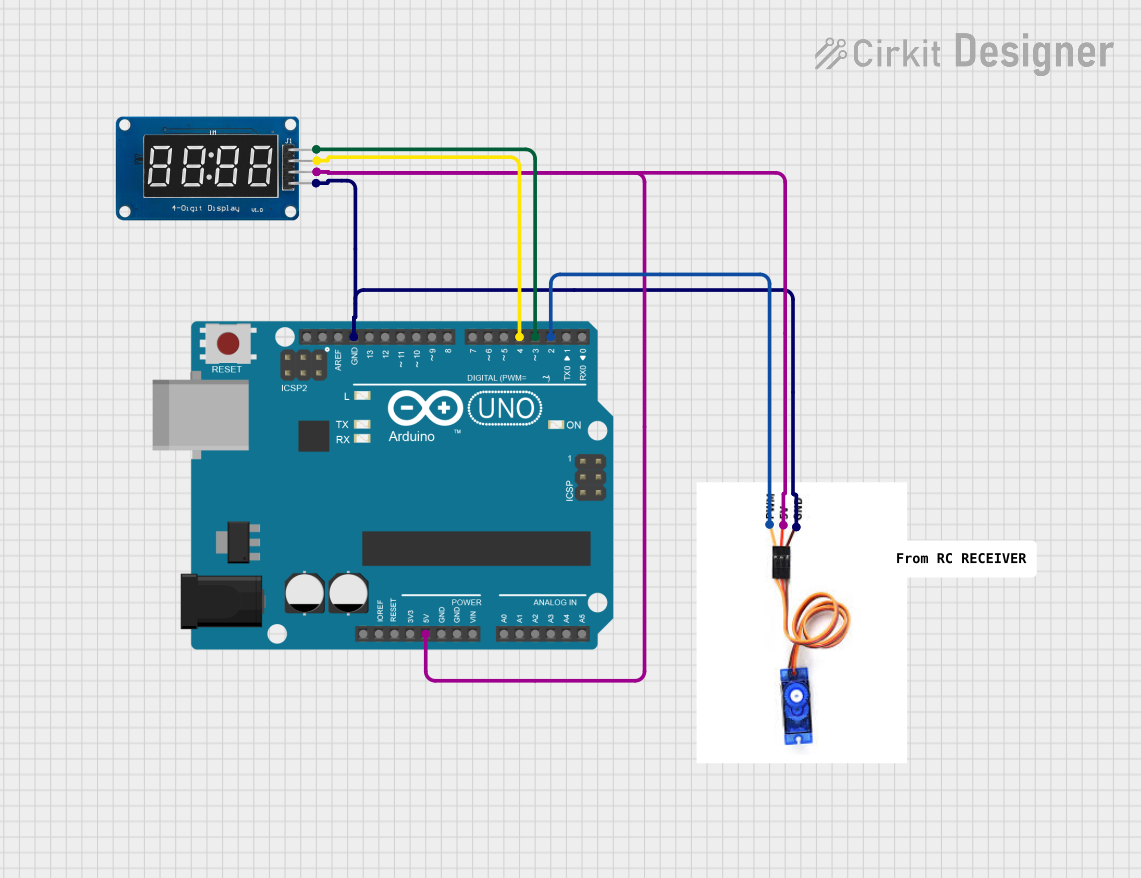
Circuit Documentation
Summary of the Circuit
This circuit consists of an Arduino UNO microcontroller, a TM1637 4-digit 7-segment display module, and an SG90 servo motor. The Arduino UNO serves as the central processing unit, controlling the display module and the servo motor. The TM1637 display module is used to show numerical data, and the SG90 servo motor is controlled by the Arduino to rotate to specific angles based on the program logic. The circuit is powered by the 5V output from the Arduino UNO, which is shared across the components. Ground connections are also shared, creating a common reference point for all components.
Component List
Arduino UNO
- Description: A microcontroller board based on the ATmega328P.
- Purpose: Acts as the central controller for the circuit, interfacing with the display module and the servo motor.
TM1637
- Description: A 4-digit 7-segment display module with a built-in controller for easy interfacing.
- Purpose: Displays numerical data as instructed by the Arduino UNO.
SG90 Servo Motor
- Description: A small and lightweight servo motor capable of precise angular movement.
- Purpose: Moves to positions as commanded by the Arduino UNO.
Comment
- Description: A placeholder for additional notes or comments within the circuit design.
- Purpose: Provides context or explanations within the circuit documentation.
Wiring Details
Arduino UNO
- 5V: Provides power to the SG90 servo motor and the TM1637 display module.
- GND: Common ground for the circuit.
- D4: Connected to the DIO pin of the TM1637 display module.
- D3: Connected to the CLK pin of the TM1637 display module.
- D2: Connected to the PWM pin of the SG90 servo motor.
TM1637
- CLK: Receives clock signals from pin D3 of the Arduino UNO.
- DIO: Receives data signals from pin D4 of the Arduino UNO.
- VCC: Powered by the 5V pin of the Arduino UNO.
- GND: Connected to the common ground.
SG90 Servo Motor
- PWM: Receives pulse width modulation signals from pin D2 of the Arduino UNO.
- 5V: Powered by the 5V pin of the Arduino UNO.
- GND: Connected to the common ground.
Documented Code
Arduino UNO Code (sketch.ino)
void setup() {
  // put your setup code here, to run once:

}

void loop() {
  // put your main code here, to run repeatedly:

}
Additional Notes (documentation.txt)
No additional code documentation was provided.