
Arduino UNO Controlled Stepper Motor with Piezo Speaker and Pushbutton
View and Edit Project In Cirkit Designer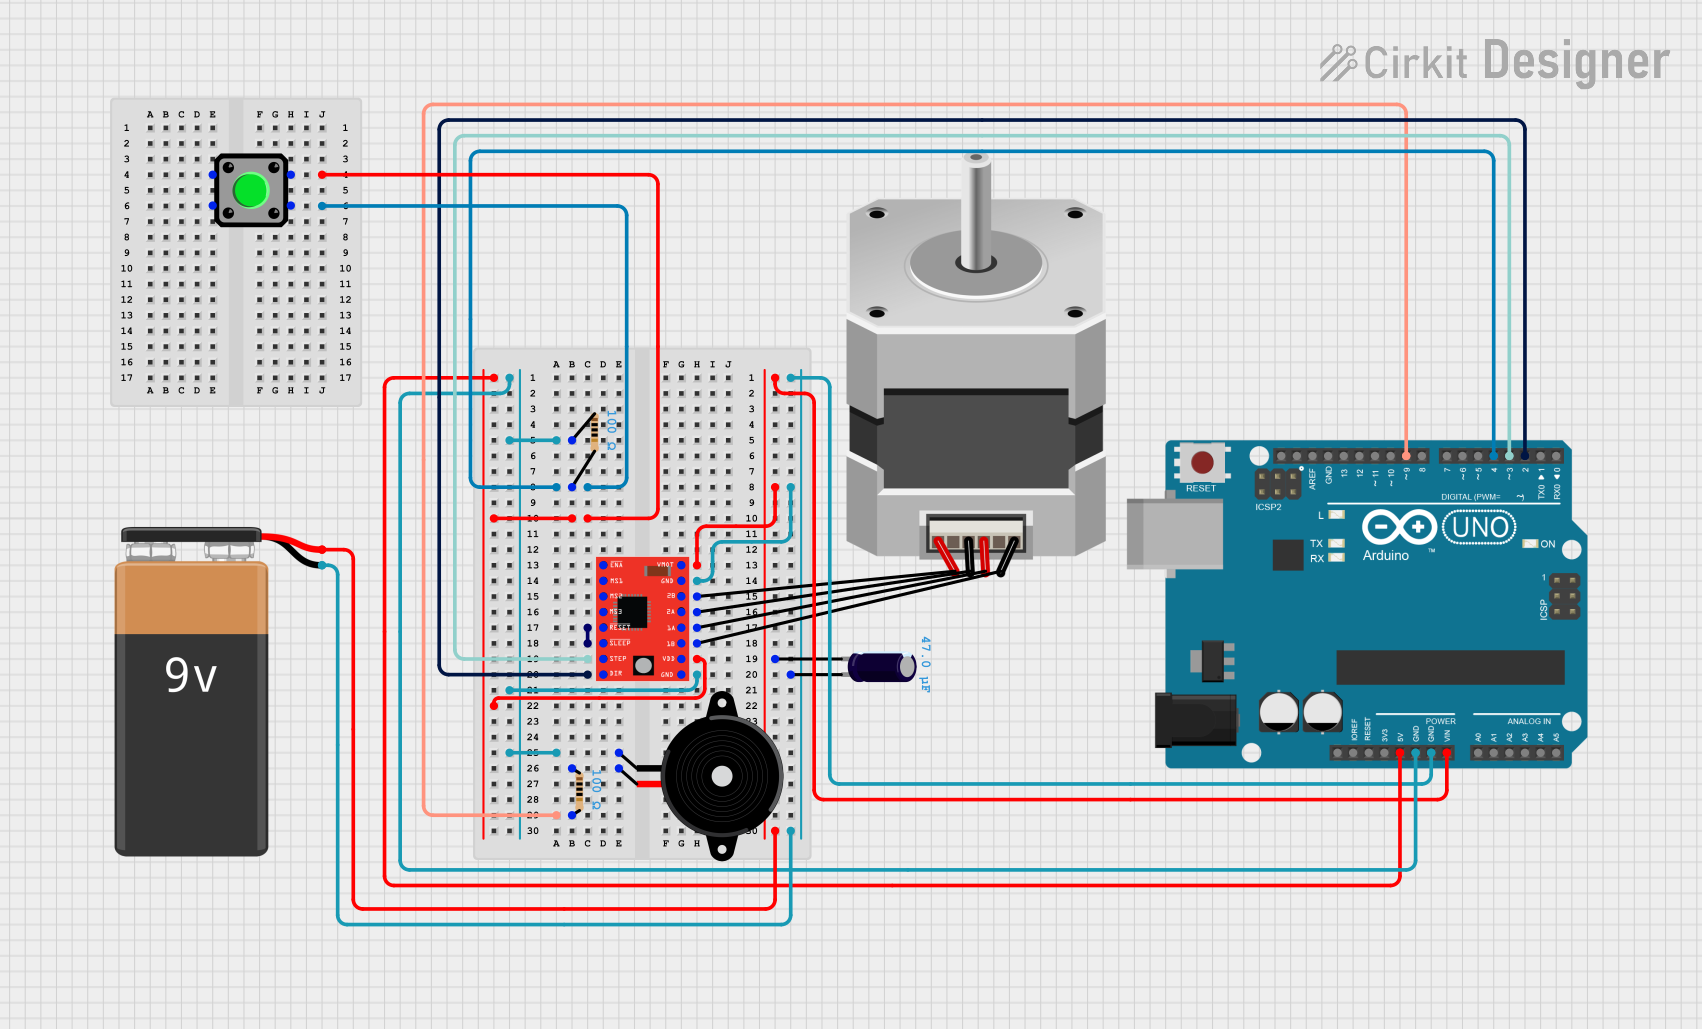
Circuit Documentation
Summary
This document provides a detailed overview of a circuit that includes a variety of components such as a Piezo Speaker, Resistors, a Stepper Motor Driver, an Electrolytic Capacitor, an Arduino UNO, a Bipolar Stepper Motor, a Pushbutton, and a 9V Battery. The circuit is designed to control a stepper motor and includes a piezo speaker for audio feedback. The Arduino UNO microcontroller is used to manage the operations of the circuit.
Component List
Piezo Speaker
- Description: A device that produces sound when an electric signal is applied.
- Pins: pin1, pin2
Resistor (100 Ohms)
- Description: A passive electrical component that provides resistance to the flow of current.
- Pins: pin1, pin2
- Properties:
- Resistance: 100 Ohms
A4988 Stepper Motor Driver (Red)
- Description: A driver module used to control bipolar stepper motors.
- Pins: ENABLE, MS1, MS2, MS3, RESET, SLEEP, STEP, DIR, VMOT, GND, 2B, 2A, 1A, 1B, VDD
Electrolytic Capacitor (47 µF)
- Description: A type of capacitor that uses an electrolyte to achieve a larger capacitance.
- Pins: -, +
- Properties:
- Capacitance: 47 µF
Arduino UNO
- Description: A microcontroller board based on the ATmega328P.
- Pins: UNUSED, IOREF, Reset, 3.3V, 5V, GND, Vin, A0, A1, A2, A3, A4, A5, SCL, SDA, AREF, D13, D12, D11, D10, D9, D8, D7, D6, D5, D4, D3, D2, D1, D0
Stepper Motor (Bipolar)
- Description: A type of motor that moves in discrete steps, used for precise control.
- Pins: D, B, C, A
Pushbutton
- Description: A simple switch mechanism for controlling some aspect of a machine or process.
- Pins: Pin 2, Pin 1, Pin 3, Pin 4
9V Battery
- Description: A common battery type used to power electronic devices.
- Pins: -, +
Wiring Details
Piezo Speaker
pin1 is connected to:
- Resistor pin1
- A4988 Stepper Motor Driver GND
- Arduino UNO GND
pin2 is connected to:
- Resistor pin1
Resistor (100 Ohms)
pin1 is connected to:
- Piezo Speaker pin1
- A4988 Stepper Motor Driver GND
- Arduino UNO GND
pin2 is connected to:
- Pushbutton Pin 4
- Arduino UNO D4
A4988 Stepper Motor Driver (Red)
GND is connected to:
- Resistor pin1
- Piezo Speaker pin1
- Arduino UNO GND
VDD is connected to:
- Pushbutton Pin 1
- Arduino UNO 5V
VMOT is connected to:
- Electrolytic Capacitor -
- Arduino UNO Vin
- 9V Battery +
RESET is connected to:
- SLEEP
STEP is connected to:
- Arduino UNO D3
DIR is connected to:
- Arduino UNO D2
2B is connected to:
- Stepper Motor (Bipolar) A
2A is connected to:
- Stepper Motor (Bipolar) C
1A is connected to:
- Stepper Motor (Bipolar) B
1B is connected to:
- Stepper Motor (Bipolar) D
Electrolytic Capacitor (47 µF)
- is connected to:
- A4988 Stepper Motor Driver VMOT
- Arduino UNO Vin
- 9V Battery +
+ is connected to:
- A4988 Stepper Motor Driver GND
- Arduino UNO GND
- 9V Battery -
Arduino UNO
GND is connected to:
- Resistor pin1
- Piezo Speaker pin1
- A4988 Stepper Motor Driver GND
- Electrolytic Capacitor +
5V is connected to:
- Pushbutton Pin 1
- A4988 Stepper Motor Driver VDD
Vin is connected to:
- A4988 Stepper Motor Driver VMOT
- Electrolytic Capacitor -
- 9V Battery +
D4 is connected to:
- Resistor pin2
- Pushbutton Pin 4
D3 is connected to:
- A4988 Stepper Motor Driver STEP
D2 is connected to:
- A4988 Stepper Motor Driver DIR
D9 is connected to:
- Resistor pin2
Stepper Motor (Bipolar)
A is connected to:
- A4988 Stepper Motor Driver 2B
C is connected to:
- A4988 Stepper Motor Driver 2A
B is connected to:
- A4988 Stepper Motor Driver 1A
D is connected to:
- A4988 Stepper Motor Driver 1B
Pushbutton
Pin 1 is connected to:
- A4988 Stepper Motor Driver VDD
- Arduino UNO 5V
Pin 4 is connected to:
- Resistor pin2
- Arduino UNO D4
9V Battery
+ is connected to:
- A4988 Stepper Motor Driver VMOT
- Electrolytic Capacitor -
- Arduino UNO Vin
- is connected to:
- A4988 Stepper Motor Driver GND
- Electrolytic Capacitor +
- Arduino UNO GND
Documented Code
Arduino UNO Code (sketch.ino)
void setup() {
  // put your setup code here, to run once:

}

void loop() {
  // put your main code here, to run repeatedly:

}
This code is a basic template for the Arduino UNO. The setup() function is where you initialize your settings, and the loop() function is where you place the main code that runs repeatedly.