
Arduino UNO Joystick-Controlled Traffic Light System with Push Button Override
View and Edit Project In Cirkit Designer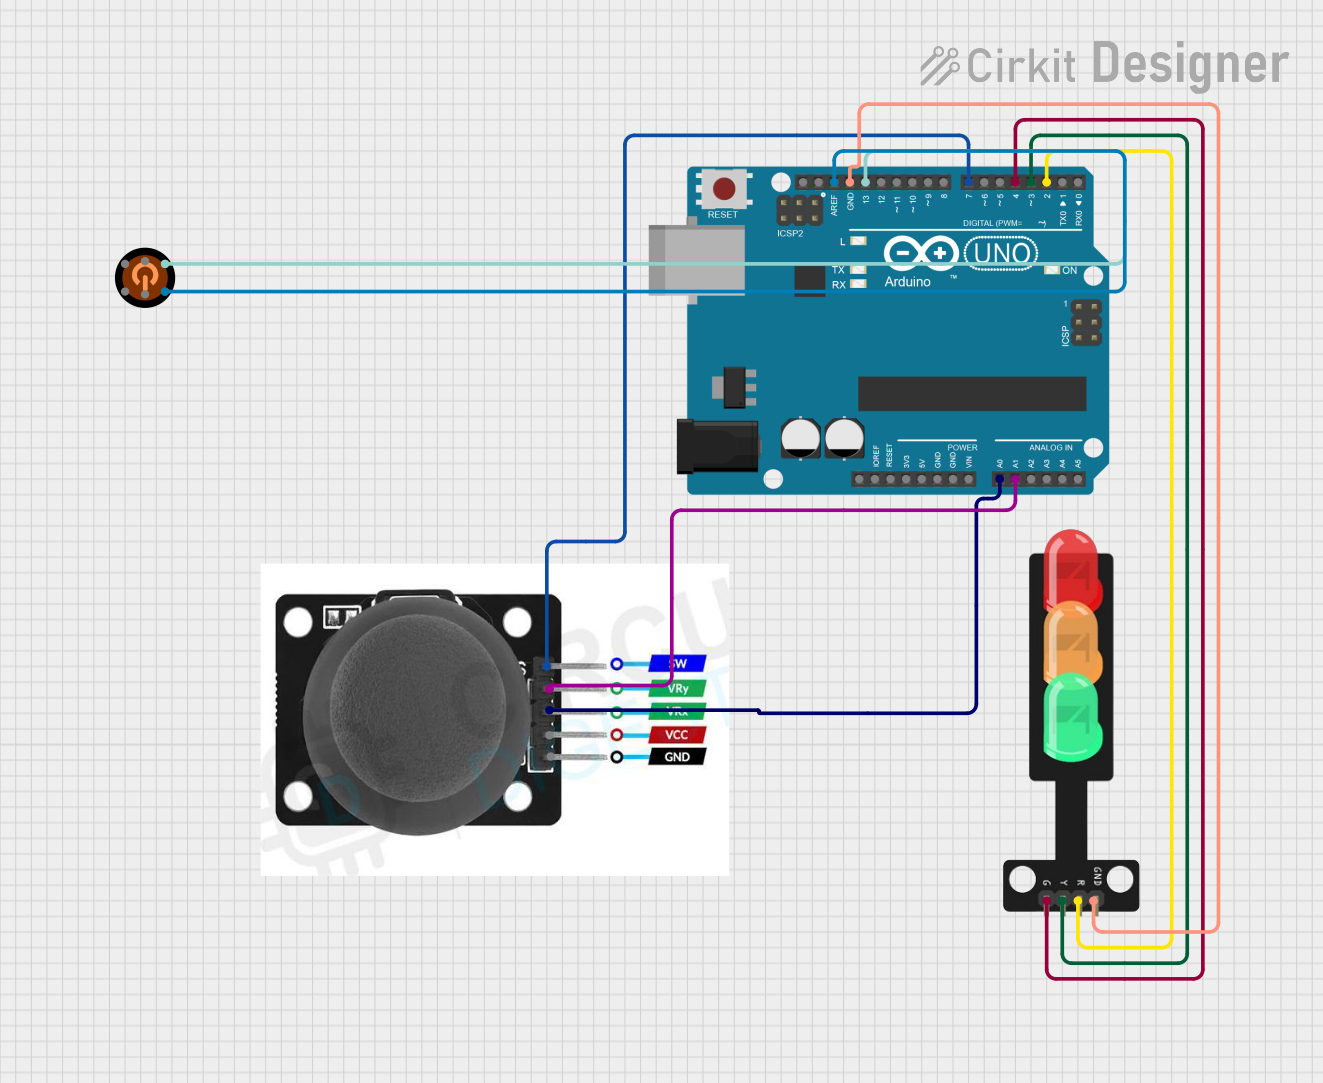
Circuit Documentation
Summary
This circuit is designed to control a traffic light system using a joystick module and an Arduino UNO. The joystick module allows the user to control the state of the traffic lights (red, yellow, green) based on the direction the joystick is moved. Additionally, a push button is included to turn off all LEDs regardless of the joystick position.
Component List
Arduino UNO
- Description: A microcontroller board based on the ATmega328P.
- Pins: UNUSED, IOREF, Reset, 3.3V, 5V, GND, Vin, A0, A1, A2, A3, A4, A5, SCL, SDA, AREF, D13, D12, D11, D10, D9, D8, D7, D6, D5, D4, D3, D2, D1, D0
Traffic Light
- Description: A module with three LEDs (Green, Yellow, Red) and a ground pin.
- Pins: Green, Yellow, Red, GND
Joystick Module
- Description: A module with a joystick that provides analog outputs for X and Y axes and a digital output for a button press.
- Pins: SW, VRY, VRX, VCC, GND
3104 Push Button
- Description: A push button with multiple pins.
- Pins: pin 2, pin 5, pin 1, pin 3, pin 6, pin 4
Wiring Details
Arduino UNO
- A0 connected to Joystick Module VRX
- A1 connected to Joystick Module VRY
- AREF connected to 3104 Push Button pin 1
- GND connected to Traffic Light GND
- D13 connected to 3104 Push Button pin 3
- D7 connected to Joystick Module SW
- D4 connected to Traffic Light Green
- D3 connected to Traffic Light Yellow
- D2 connected to Traffic Light Red
Traffic Light
- Green connected to Arduino UNO D4
- Yellow connected to Arduino UNO D3
- Red connected to Arduino UNO D2
- GND connected to Arduino UNO GND
Joystick Module
- VRX connected to Arduino UNO A0
- VRY connected to Arduino UNO A1
- SW connected to Arduino UNO D7
3104 Push Button
- pin 1 connected to Arduino UNO AREF
- pin 3 connected to Arduino UNO D13
Code Documentation
Arduino UNO Code
/*
 * This Arduino sketch controls a traffic light system using a joystick module.
 * When the joystick is moved up, the red LED turns on.
 * When the joystick is moved left, the yellow LED turns on.
 * When the joystick is moved right, the green LED turns on.
 * When the joystick is moved down, all LEDs turn on.
 * Additionally, a push button is connected to pin 13, and when pressed, it
 * will turn off all LEDs regardless of the joystick position.
 */

// Pin definitions
const int VRX_PIN = A0; // Joystick X-axis
const int VRY_PIN = A1; // Joystick Y-axis
const int SW_PIN = 7;   // Joystick button (not used)
const int RED_LED_PIN = 2;   // Red LED
const int YELLOW_LED_PIN = 3; // Yellow LED
const int GREEN_LED_PIN = 4;  // Green LED
const int BUTTON_PIN = 13;    // Push button

void setup() {
  // Initialize serial communication
  Serial.begin(9600);

  // Set LED pins as outputs
  pinMode(RED_LED_PIN, OUTPUT);
  pinMode(YELLOW_LED_PIN, OUTPUT);
  pinMode(GREEN_LED_PIN, OUTPUT);

  // Set joystick button pin as input
  pinMode(SW_PIN, INPUT);

  // Set push button pin as input
  pinMode(BUTTON_PIN, INPUT);
}

void loop() {
  // Read joystick values
  int xValue = analogRead(VRX_PIN);
  int yValue = analogRead(VRY_PIN);

  // Read push button state
  int buttonState = digitalRead(BUTTON_PIN);

  // If button is pressed, turn off all LEDs
  if (buttonState == HIGH) {
    digitalWrite(RED_LED_PIN, LOW);
    digitalWrite(YELLOW_LED_PIN, LOW);
    digitalWrite(GREEN_LED_PIN, LOW);
  } else {
    // Determine joystick direction
    if (yValue < 300) { // Joystick moved up
      digitalWrite(RED_LED_PIN, HIGH);
      digitalWrite(YELLOW_LED_PIN, LOW);
      digitalWrite(GREEN_LED_PIN, LOW);
    } else if (xValue < 300) { // Joystick moved left
      digitalWrite(RED_LED_PIN, LOW);
      digitalWrite(YELLOW_LED_PIN, HIGH);
      digitalWrite(GREEN_LED_PIN, LOW);
    } else if (xValue > 700) { // Joystick moved right
      digitalWrite(RED_LED_PIN, LOW);
      digitalWrite(YELLOW_LED_PIN, LOW);
      digitalWrite(GREEN_LED_PIN, HIGH);
    } else if (yValue > 700) { // Joystick moved down
      digitalWrite(RED_LED_PIN, HIGH);
      digitalWrite(YELLOW_LED_PIN, HIGH);
      digitalWrite(GREEN_LED_PIN, HIGH);
    } else { // Joystick in neutral position
      digitalWrite(RED_LED_PIN, LOW);
      digitalWrite(YELLOW_LED_PIN, LOW);
      digitalWrite(GREEN_LED_PIN, LOW);
    }
  }

  // Small delay to stabilize readings
  delay(100);
}
Traffic Light Code
void setup() {
  // put your setup code here, to run once:

}

void loop() {
  // put your main code here, to run repeatedly:

}
This documentation provides a comprehensive overview of the circuit, including a summary, detailed component list, wiring details, and the code used in the microcontroller.