
Arduino-Controlled Fire-Extinguishing Robot with Bluetooth Interface
View and Edit Project In Cirkit Designer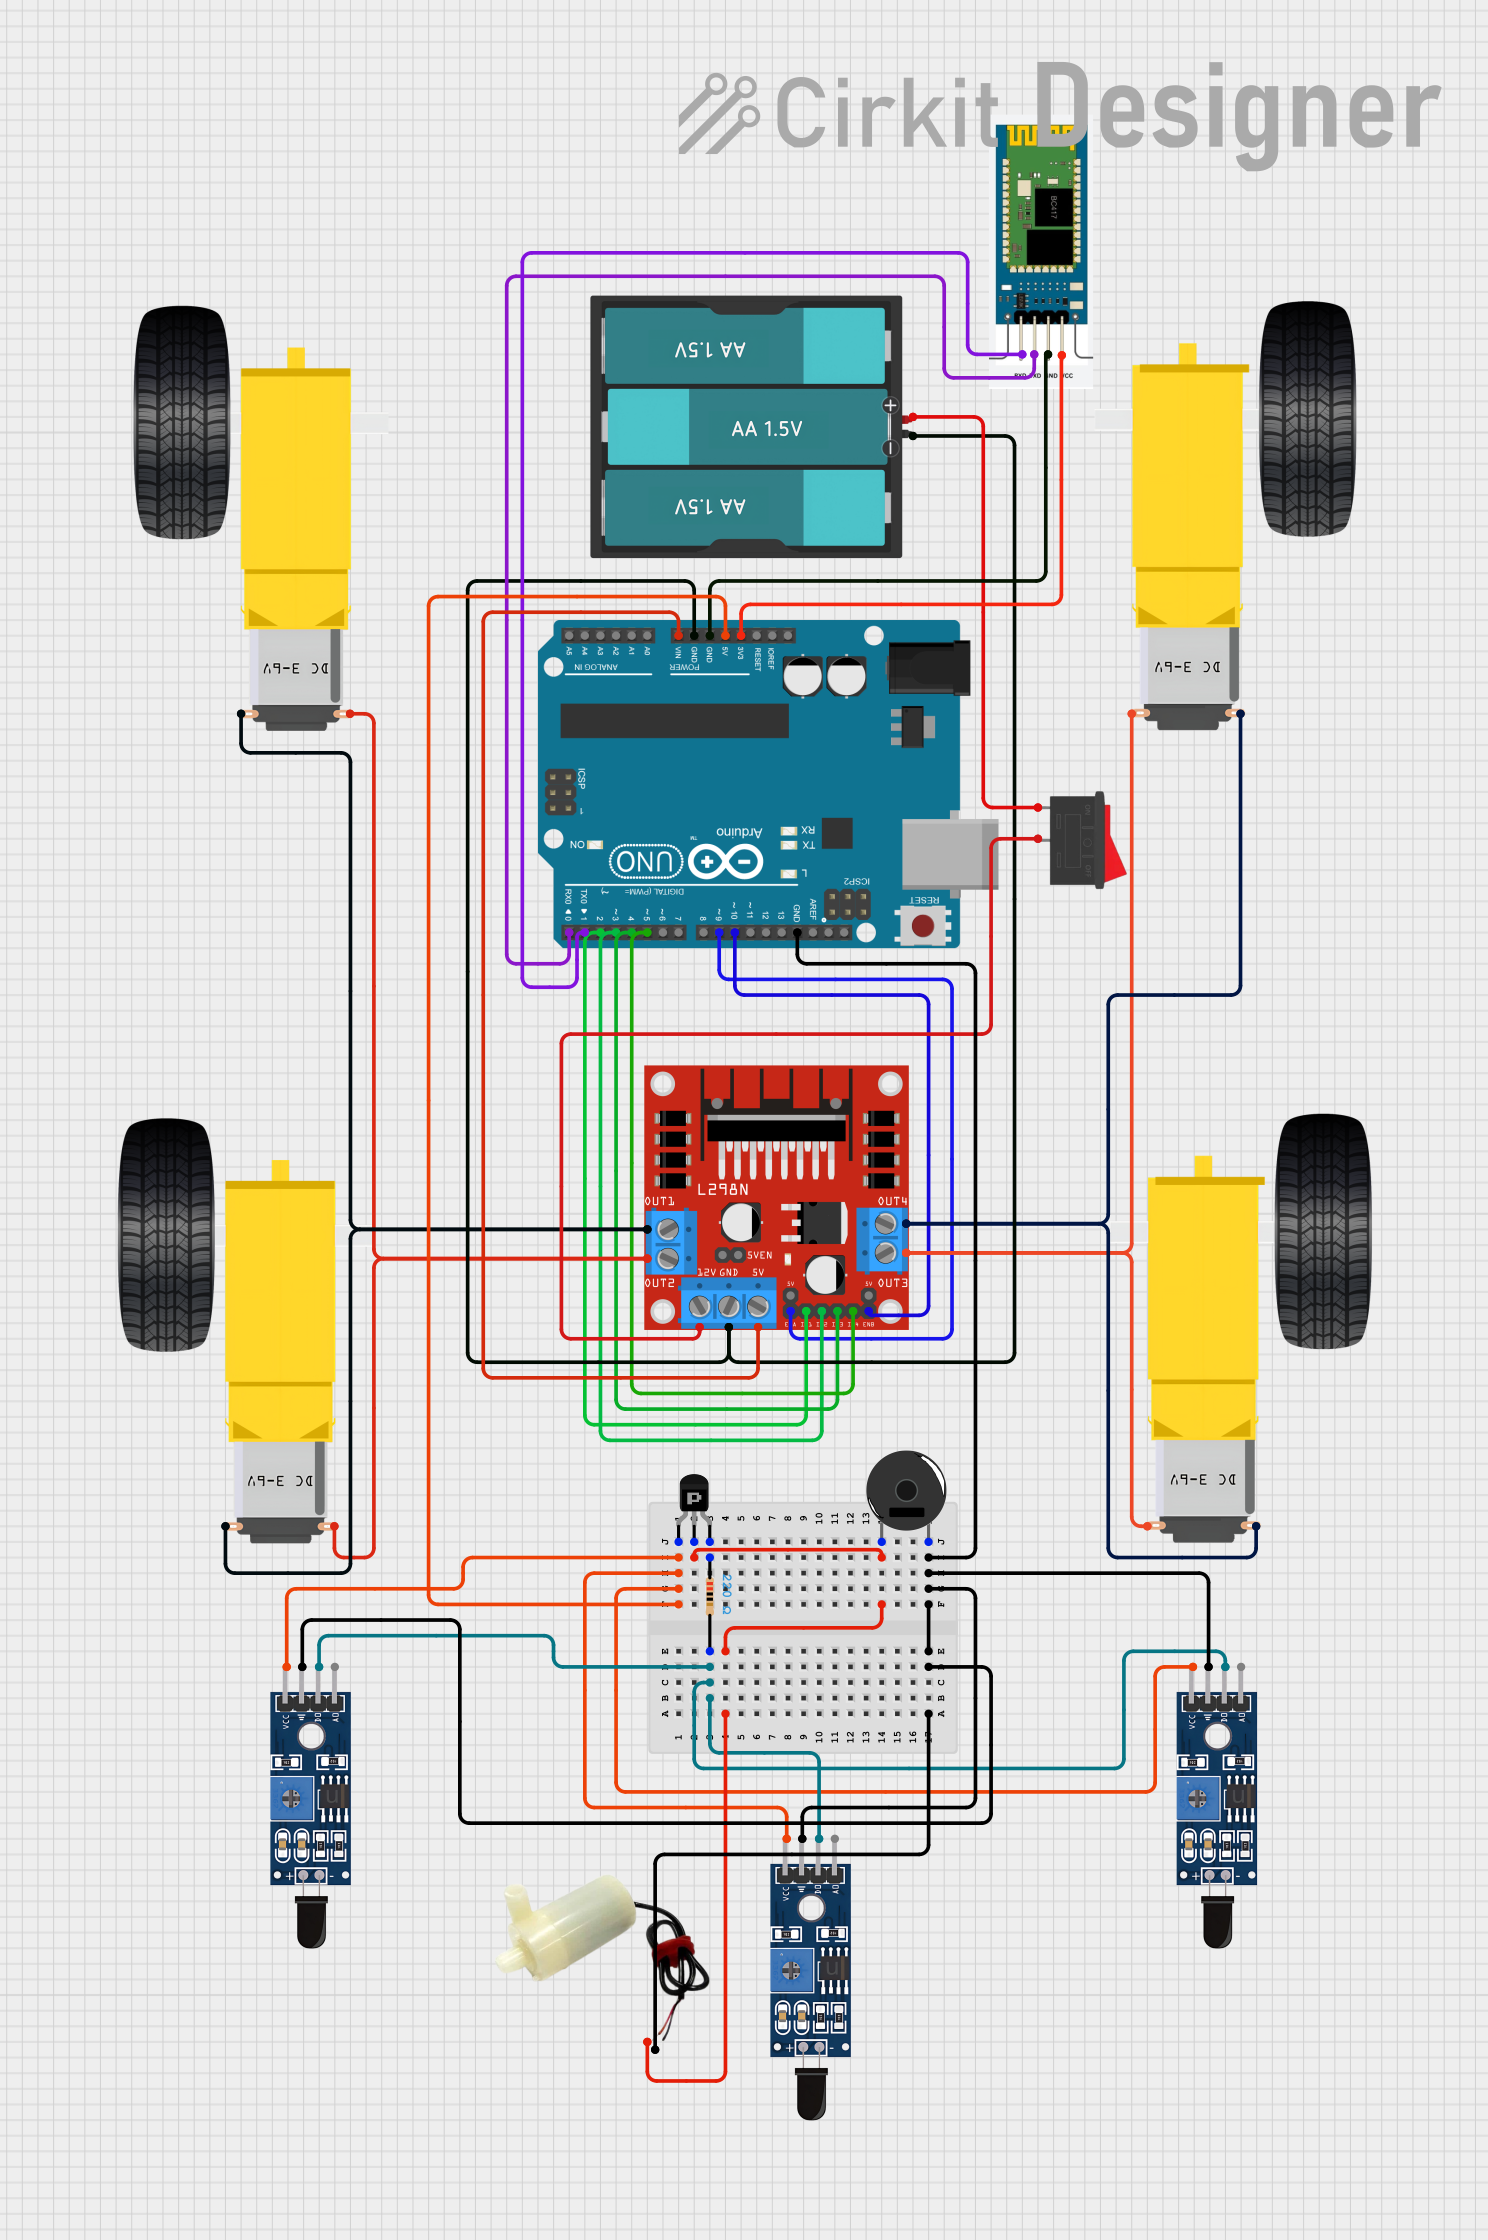
Circuit Documentation
Summary of the Circuit
This circuit is designed to control a 4-wheeled robot with the capability to move in different directions (forward, backward, left, and right) based on serial commands. It also features a fire detection system using flame sensors and can activate a water pump as a fire extinguishing mechanism. The brain of the robot is an Arduino UNO microcontroller, which processes the input commands and sensor data to control the motors and the extinguisher. The motors are driven by an L298N DC motor driver, and the system is powered by a 4.5V battery pack. A PNP transistor is used to control the power to the piezo buzzer and water pump, which are activated when fire is detected.
Component List
- Gearmotor DC Wheels (Left and Right): These are the motors that drive the wheels of the robot.
- Sensor SHT113 Flame: These sensors are used to detect the presence of fire.
- 5v Mini Water Pump: This pump is activated to extinguish the fire when detected by the flame sensors.
- Rocker Switch: This switch controls the power supply to the circuit.
- Battery AAx3 4.5V: This battery pack provides the power source for the circuit.
- PNP Transistor (ECB): This transistor is used to control the activation of the piezo buzzer and water pump.
- Resistor (220 Ohms): This resistor is connected to the base of the PNP transistor.
- L298N DC Motor Driver: This component is used to control the direction and speed of the motors.
- HC-06: This is a Bluetooth module that allows for wireless communication with the Arduino.
- Arduino UNO: The main microcontroller board that controls the robot's operations.
- Piezo Buzzer: An audible indicator that can be used for alerts or notifications.
Wiring Details
Gearmotor DC Wheels (Left and Right)
- Left Motor:
- PIN1 connected to L298N DC motor driver OUT3
- PIN2 connected to L298N DC motor driver OUT4
- Right Motor:
- PIN1 connected to L298N DC motor driver OUT1
- PIN2 connected to L298N DC motor driver OUT2
Sensor SHT113 Flame
- All Flame Sensors:
- A0 connected to individual analog pins on the Arduino UNO
- D0 connected to the resistor and then to the PNP transistor base
- GND connected to the common ground net
- VCC connected to the 5V net from the Arduino UNO
5v Mini Water Pump
- Positive pin connected to the collector of the PNP transistor
- Negative pin connected to the common ground net
Rocker Switch
- Pin 1 connected to the VCC of the Battery AAx3 4.5V
- Pin 2 connected to the 12V input of the L298N DC motor driver
Battery AAx3 4.5V
- VCC connected to the Rocker Switch
- GND connected to the common ground net
PNP Transistor (ECB)
- Emitter connected to the 5V net from the Arduino UNO
- Collector connected to the positive pin of the 5v mini water pump and pin 1 of the Piezo Buzzer
- Base connected to the 220 Ohm resistor
Resistor (220 Ohms)
- Pin1 connected to the base of the PNP transistor
- Pin2 connected to the D0 pins of the flame sensors
L298N DC Motor Driver
- OUT1, OUT2, OUT3, OUT4 connected to the respective pins of the Gearmotor DC Wheels
- 12V connected to the Rocker Switch
- GND connected to the common ground net
- 5V connected to the Vin pin of the Arduino UNO
- ENA, ENB connected to the respective PWM pins on the Arduino UNO
- IN1, IN2, IN3, IN4 connected to the respective digital pins on the Arduino UNO
HC-06 Bluetooth Module
- RXD connected to D1 (TX) on the Arduino UNO
- TXD connected to D0 (RX) on the Arduino UNO
- GND connected to the common ground net
- VCC connected to the 3.3V output on the Arduino UNO
Arduino UNO
- 5V connected to the VCC pins of the flame sensors and the emitter of the PNP transistor
- GND connected to the common ground net
- Vin connected to the 5V input of the L298N DC motor driver
- Digital pins D0-D10 connected to the HC-06 Bluetooth module and L298N DC motor driver as per the code
Piezo Buzzer
- Pin 1 connected to the collector of the PNP transistor
- Pin 2 connected to the common ground net
Documented Code
/*
 * 4-Wheeled Robot Control and Fire Extinguishing
 *
 * This Arduino sketch controls a 4-wheeled robot. The robot can move forward,
 * backward, left, and right based on serial commands. Additionally, it can
 * detect fire using a sensor and activate a mechanism to extinguish the fire.
 */

int A_IN1 = 2;
int A_IN2 = 3;
int B_IN3 = 4;
int B_IN4 = 5;
int A_PWM = 9;
int B_PWM = 10;
int fireSensor = A0; // Analog pin for fire sensor
int extinguisher = 6; // Digital pin for fire extinguisher
int spd = 200;
char sms;

void setup() {
  Serial.begin(9600);
  pinMode(A_IN1, OUTPUT);
  pinMode(A_IN2, OUTPUT);
  pinMode(B_IN3, OUTPUT);
  pinMode(B_IN4, OUTPUT);
  pinMode(A_PWM, OUTPUT);
  pinMode(B_PWM, OUTPUT);
  pinMode(fireSensor, INPUT);
  pinMode(extinguisher, OUTPUT);
}

void loop() {
  if (Serial.available()) {
    sms = Serial.read();
  }
  analogWrite(A_PWM, spd);
  analogWrite(B_PWM, spd);
  if (sms == 'S') {
    Stop();
  }
  if (sms == 'F') {
    Forward();
  }
  if (sms == 'B') {
    Backward();
  }
  if (sms == 'R') {
    Right();
  }
  if (sms == 'L') {
    Left();
  }
  if (sms >= '0' && sms <= '9') {
    spd = map(sms - '0', 0, 9, 0, 255);
  }
  if (analogRead(fireSensor) > 500) { // Fire detected
    activateExtinguisher();
  }
}

void Forward() {
  digitalWrite(A_IN1, HIGH);
  digitalWrite(A_IN2, LOW);
  digitalWrite(B_IN3, HIGH);
  digitalWrite(B_IN4, LOW);
}

void Backward() {
  digitalWrite(A_IN1, LOW);
  digitalWrite(A_IN2, HIGH);
  digitalWrite(B_IN3, LOW);
  digitalWrite(B_IN4, HIGH);
}

void Right() {
  digitalWrite(A_IN1, LOW);
  digitalWrite(A_IN2, LOW);
  digitalWrite(B_IN3, HIGH);
  digitalWrite(B_IN4, LOW);
}

void Left() {
  digitalWrite(A_IN1, HIGH);
  digitalWrite(A_IN2, LOW);
  digitalWrite(B_IN3, LOW);
  digitalWrite(B_IN4, LOW);
}

void Stop() {
  digitalWrite(A_IN1, LOW);
  digitalWrite(A_IN2, LOW);
  digitalWrite(B_IN3, LOW);
  digitalWrite(B_IN4, LOW);
}

void activateExtinguisher() {
  digitalWrite(extinguisher, HIGH);
  delay(5000); // Keep extinguisher on for 5 seconds
  digitalWrite(extinguisher, LOW);
}
This code is responsible for controlling the robot's movements and handling the fire detection and extinguishing process. It sets up the necessary pins as inputs or outputs, reads serial commands to control the robot's movements, and activates the extinguisher when a fire is detected.