
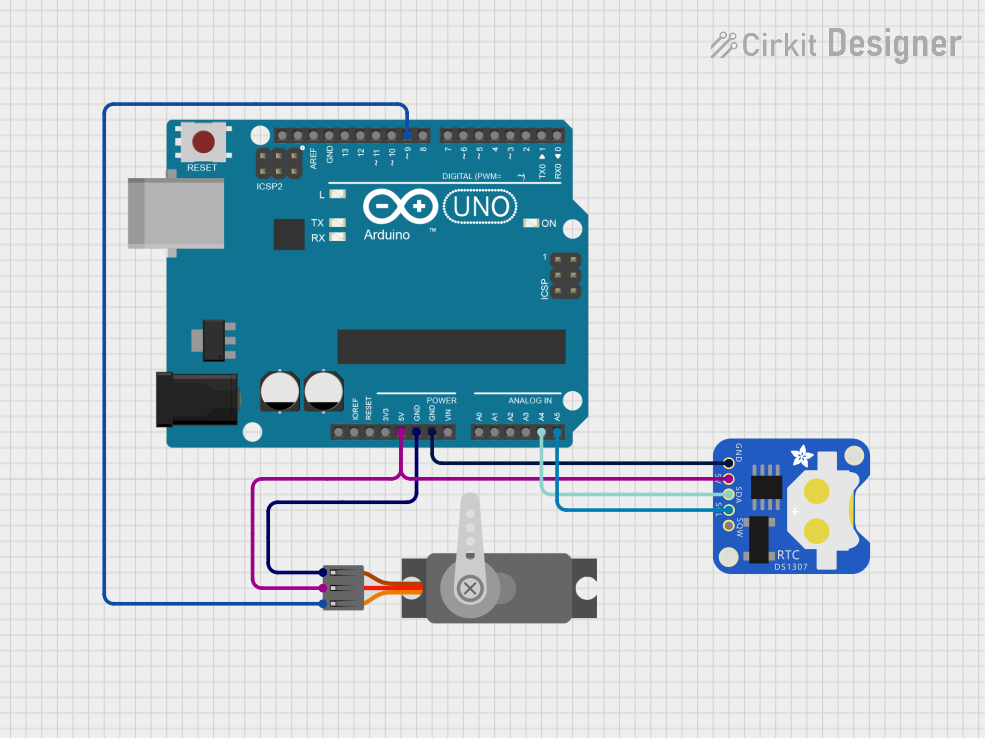
Circuit Documentation
Summary of the Circuit
This circuit integrates an Arduino UNO microcontroller with a Servo motor and a DS1307 Real-Time Clock (RTC) module. The Arduino UNO serves as the central processing unit, controlling the Servo motor's position and maintaining accurate timekeeping with the DS1307 RTC. The Servo motor is powered and controlled by the Arduino, while the RTC module communicates with the Arduino over the I2C protocol using the SDA and SCL lines.
Component List
Arduino UNO
- Description: A microcontroller board based on the ATmega328P.
- Purpose: Acts as the central controller for the circuit, interfacing with the Servo motor and the DS1307 RTC module.
- Pins: UNUSED, IOREF, Reset, 3.3V, 5V, GND, Vin, A0-A5, SCL, SDA, AREF, D0-D13.
Servo (Wokwi Compatible)
- Description: A motor capable of precise angular positioning.
- Purpose: Receives PWM signals from the Arduino to adjust its position.
- Pins: GND, V+, PWM.
DS1307 RTC (Wokwi Compatible)
- Description: A low-power, full binary-coded decimal (BCD) clock/calendar with 56 bytes of NV SRAM.
- Purpose: Keeps track of the current time even when the Arduino is powered off.
- Pins: GND, 5V, SDA, SCL, SQW.
Wiring Details
Arduino UNO
- 5V: Connected to the 5V power supply of the DS1307 RTC and the V+ of the Servo.
- GND: Common ground with the DS1307 RTC and the Servo.
- A4 (SDA): Connected to the SDA pin of the DS1307 RTC for I2C communication.
- A5 (SCL): Connected to the SCL pin of the DS1307 RTC for I2C communication.
- D9: Connected to the PWM pin of the Servo for control signals.
Servo (Wokwi Compatible)
- GND: Connected to the common ground.
- V+: Connected to the 5V output from the Arduino UNO.
- PWM: Controlled by the D9 pin of the Arduino UNO.
DS1307 RTC (Wokwi Compatible)
- GND: Connected to the common ground.
- 5V: Powered by the 5V output from the Arduino UNO.
- SDA: Connected to the A4 (SDA) pin of the Arduino UNO for I2C communication.
- SCL: Connected to the A5 (SCL) pin of the Arduino UNO for I2C communication.
- SQW: Not connected in this circuit.
Documented Code
Arduino UNO Code (sketch.ino)
void setup() {
  // put your setup code here, to run once:

}

void loop() {
  // put your main code here, to run repeatedly:

}
Note: The provided code is a template and does not contain any functional code to control the Servo or interface with the DS1307 RTC. The user is expected to fill in the setup and loop functions with the appropriate initialization and control code.