Cirkit Designer
Your all-in-one circuit design IDE
Home /
Project Documentation
Arduino Uno R3 Based Gas Leak Detector with SMS Alert and Weight Monitoring
Circuit Documentation
Summary
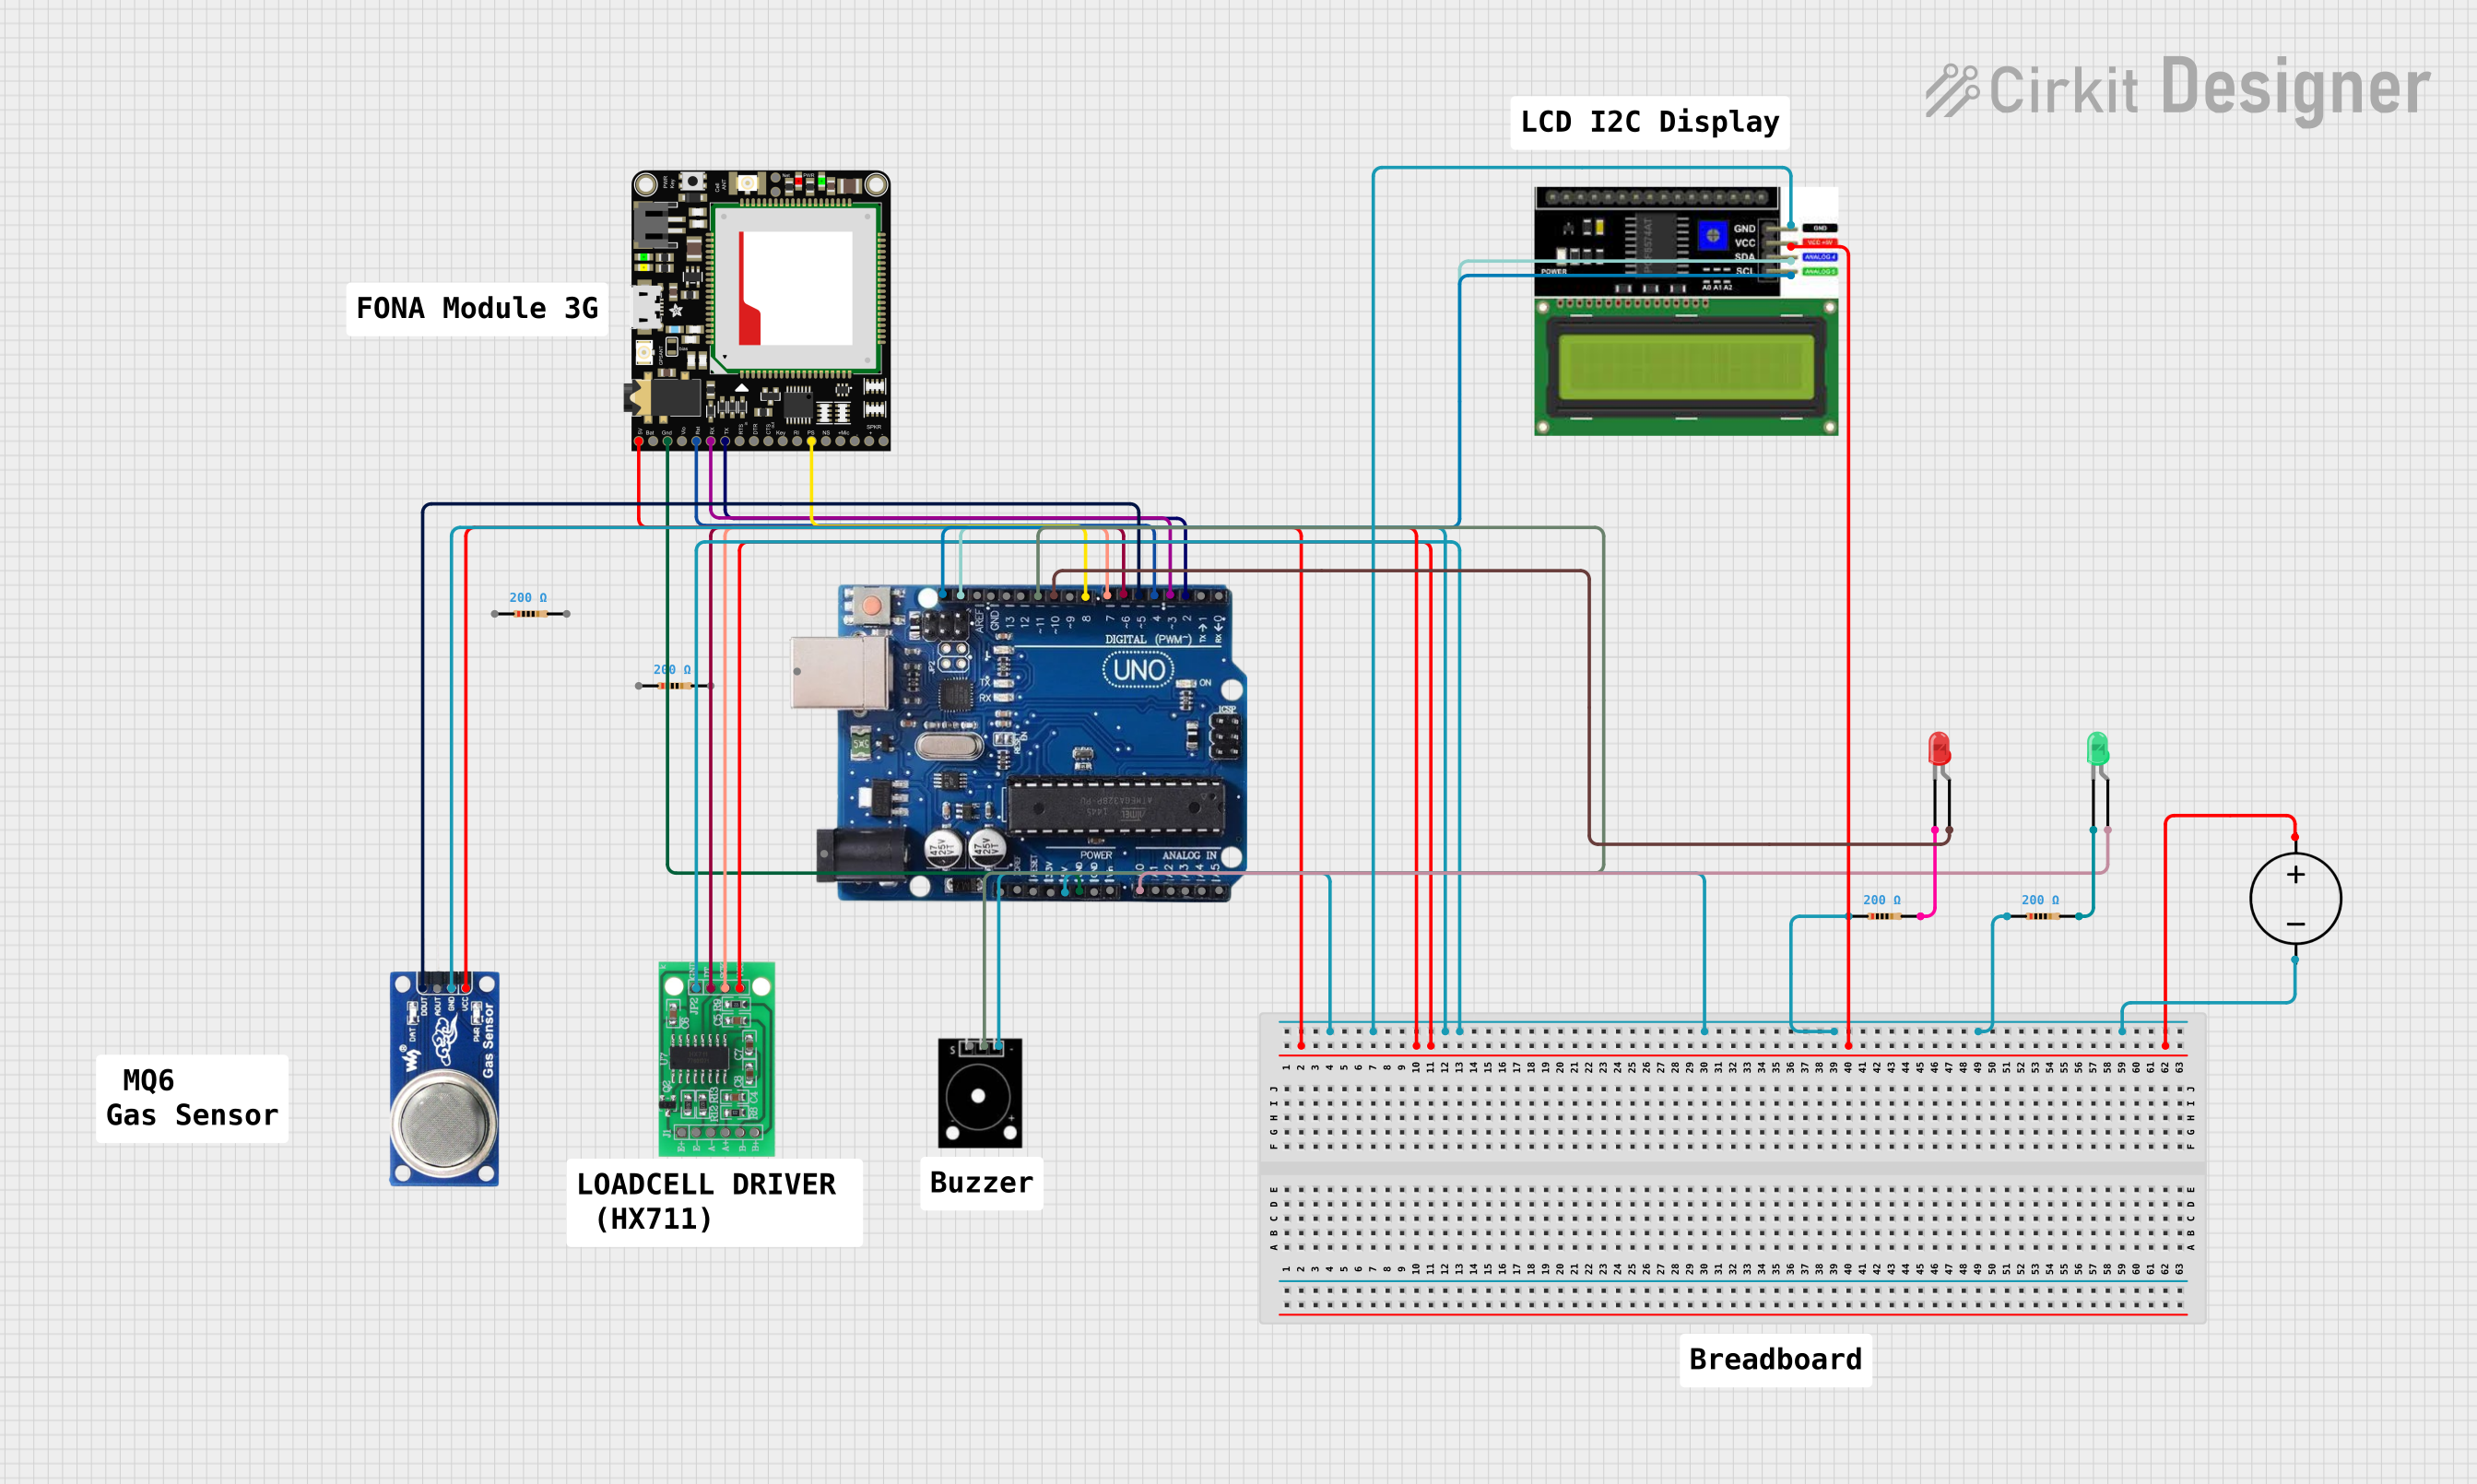
The circuit is designed to monitor gas leakage and weight, providing visual and auditory alerts, and the ability to communicate alerts via SMS and phone calls. It includes sensors for gas detection and weight measurement, indicators in the form of LEDs and a buzzer, an LCD display for status messages, and a communication module for sending SMS and making calls. The Arduino Uno R3 serves as the central microcontroller, interfacing with the various components and executing the embedded code to control the circuit's behavior.
Component List
- LED (Green): A two-pin green LED used as an indicator.
- LED (Red): A two-pin red LED used as an indicator.
- MQ6 Gas Sensor: A gas sensor module for detecting LPG, butane, propane, methane, alcohol, hydrogen, and smoke.
- Elegoo Passive Buzzer: An electronic buzzer for auditory alerts.
- Resistor (200 Ohms): Four resistors used to limit current through the LEDs and for pull-up/pull-down purposes.
- LCD I2C Display: A 16x2 character LCD display with an I2C interface for displaying status messages.
- Adafruit FONA 3G Breakout: A cellular module capable of making calls, sending SMS, and data communication.
- Arduino Uno R3: The main microcontroller board based on the ATmega328P.
- HX711 - Bridge Sensor Interface: A precision 24-bit analog-to-digital converter (ADC) designed for weigh scales and industrial control applications to interface directly with a bridge sensor.
- DC Power Source: A power supply unit providing the necessary voltage and current to power the circuit.
Wiring Details
LED (Green)
- Anode: Connected to Arduino Uno R3's A0 pin.
- Cathode: Connected to a 200 Ohm resistor, which is then connected to the ground.
LED (Red)
- Anode: Connected to Arduino Uno R3's pin 10.
- Cathode: Connected to a 200 Ohm resistor, which is then connected to the ground.
MQ6 Gas Sensor
- VCC: Connected to the positive terminal of the DC Power Source.
- GND: Connected to the ground.
- A0: Not connected in the provided net list.
- DO: Connected to Arduino Uno R3's pin 5.
Elegoo Passive Buzzer
- VCC: Connected to Arduino Uno R3's pin 11.
- GND: Connected to the ground.
- OUTPUT: Not connected in the provided net list.
Resistor (200 Ohms)
- Four resistors are used, each with one pin connected to the ground and the other pin connected to the cathode of the respective LED.
LCD I2C Display
- GND: Connected to the ground.
- VCC: Connected to the positive terminal of the DC Power Source.
- SDA: Connected to Arduino Uno R3's SDA pin.
- SCL: Connected to Arduino Uno R3's SCL pin.
Adafruit FONA 3G Breakout
- +5V: Connected to the positive terminal of the DC Power Source.
- GND: Connected to the ground.
- Reset: Connected to Arduino Uno R3's pin 4.
- RXD: Connected to Arduino Uno R3's pin 3.
- TXD: Connected to Arduino Uno R3's pin 2.
- PwrStat: Connected to Arduino Uno R3's pin 8.
- Other pins are not connected in the provided net list.
Arduino Uno R3
- GND: Connected to the ground.
- A0: Connected to the anode of the green LED.
- Pins 2, 3, 4, 5, 6, 7, 8, 10, 11: Connected to various components as detailed above.
- SDA: Connected to the SDA pin of the LCD I2C Display.
- SCL: Connected to the SCL pin of the LCD I2C Display.
HX711 - Bridge Sensor Interface
- 3.3/3.5V Supply: Connected to the positive terminal of the DC Power Source.
- GND - GROUND: Connected to the ground.
- DATA (OUT): Connected to Arduino Uno R3's pin 6.
- SCK - CLOCK (IN): Connected to Arduino Uno R3's pin 7.
DC Power Source
- Ground: Connected to the ground.
- Positive: Connected to the VCC of various components.
Documented Code
#include <SoftwareSerial.h>
#include "Adafruit_FONA.h"
#include "HX711.h"
#include <LiquidCrystal_I2C.h>
#include <AsyncDelay.h>

// fona pins
#define FONA_TX 2
#define FONA_RX 3
#define FONA_RST 4
#define FONA_POWER 8
// board pins
#define BUZZER_PIN 11
#define RED_LED_PIN 10
#define GREEN_LED_PIN A0 // act as a digital pin
#define GAS_THRESHOLD 30 // Threshold for gas level in percentage
#define MQ6_PIN 5 // gas sensor pin

AsyncDelay sendsmsdelay;
HX711 scale;
LiquidCrystal_I2C lcd(0x27, 16, 2); // Address 0x27, 16 column and 2 rows
SoftwareSerial fonaSS = SoftwareSerial(FONA_TX, FONA_RX);
SoftwareSerial *fonaSerial = &fonaSS;

Adafruit_FONA_3G fona = Adafruit_FONA_3G(FONA_RST);

bool gasLeakageDetected = false;
bool gasBelowThreshold = false;
bool lowWeight=false;

void setup()
{
  pinMode(BUZZER_PIN, OUTPUT);
  pinMode(RED_LED_PIN, OUTPUT);
  pinMode(GREEN_LED_PIN, OUTPUT);
  pinMode(MQ6_PIN, INPUT); // Set MQ6_PIN as input
  pinMode(FONA_POWER, OUTPUT);
  digitalWrite(FONA_POWER, HIGH);
  delay(180);
  digitalWrite(FONA_POWER, LOW);
  delay(3000);

  Serial.begin(4800);
  Serial.println(F("Initializing FONA..."));

  fonaSerial->begin(4800);
  if (!fona.begin(*fonaSerial))
  {
    Serial.println(F("Couldn't find FONA"));
    while(1);
  }
  Serial.println(F("FONA is OK"));

  scale.begin(6, 7); // DT, SCK pins for HX711
  // Wait for the scale to stabilize
  delay(1000);
  scale.set_scale(-211.23);  // this value is obtained by calibrating the scale with known weights; see the README for details
  scale.tare();               // reset the scale to 0

  lcd.init();
  lcd.backlight();
  lcd.setCursor(2, 0);

  sendsmsdelay.start(60000,AsyncDelay::MILLIS);

}

void loop()
{
  // Your main code logic here
   // Read gas weight and detect gas leakage
  int gasWeight = scale.get_units(5); // Read load cell
  Serial.print("Weight: "); Serial.println(gasWeight);
  gasLeakageDetected = digitalRead(MQ6_PIN) == LOW; // Gas leakage detected if MQ6_PIN is LOW

  Serial.print("Gas leak: "); Serial.println(gasLeakageDetected);

  // Case 1: No gas leakage and weight above threshold
  if (!gasLeakageDetected && gasWeight > GAS_THRESHOLD) {
    lcd.clear();
    lcd.print("YOU ARE SAFE");
    digitalWrite(RED_LED_PIN, LOW);  // Turn off red LED
    digitalWrite(GREEN_LED_PIN, HIGH);  // Turn on green LED
    noTone(BUZZER_PIN);  // Stop buzzer
  }
  // Case 2: Weight above threshold and gas leakage detected
  else if (gasWeight > GAS_THRESHOLD && gasLeakageDetected) {
    lcd.clear();
    lcd.print(" GAS LEAKING!!! ");
    digitalWrite(RED_LED_PIN, HIGH);  // Turn on red LED
    digitalWrite(GREEN_LED_PIN, LOW);  // Turn off green LED
    tone(BUZZER_PIN, 1000);  // Ring buzzer
    sndSMS("ALERT! GAS LEAK DETECTED. PLEASE CLOSE THE GAS VALVE IMMEDIATELY.");
    makeCall();
  }

  // Case 3: Weight below threshold and gas leakage detected
  else if (gasWeight <= GAS_THRESHOLD && gasLeakageDetected) {
    lcd.clear();
    lcd.setCursor(0, 0);
    lcd.print(" GAS LEAKING!!! ");
    lcd.setCursor(0, 1);
    lcd.print("GAS BELOW 30%");
    digitalWrite(RED_LED_PIN, HIGH);  // Turn on red LED
    digitalWrite(GREEN_LED_PIN, LOW);  // Turn off green LED
    tone(BUZZER_PIN, 1000);  // Ring buzzer
    sndSMS("CRITICAL ALERT! GAS LEAK DETECTED AND GAS LEVEL BELOW 30%. CLOSE THE GAS VALVE AND BUDGET FOR A REFILL.");
    // sndSMS("GAS BELOW 30%, REFILL GAS");
    makeCall();
  }

  // Case 4: No gas leakage but weight below threshold
  else if (!gasLeakageDetected && gasWeight <= GAS_THRESHOLD) {
    lcd.clear();