
Arduino UNO Controlled Traffic Light with Pushbutton Activation
View and Edit Project In Cirkit Designer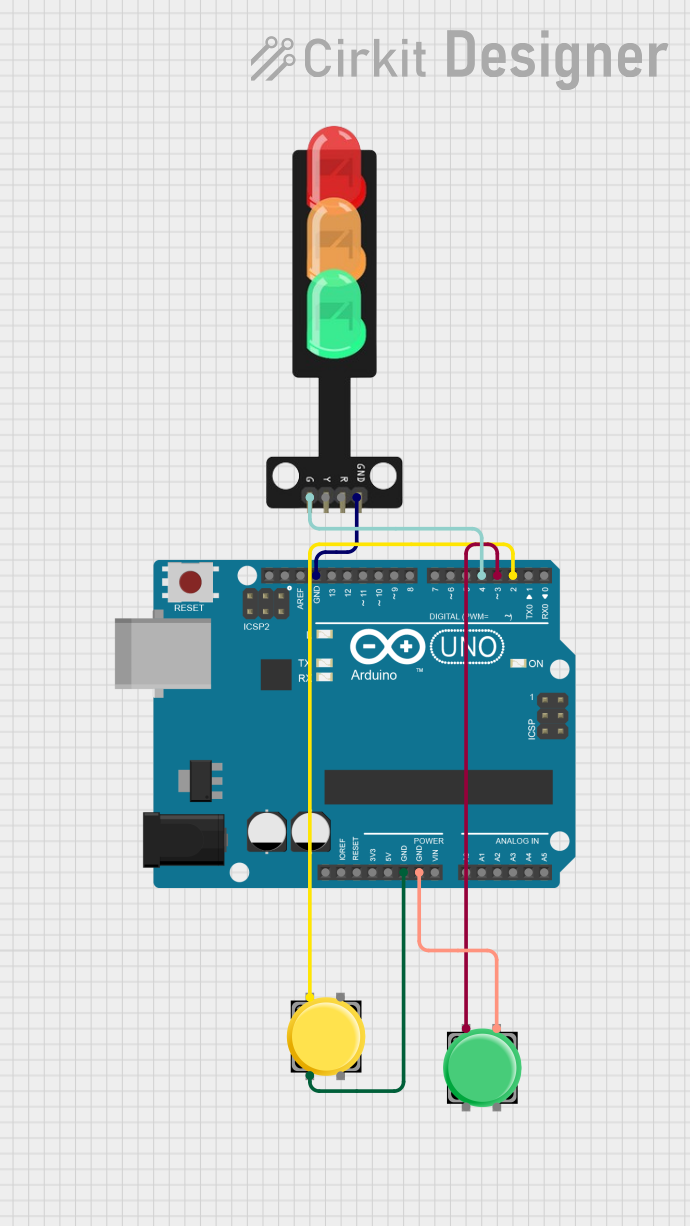
Traffic Light Control Circuit Documentation
Summary
This circuit is designed to control a traffic light system using an Arduino UNO microcontroller and two pushbuttons. The system operates such that when the first pushbutton is pressed, the green light on the traffic light turns on. Pressing the second pushbutton turns the green light off. The circuit is powered by the Arduino UNO, which also provides ground connections to the pushbuttons and the traffic light.
Component List
Arduino UNO
- Description: A microcontroller board based on the ATmega328P.
- Purpose: Acts as the central control unit for the traffic light system, reading input from the pushbuttons and controlling the state of the green light.
Traffic Light
- Description: A simple traffic light module with three LEDs (Green, Yellow, Red).
- Purpose: Displays the green light when activated by the Arduino UNO.
Pushbutton (x2)
- Description: A standard pushbutton switch.
- Purpose: Provides user input to the Arduino UNO to control the traffic light system.
Wiring Details
Arduino UNO
- Digital Pin D2: Connected to the first pushbutton.
- Digital Pin D3: Connected to the second pushbutton.
- Digital Pin D4: Connected to the green light on the traffic light.
- GND: Connected to the ground pins of both pushbuttons and the traffic light.
Traffic Light
- Green: Connected to Digital Pin D4 on the Arduino UNO.
- GND: Connected to GND on the Arduino UNO.
Pushbutton 1
- Pin 1: Connected to Digital Pin D2 on the Arduino UNO.
- Pin 2: Connected to GND on the Arduino UNO.
Pushbutton 2
- Pin 1: Connected to Digital Pin D3 on the Arduino UNO.
- Pin 3: Connected to GND on the Arduino UNO.
Documented Code
/*
 * This Arduino sketch controls a traffic light system with two pushbuttons.
 * When the first pushbutton is pressed, the green light turns on.
 * When the second pushbutton is pressed, the green light turns off.
 */

const int button1Pin = 2; // Pin for the first pushbutton
const int button2Pin = 3; // Pin for the second pushbutton
const int greenLightPin = 4; // Pin for the green light

void setup() {
  // Initialize the pushbutton pins as inputs
  pinMode(button1Pin, INPUT);
  pinMode(button2Pin, INPUT);
  // Initialize the green light pin as an output
  pinMode(greenLightPin, OUTPUT);
  // Start with the green light off
  digitalWrite(greenLightPin, LOW);
}

void loop() {
  // Read the state of the first pushbutton
  int button1State = digitalRead(button1Pin);
  // Read the state of the second pushbutton
  int button2State = digitalRead(button2Pin);
  // If the first pushbutton is pressed, turn on the green light
  if (button1State == HIGH) {
    digitalWrite(greenLightPin, HIGH);
  }
  // If the second pushbutton is pressed, turn off the green light
  if (button2State == HIGH) {
    digitalWrite(greenLightPin, LOW);
  }
}
The code is written for the Arduino UNO and is responsible for reading the state of two pushbuttons to control the green light of the traffic light. The setup() function initializes the pins connected to the pushbuttons as inputs and the pin connected to the green light as an output. The loop() function continuously checks the state of the pushbuttons and turns the green light on or off accordingly.