
Arduino Nano-Based GPS and GSM Emergency Alert System with Battery Power
View and Edit Project In Cirkit Designer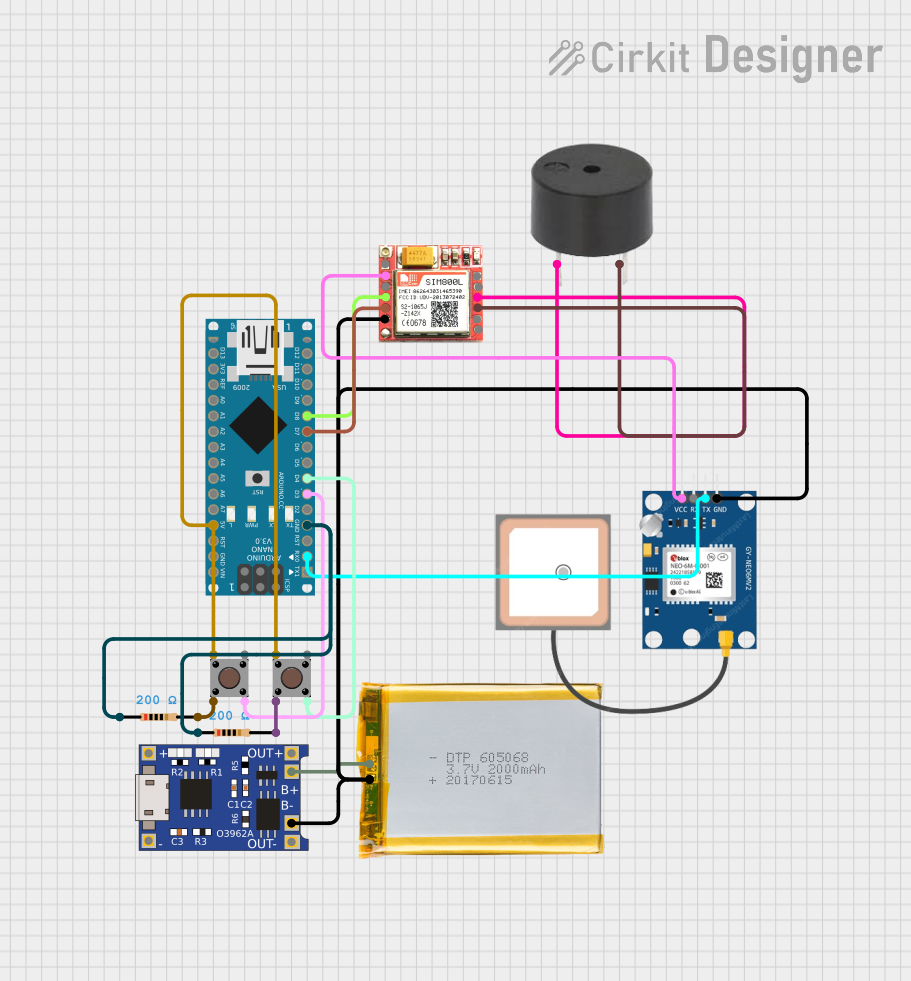
Circuit Documentation
Summary
This circuit involves two Arduino Nano microcontrollers, a GPS NEO 6M module, a SIM 800L module, pushbuttons, resistors, a 2000mAh battery, a TP4056 battery charger, and a buzzer. The circuit is designed to send SMS alerts and make calls when specific buttons are pressed, using GPS data to provide location information.
Component List
Arduino Nano
- Description: A small, complete, and breadboard-friendly board based on the ATmega328P.
- Pins: D1/TX, D0/RX, RESET, GND, D2, D3, D4, D5, D6, D7, D8, D9, D10, D11/MOSI, D12/MISO, VIN, 5V, A7, A6, A5, A4, A3, A2, A1, A0, AREF, 3V3, D13/SCK
Pushbutton
- Description: A simple pushbutton switch.
- Pins: Pin 3 (out), Pin 4 (out), Pin 1 (in), Pin 2 (in)
2000mAh Battery
- Description: A rechargeable battery providing power to the circuit.
- Pins: VCC, GND
Resistor
- Description: A 200 Ohm resistor used for current limiting.
- Pins: pin1, pin2
- Properties: Resistance: 200 Ohms
GPS NEO 6M
- Description: A GPS module used for obtaining location data.
- Pins: VCC, RX, TX, GND
TP4056
- Description: A lithium battery charger module.
- Pins: OUT-, B-, B+, OUT+, IN-, IN+
Buzzer
- Description: An audio signaling device.
- Pins: PIN, GND
SIM 800L
- Description: A GSM/GPRS module used for sending SMS and making calls.
- Pins: NFT, RING, VCC, DTR, RST, MIC +, RXD, MIC-, TXD, SPK+, GND, SPK-
Wiring Details
Arduino Nano
- D0/RX connected to TX of GPS NEO 6M
- GND connected to pin1 of both Resistors
- D3 connected to Pin 4 (out) of Pushbutton
- D4 connected to Pin 4 (out) of another Pushbutton
- D7 connected to TXD of SIM 800L
- D8 connected to RXD of SIM 800L
- 5V connected to Pin 1 (in) of both Pushbuttons
Pushbutton
- Pin 4 (out) connected to D3 of Arduino Nano
- Pin 4 (out) of another Pushbutton connected to D4 of Arduino Nano
- Pin 1 (in) connected to Pin 1 (in) of another Pushbutton and 5V of Arduino Nano
- Pin 2 (in) connected to pin2 of Resistor
- Pin 2 (in) of another Pushbutton connected to pin2 of another Resistor
2000mAh Battery
- GND connected to GND of SIM 800L, B- of TP4056, and GND of GPS NEO 6M
- VCC connected to B+ of TP4056
Resistor
- pin1 connected to GND of Arduino Nano
- pin2 connected to Pin 2 (in) of Pushbutton
- pin1 of another Resistor connected to GND of Arduino Nano
- pin2 of another Resistor connected to Pin 2 (in) of another Pushbutton
GPS NEO 6M
- TX connected to D0/RX of Arduino Nano
- VCC connected to VCC of SIM 800L
- GND connected to GND of 2000mAh Battery
TP4056
- B- connected to GND of 2000mAh Battery
- B+ connected to VCC of 2000mAh Battery
Buzzer
- PIN connected to MIC + of SIM 800L
- GND connected to MIC- of SIM 800L
SIM 800L
- TXD connected to D7 of Arduino Nano
- RXD connected to D8 of Arduino Nano
- VCC connected to VCC of GPS NEO 6M
- GND connected to GND of 2000mAh Battery
- MIC + connected to PIN of Buzzer
- MIC- connected to GND of Buzzer
Documented Code
Arduino Nano (Instance 1)
void setup() {
  // put your setup code here, to run once:

}

void loop() {
  // put your main code here, to run repeatedly:

}
Arduino Nano (Instance 2)
#include <TinyGPS.h>
#include <SoftwareSerial.h>
#include <Wire.h>
SoftwareSerial Gsm(7, 8);
char phone_no[] = "+9188305848xx";  //For SMS
TinyGPS gps;
int state;
String textMessage;

void setup() {
  Serial.begin(9600);
  Gsm.begin(9600);
  delay(2000);

  Serial.print("AT+CMGF=1\r");
  delay(100);
  Serial.print("AT+CNMI=2,2,0,0,0\r");
  delay(100);
  pinMode(4, INPUT);
  pinMode(5, INPUT);
}

void loop() {

  bool newData = false;
  unsigned long chars;
  unsigned short sentences, failed;

  for (unsigned long start = millis(); millis() - start < 1000;) {
    while (Serial.available()) {
      char c = Serial.read();
      Serial.print(c);
      if (gps.encode(c))
        newData = true;
    }
  }
  if (Gsm.available() > 0) {
    textMessage = Gsm.readString();
    textMessage.toUpperCase();
    delay(10);
  }

  state = digitalRead(4);
  if (state == 1)  //When Button is Press
  {
    float flat, flon;
    unsigned long age;
    gps.f_get_position(&flat, &flon, &age);
    Gsm.print("AT+CMGF=1\r");
    delay(400);
    Gsm.print("AT+CMGS=\"");
    Gsm.print(phone_no);
    Gsm.println("\"");
    Gsm.println("Alert I need help.............");
    Gsm.print("http://maps.google.com/maps?q=loc:");
    Gsm.print(flat == TinyGPS::GPS_INVALID_F_ANGLE ? 0.0 : flat, 6);
    Gsm.print(",");
    Gsm.print(flon == TinyGPS ::GPS_INVALID_F_ANGLE ? 0.0 : flon, 6);
    delay(200);
    Gsm.println((char)26);
    delay(200);
    Gsm.println();
    delay(10000);
  } else {
    delay(10);
  }

  state = digitalRead(5);
  if (state == 1)  //When Button is Press
  {

    Serial.println("OK");
    delay(20000);
    Gsm.println("ATD+9188305848xx;");  //For Call
    delay(150000);
    Gsm.println("ATH");
    delay(1000);

  } else {
    delay(10);
  }
  Serial.println(failed);
}
This documentation provides a comprehensive overview of the circuit, including a summary, detailed component list, wiring details, and documented code for the microcontrollers.