
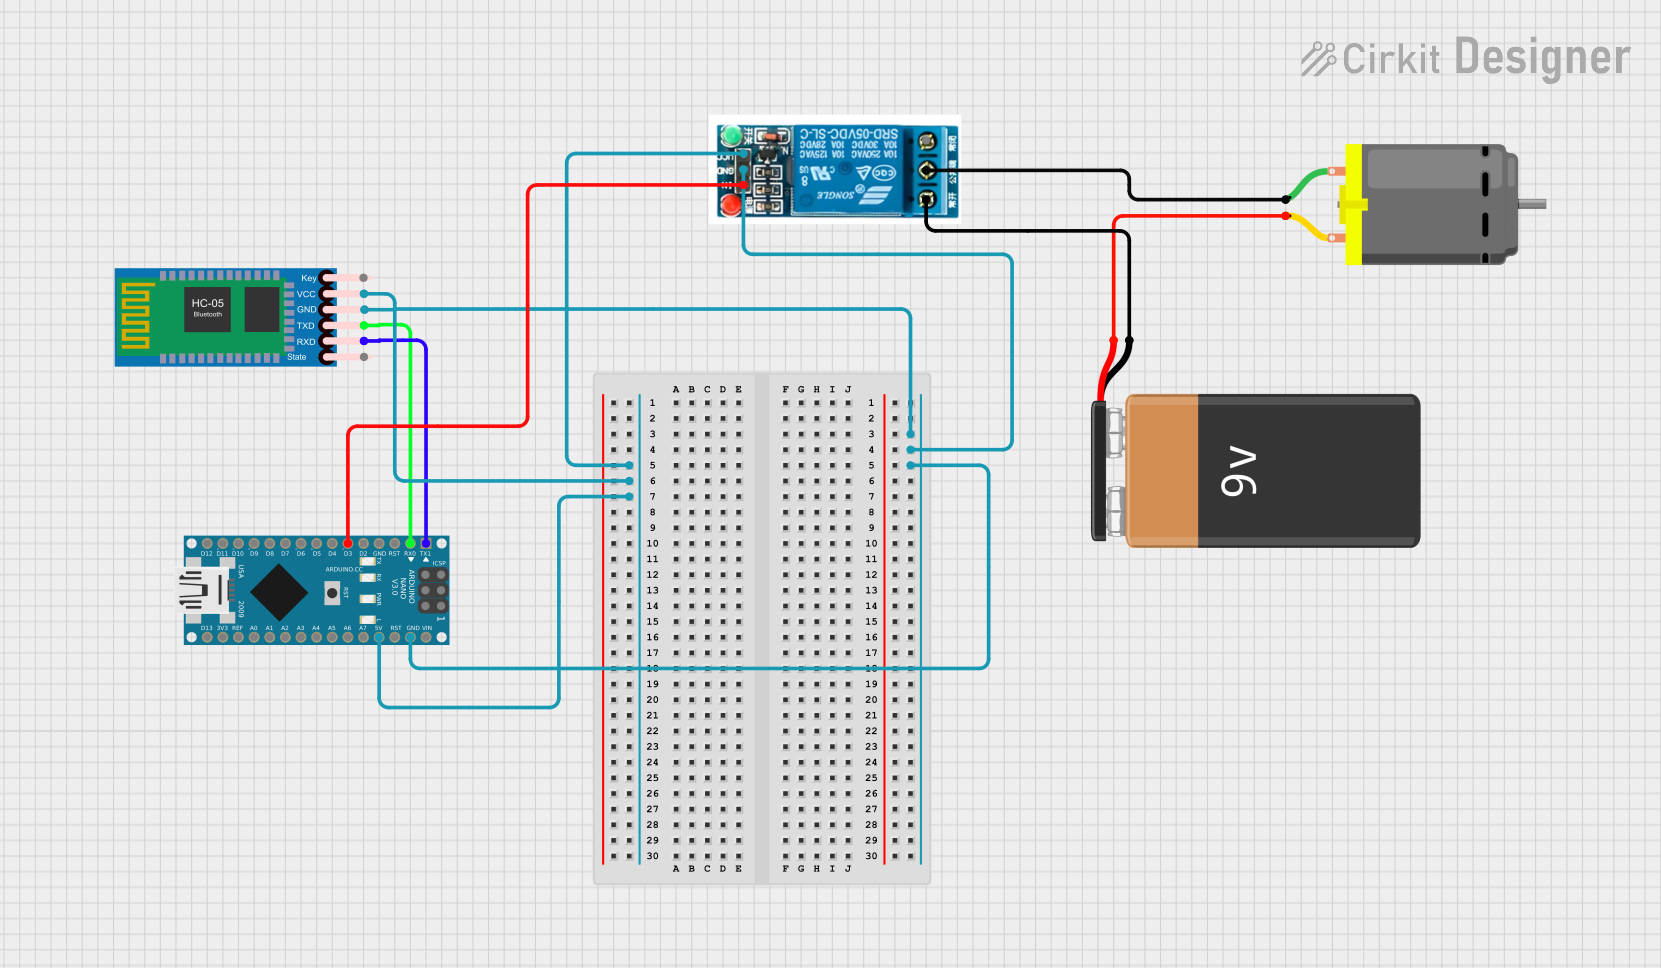
Circuit Documentation
Summary
This circuit is designed to control a DC motor using an Arduino Nano and a 5V relay, with communication facilitated by an HC-05 Bluetooth module. The Arduino Nano receives commands via Bluetooth and controls the relay, which in turn powers the DC motor using a 9V battery.
Component List
Arduino Nano
- Description: A small, complete, and breadboard-friendly board based on the ATmega328P.
- Pins: D1/TX, D0/RX, RESET, GND, D2, D3, D4, D5, D6, D7, D8, D9, D10, D11/MOSI, D12/MISO, VIN, 5V, A7, A6, A5, A4, A3, A2, A1, A0, AREF, 3V3, D13/SCK
HC-05 Bluetooth Module
- Description: A Bluetooth module used for wireless communication.
- Pins: Key, VCC, TXD, RXD, State, GND
9V Battery
- Description: A standard 9V battery used to power the DC motor.
- Pins: -, +
5V Relay
- Description: An electromechanical switch used to control the DC motor.
- Pins: Normally Open, Common terminal, Normally Closed, In, GND, VCC
DC Motor
- Description: A motor powered by DC voltage.
- Pins: pin 1, pin 2
Wiring Details
Arduino Nano
- D1/TX connected to RXD of HC-05 Bluetooth Module
- D0/RX connected to TXD of HC-05 Bluetooth Module
- D3 connected to In of 5V Relay
- GND connected to GND of HC-05 Bluetooth Module and 5V Relay
- 5V connected to VCC of HC-05 Bluetooth Module and 5V Relay
HC-05 Bluetooth Module
- RXD connected to D1/TX of Arduino Nano
- TXD connected to D0/RX of Arduino Nano
- GND connected to GND of Arduino Nano and 5V Relay
- VCC connected to 5V of Arduino Nano and 5V Relay
9V Battery
- - connected to Normally Open of 5V Relay
- + connected to pin 2 of DC Motor
5V Relay
- In connected to D3 of Arduino Nano
- GND connected to GND of Arduino Nano and HC-05 Bluetooth Module
- VCC connected to 5V of Arduino Nano and HC-05 Bluetooth Module
- Normally Open connected to - of 9V Battery
- Common terminal connected to pin 1 of DC Motor
DC Motor
- pin 1 connected to Common terminal of 5V Relay
- pin 2 connected to + of 9V Battery
Code Documentation
Arduino Nano Code
String readString;
#define relay1 3

void setup()
{
  Serial.begin(9600);
  pinMode(relay1, OUTPUT);
  digitalWrite(relay1, LOW);
}

void loop()
{
  while(Serial.available())
  {
    delay(10);
    char c = Serial.read();
    if (c == '#'){
      break;
    }
    readString += c;
  }
  if (readString.length() > 0)
  {
    Serial.println(readString);

    if (readString == "f success"){
      digitalWrite(relay1, HIGH);
      delay(3000);
      digitalWrite(relay1, LOW);
    }
    readString = "";
  }
}
This code initializes the serial communication and sets up the relay pin as an output. It reads incoming serial data and checks for a specific command ("f success"). When the command is received, it activates the relay for 3 seconds, which in turn powers the DC motor.