
Arduino Mega 2560 Controlled Ultrasonic Sensor with Servo, LCD Display, and Interactive Pushbutton
View and Edit Project In Cirkit Designer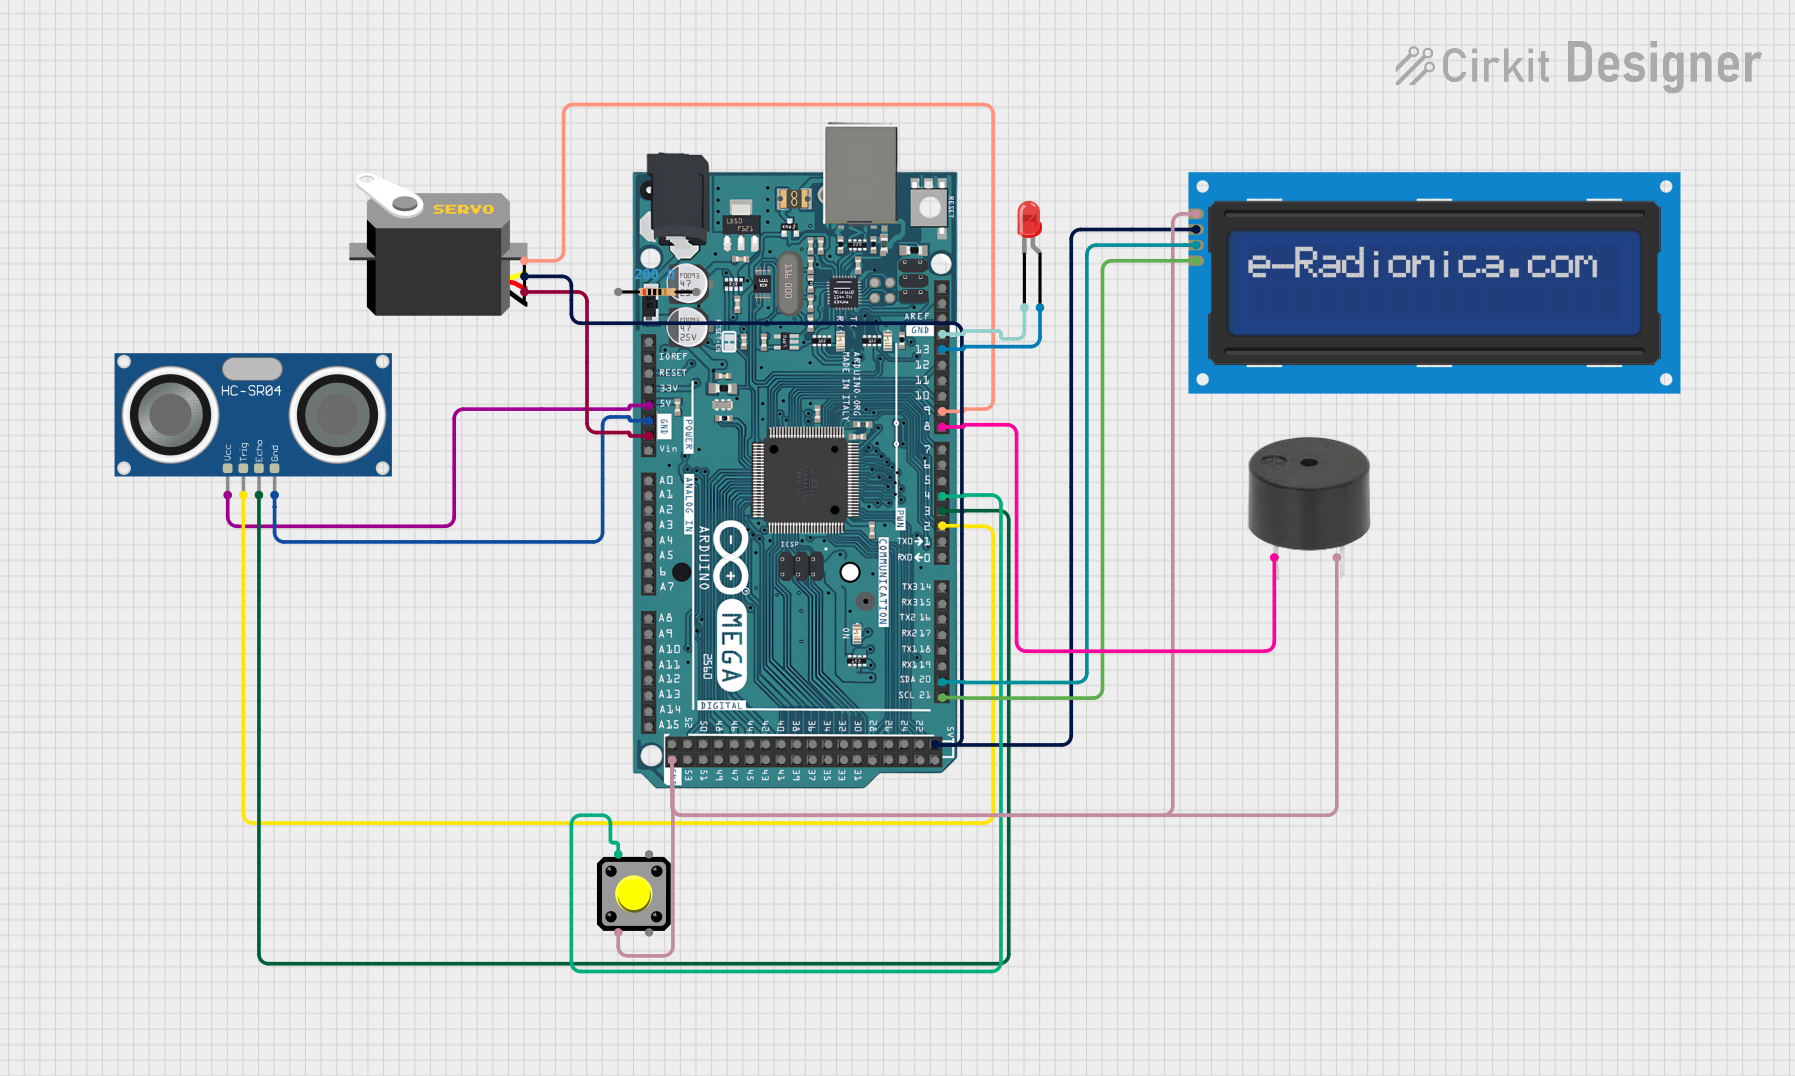
Circuit Documentation
Summary
The circuit in question is designed to interface an HC-SR04 Ultrasonic Sensor, a Servo motor, a red LED, a Pushbutton, an LCD screen (16x2 with I2C interface), a Resistor, and a Buzzer with an Arduino Mega 2560 microcontroller. The circuit is likely intended for distance measurement, user input via a pushbutton, visual feedback through an LED and an LCD screen, and auditory signaling using a buzzer. The servo motor's position can be controlled, potentially in response to sensor readings or button presses.
Component List
HC-SR04 Ultrasonic Sensor
- Description: A sensor that measures distance using ultrasonic waves.
- Pins: VCC, TRIG, ECHO, GND
Servo
- Description: A motor capable of precise position control.
- Pins: GND, VCC, Pulse
LED: Two Pin (red)
- Description: A red light-emitting diode for visual indication.
- Pins: Cathode, Anode
Pushbutton
- Description: A simple switch that allows user interaction.
- Pins: Pin 1, Pin 2, Pin 3, Pin 4
LCD screen 16x2 I2C
- Description: A 16x2 character LCD display with an I2C interface.
- Pins: SCL, SDA, VCC, GND
Resistor
- Description: A passive two-terminal electrical component that implements electrical resistance.
- Pins: Pin 1, Pin 2
- Properties: 200 Ohms resistance
Arduino Mega 2560
- Description: A microcontroller board based on the ATmega2560.
- Pins: Multiple digital and analog pins, power, and ground pins.
Buzzer
- Description: An audio signaling device.
- Pins: PIN, GND
Wiring Details
HC-SR04 Ultrasonic Sensor
- VCC connected to Arduino Mega 2560 5V
- GND connected to Arduino Mega 2560 GND
- TRIG connected to Arduino Mega 2560 D2 PWM
- ECHO connected to Arduino Mega 2560 D3 PWM
Servo
- GND connected to Arduino Mega 2560 GND
- VCC connected to Arduino Mega 2560 5V
- Pulse connected to Arduino Mega 2560 D9 PWM
LED: Two Pin (red)
- Cathode connected to Arduino Mega 2560 GND
- Anode connected to Arduino Mega 2560 D13 PWM
Pushbutton
- Pin 1 connected to Arduino Mega 2560 D4 PWM
- Pin 2 connected to Arduino Mega 2560 GND
LCD screen 16x2 I2C
- SCL connected to Arduino Mega 2560 D21/SCL
- SDA connected to Arduino Mega 2560 D20/SDA
- VCC connected to Arduino Mega 2560 5V
- GND connected to Arduino Mega 2560 GND
Resistor
- Not explicitly connected in the provided net list.
Buzzer
- PIN connected to Arduino Mega 2560 D8 PWM
- GND connected to Arduino Mega 2560 GND
Documented Code
Arduino Mega 2560 Code
// Define pin numbers
const int ledPin = 9;      // Pin for the LED
const int buttonPin = 2;   // Pin for the push button

// Variable to hold the button state
int buttonState = 0;

void setup() {
  // Initialize the LED pin as an output
  pinMode(ledPin, OUTPUT);

  // Initialize the button pin as an input with pull-up resistor
  pinMode(buttonPin, INPUT_PULLUP);

  // Start serial communication for debugging
  Serial.begin(9600);
}

void loop() {
  // Read the state of the button
  buttonState = digitalRead(buttonPin);

  // Check if the button is pressed
  if (buttonState == LOW) { // Button pressed (active LOW)
    // Turn on the LED
    digitalWrite(ledPin, HIGH);
    Serial.println("Button Pressed: LED ON");
  } else {
    // Turn off the LED
    digitalWrite(ledPin, LOW);
    Serial.println("Button Released: LED OFF");
  }

  // Small delay for stability
  delay(100);
}
HC-SR04 Ultrasonic Sensor Code
void setup() {
  // put your setup code here, to run once:

}

void loop() {
  // put your main code here, to run repeatedly:

}
LCD screen 16x2 I2C Code
void setup() {
  // put your setup code here, to run once:

}

void loop() {
  // put your main code here, to run repeatedly:

}
Buzzer Code
void setup() {
  // put your setup code here, to run once:

}

void loop() {
  // put your main code here, to run repeatedly:

}
(Note: The code for the HC-SR04 Ultrasonic Sensor, LCD screen, and Buzzer is not provided with specific functionality and contains only the template structure. The actual implementation should be added based on the desired functionality of the circuit.)