Cirkit Designer
Your all-in-one circuit design IDE
Home /
Project Documentation
Arduino UNO RFID Access Control System with LED Notification
Circuit Documentation
Summary
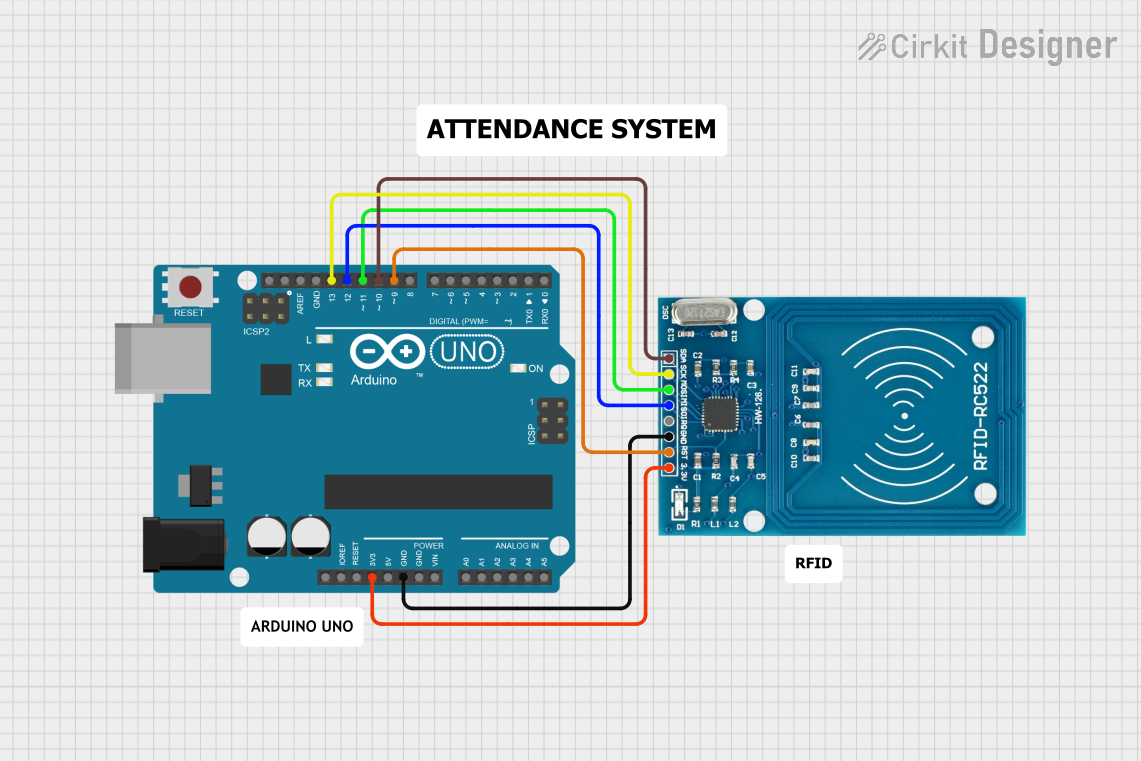
This circuit involves an Arduino UNO microcontroller interfaced with an RFID-RC522 module. The Arduino UNO reads RFID tags using the RFID-RC522 module and performs actions based on the detected RFID tag. The circuit is powered by the 3.3V and GND pins of the Arduino UNO.
Component List
Arduino UNO
- Description: A microcontroller board based on the ATmega328P.
- Pins: UNUSED, IOREF, Reset, 3.3V, 5V, GND, Vin, A0, A1, A2, A3, A4, A5, SCL, SDA, AREF, D13, D12, D11, D10, D9, D8, D7, D6, D5, D4, D3, D2, D1, D0
RFID-RC522
- Description: A low-cost RFID reader module that uses the SPI protocol.
- Pins: VCC (3.3V), RST, GND, IRQ, MISO, MOSI, SCK, SDA
Comment
- Description: Placeholder for comments in the circuit design.
- Pins: None
Wiring Details
Arduino UNO
- 3.3V: Connected to VCC (3.3V) of RFID-RC522
- GND: Connected to GND of RFID-RC522
- D13: Connected to SCK of RFID-RC522
- D12: Connected to MISO of RFID-RC522
- D11: Connected to MOSI of RFID-RC522
- D10: Connected to SDA of RFID-RC522
- D9: Connected to RST of RFID-RC522
RFID-RC522
- VCC (3.3V): Connected to 3.3V of Arduino UNO
- GND: Connected to GND of Arduino UNO
- SCK: Connected to D13 of Arduino UNO
- MISO: Connected to D12 of Arduino UNO
- MOSI: Connected to D11 of Arduino UNO
- SDA: Connected to D10 of Arduino UNO
- RST: Connected to D9 of Arduino UNO
Code Documentation
Arduino UNO Code
#include <SPI.h>
#include <MFRC522.h>

#define SS_PIN 10
#define RST_PIN 6
#define LED_PIN 5

MFRC522 rfid(SS_PIN, RST_PIN);

MFRC522::MIFARE_Key key;

void setup() {
  Serial.begin(9600);
  SPI.begin();
  rfid.PCD_Init();

  pinMode(LED_PIN, OUTPUT);
  Serial.println("Place your card on the reader...");
  Serial.println();
}

void loop() {
  // Look for new cards
  if (!rfid.PICC_IsNewCardPresent() || !rfid.PICC_ReadCardSerial())
    return;

  // Print UID of the card
  Serial.print("Card UID: ");
  String content = "";
  for (byte i = 0; i < rfid.uid.size; i++) {
    Serial.print(rfid.uid.uidByte[i] < 0x10 ? " 0" : " ");
    Serial.print(rfid.uid.uidByte[i], HEX);
    content.concat(String(rfid.uid.uidByte[i] < 0x10 ? " 0" : " "));
    content.concat(String(rfid.uid.uidByte[i], HEX));
  }
  Serial.println();

  // Convert content to uppercase
  content.toUpperCase();

  // Check which UID it is
  if (content.substring(1) == "83 3F 02 35") { // Replace with your card's UID
    Serial.println("Welcome, Abhishek!");
    blinkLED();
  }
  else if (content.substring(1) == "33 5C 41 1C") { // Replace with your card's UID
    Serial.println("Welcome, Yatish!");
    blinkLED();
  }
  else {
    Serial.println("Unknown card!");
  }

  // Halt PICC
  rfid.PICC_HaltA();

  // Stop encryption on PCD
  rfid.PCD_StopCrypto1();
}

void blinkLED() {
  digitalWrite(LED_PIN, HIGH);
  delay(500); // LED on for 500 ms
  digitalWrite(LED_PIN, LOW);
}
This code initializes the RFID reader and continuously checks for new RFID tags. When a tag is detected, it reads the UID and performs actions based on the UID. The LED blinks to indicate a recognized tag.