
Arduino and ESP8266-Based Water Quality Monitoring System with LCD Display
View and Edit Project In Cirkit Designer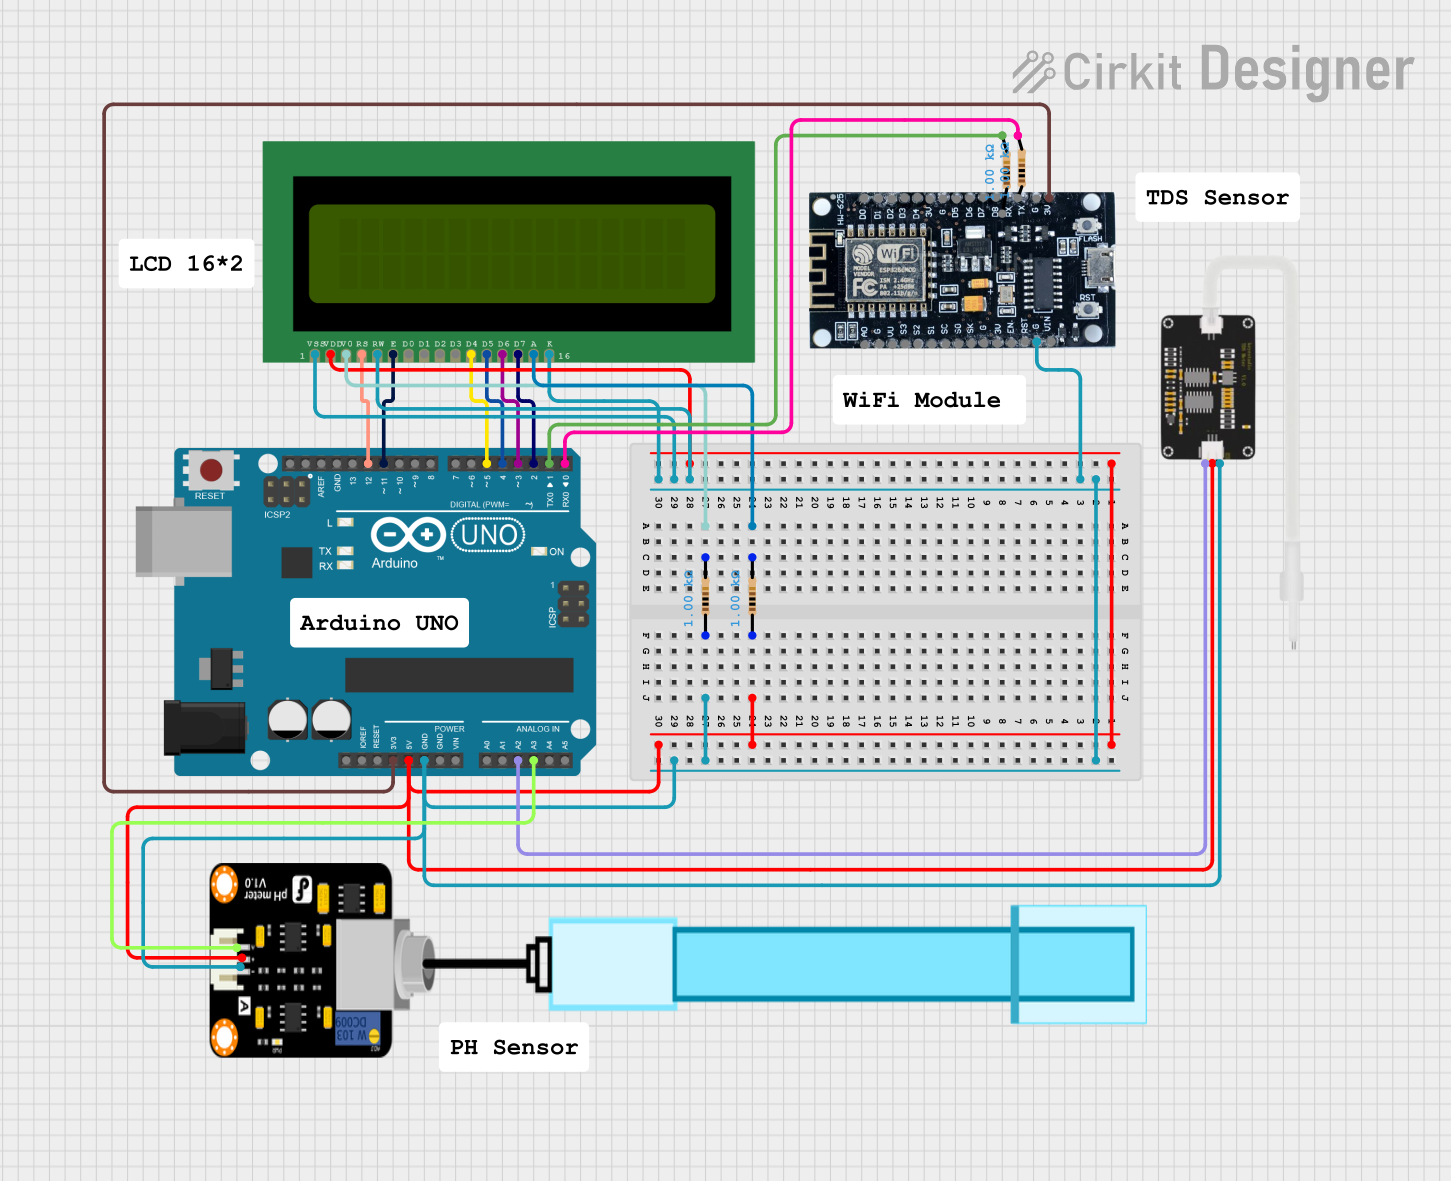
Circuit Documentation
Summary
This circuit is designed for water quality monitoring, utilizing an Arduino UNO and an ESP8266 for data acquisition and wireless communication. The system measures Total Dissolved Solids (TDS) and pH levels using respective sensors and displays the data on an LCD. The data is also transmitted to a web server via the ESP8266.
Component List
Arduino UNO
- Description: Microcontroller board based on the ATmega328P.
- Pins: UNUSED, IOREF, Reset, 3.3V, 5V, GND, Vin, A0, A1, A2, A3, A4, A5, SCL, SDA, AREF, D13, D12, D11, D10, D9, D8, D7, D6, D5, D4, D3, D2, D1, D0
LCD 16x2 (Wokwi Compatible)
- Description: 16x2 character LCD display.
- Pins: VSS, VDD, V0, RS, RW, E, D0, D1, D2, D3, D4, D5, D6, D7, A, K
Resistor (1k Ohms)
- Description: Resistor with a resistance of 1000 Ohms.
- Pins: pin1, pin2
esp8266
- Description: Wi-Fi module for wireless communication.
- Pins: 3V, G, D8, D7, D6, D5, D4, D3, D2, D1, D0, A0, S3, S2, S1, SC, S0, SK, EN, VIN, RST, VU
TDS Sensor
- Description: Sensor for measuring Total Dissolved Solids in water.
- Pins: AI, GND, 5V
PH Meter
- Description: Sensor for measuring pH levels in water.
- Pins: Signal, VCC, GND
Wiring Details
Arduino UNO
5V connected to:
- Resistor (pin1)
- PH Meter (VCC)
- TDS Sensor (5V)
- LCD 16x2 (VDD)
GND connected to:
- Resistor (pin1)
- PH Meter (GND)
- TDS Sensor (GND)
- esp8266 (G)
- LCD 16x2 (RW, VSS, K)
3.3V connected to:
- esp8266 (3V)
A2 connected to:
- TDS Sensor (AI)
A3 connected to:
- PH Meter (Signal)
D12 connected to:
- LCD 16x2 (RS)
D11 connected to:
- LCD 16x2 (E)
D5 connected to:
- LCD 16x2 (D4)
D4 connected to:
- LCD 16x2 (D5)
D3 connected to:
- LCD 16x2 (D6)
D2 connected to:
- LCD 16x2 (D7)
D1 connected to:
- Resistor (pin2)
D0 connected to:
- Resistor (pin2)
LCD 16x2 (Wokwi Compatible)
A connected to:
- Resistor (pin2)
V0 connected to:
- Resistor (pin2)
esp8266
- 3V connected to:
- Arduino UNO (3.3V)
Resistor (1k Ohms)
pin1 connected to:
- Arduino UNO (5V)
- Arduino UNO (GND)
pin2 connected to:
- LCD 16x2 (A)
- LCD 16x2 (V0)
- Arduino UNO (D1)
- Arduino UNO (D0)
TDS Sensor
5V connected to:
- Arduino UNO (5V)
GND connected to:
- Arduino UNO (GND)
AI connected to:
- Arduino UNO (A2)
PH Meter
VCC connected to:
- Arduino UNO (5V)
GND connected to:
- Arduino UNO (GND)
Signal connected to:
- Arduino UNO (A3)
Code Documentation
Arduino UNO Code
#include <LiquidCrystal.h>
LiquidCrystal lcd(12, 11, 5, 4, 3, 2);

void setup() {
  Serial.begin(9600); // Communicate with ESP8266
  lcd.begin(16, 2);
  lcd.print("Initializing...");
}

void loop() {
  // Read and map TDS data
  int TDS = analogRead(A0);
  int TDS1 = map(TDS, 0, 1023, 0, 2000);

  // Read and map pH data
  int PH = analogRead(A1);
  int PH1 = map(PH, 0, 1023, 0, 14);

  // Display on LCD
  lcd.clear();
  lcd.setCursor(0, 0);
  lcd.print("TDS: ");
  lcd.print(TDS1);
  lcd.setCursor(0, 1);
  lcd.print("pH: ");
  lcd.print(PH1);

  // Send data to ESP8266
  String data = "TDS:" + String(TDS1) + ";PH:" + String(PH1);
  Serial.println(data);

  delay(1000);
}
ESP8266 Code
#include <ESP8266WiFi.h>

const char* ssid = "Your_SSID";       // Replace with your Wi-Fi SSID
const char* password = "Your_PASSWORD"; // Replace with your Wi-Fi Password

WiFiServer server(80);
String inputData = ""; // Data received from Arduino

void setup() {
  Serial.begin(9600); // Communicate with Arduino UNO
  WiFi.begin(ssid, password);

  while (WiFi.status() != WL_CONNECTED) {
    delay(500);
    Serial.print(".");
  }
  Serial.println("Wi-Fi Connected");
  Serial.print("IP Address: ");
  Serial.println(WiFi.localIP());

  server.begin();
}

void loop() {
  // Receive data from Arduino UNO
  while (Serial.available()) {
    char c = Serial.read();
    inputData += c;
    if (c == '\n') break;
  }

  // Serve data via Wi-Fi
  WiFiClient client = server.available();
  if (client) {
    String header = "HTTP/1.1 200 OK\r\nContent-Type: text/html\r\n\r\n";
    String webpage = "<!DOCTYPE HTML><html><body>";
    webpage += "<h1>Water Monitoring</h1>";
    webpage += "<p>" + inputData + "</p>";
    webpage += "</body></html>";
    client.print(header + webpage);
    delay(10);
    client.stop();
  }

  // Clear input data after processing
  inputData = "";
}
This documentation provides a comprehensive overview of the circuit, including the components used, their wiring details, and the code running on the microcontrollers.