Arduino UNO Bluetooth Interface with Flex Sensor Input and LCD Display
Circuit Documentation
Summary
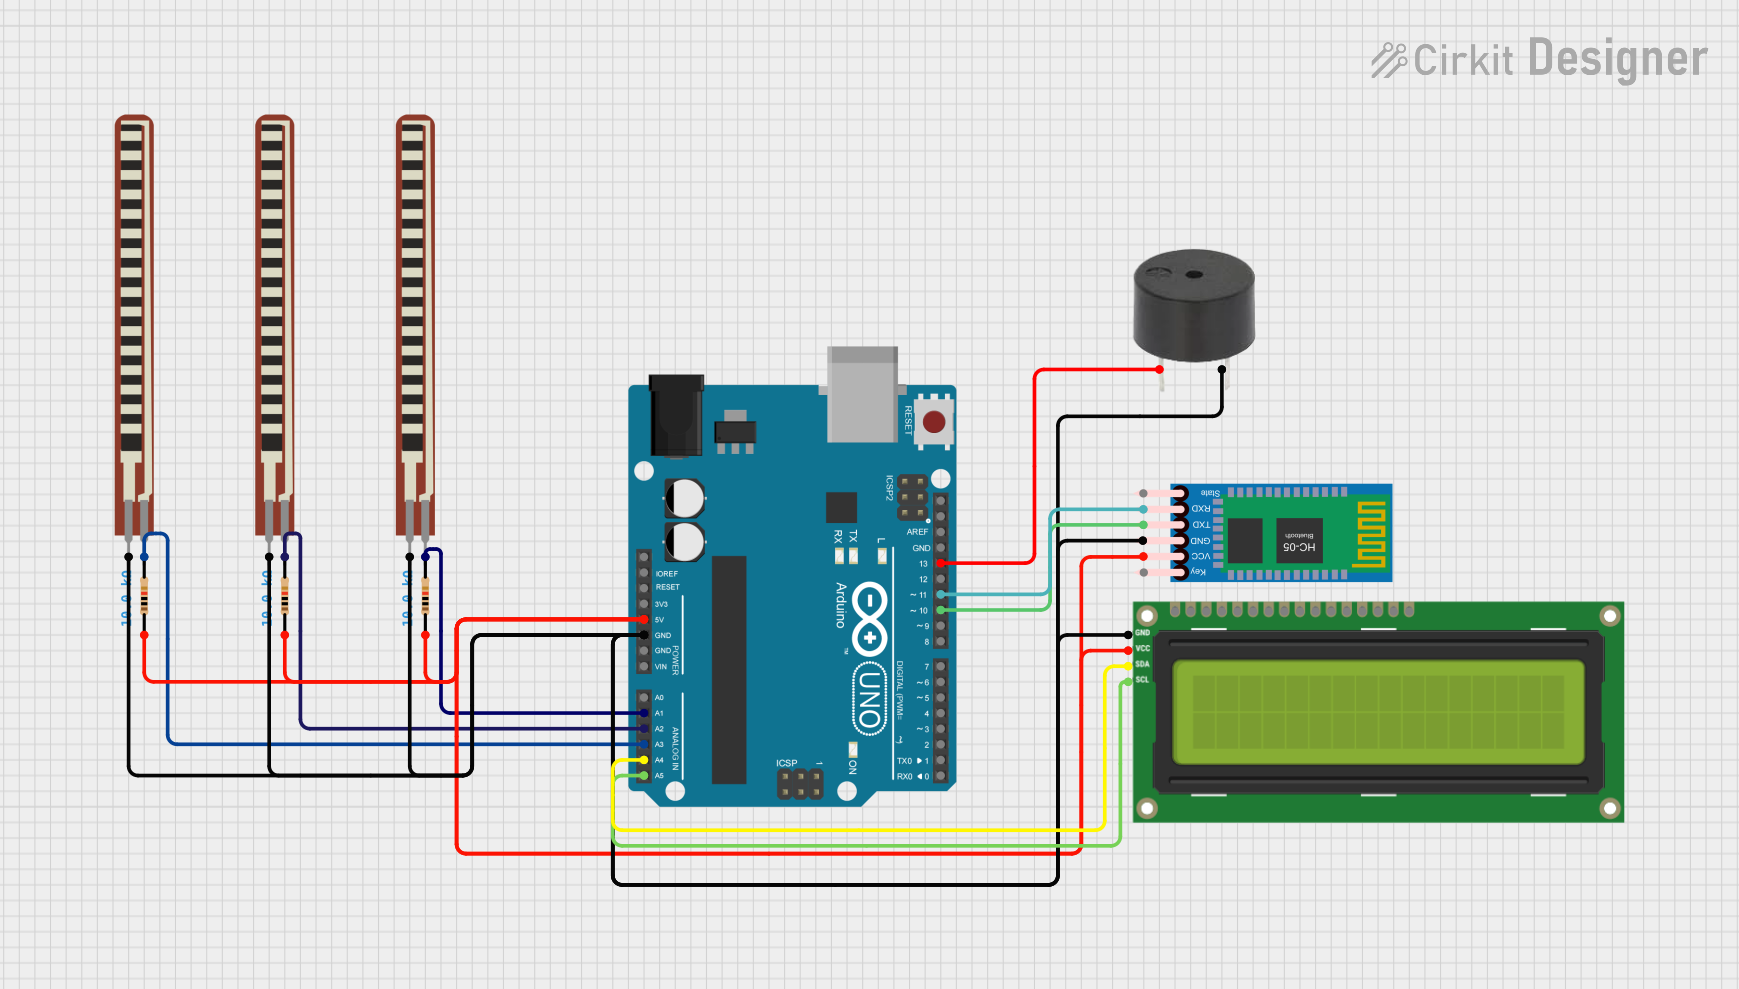
This circuit integrates an Arduino UNO microcontroller with various peripherals including an I2C LCD 16x2 Screen, multiple 2.2 inch Basic Flex Resistors, a buzzer, a set of 10k Ohm resistors, and an HC-05 Bluetooth Module. The Arduino UNO serves as the central processing unit, interfacing with the LCD screen via I2C communication and controlling a buzzer. The flex resistors are likely used as sensors, and the 10k Ohm resistors may serve as pull-up or pull-down resistors or for current limiting purposes. The HC-05 Bluetooth Module enables wireless communication, possibly for remote data monitoring or control.
Component List
Arduino UNO
- Microcontroller board based on the ATmega328P
- Provides digital and analog I/O pins
- Features serial communication capabilities
I2C LCD 16x2 Screen
- Alphanumeric liquid crystal display
- 16 characters by 2 lines
- Communicates with the Arduino via I2C protocol
2.2 inch Basic Flex Resistor (x3)
- Flexible resistive sensor
- Resistance changes with bending
- Used for detecting motion or bending
Buzzer
- Electromechanical component
- Emits sound when powered
- Typically used for audible alerts or alarms
Resistor (10k Ohm) (x3)
- Passive electrical component
- Provides a fixed value of resistance
- Commonly used for current limiting or voltage division
HC-05 Bluetooth Module
- Wireless communication module
- Enables Bluetooth connectivity for the Arduino
- Supports serial communication over Bluetooth
Wiring Details
Arduino UNO
5Vconnected to VCC of I2C LCD Screen, VCC of HC-05 Bluetooth Module, and pin1 of three 10k Ohm resistorsGNDconnected to GND of I2C LCD Screen, GND of HC-05 Bluetooth Module, GND of buzzer, and Pin 2 of three Basic Flex ResistorsA1connected to pin2 of a 10k Ohm resistorA2connected to pin2 of another 10k Ohm resistorA3connected to pin2 of the third 10k Ohm resistorA4(SDA) connected to SDA of I2C LCD ScreenA5(SCL) connected to SCL of I2C LCD ScreenD13connected to PIN of buzzerD11(TX) connected to RXD of HC-05 Bluetooth ModuleD10(RX) connected to TXD of HC-05 Bluetooth Module
I2C LCD 16x2 Screen
VCC (5V)connected to 5V of Arduino UNOGNDconnected to GND of Arduino UNOSDAconnected to A4 (SDA) of Arduino UNOSCLconnected to A5 (SCL) of Arduino UNO
2.2 inch Basic Flex Resistor (x3)
Pin 2connected to GND of Arduino UNO
Buzzer
PINconnected to D13 of Arduino UNOGNDconnected to GND of Arduino UNO
Resistor (10k Ohm) (x3)
pin1connected to 5V of Arduino UNOpin2connected to A1, A2, and A3 of Arduino UNO respectively
HC-05 Bluetooth Module
VCCconnected to 5V of Arduino UNOGNDconnected to GND of Arduino UNORXDconnected to D11 (TX) of Arduino UNOTXDconnected to D10 (RX) of Arduino UNO
Documented Code
Arduino UNO Code (sketch.ino)
void setup() {
  // put your setup code here, to run once:

}

void loop() {
  // put your main code here, to run repeatedly:

}
Note: The provided code is a template and does not include specific functionality. It should be populated with the required setup and loop code to control the circuit components as per the design requirements.