
Arduino UNO Based Temperature-Controlled Relay with LCD Display and Humidity Sensing
View and Edit Project In Cirkit Designer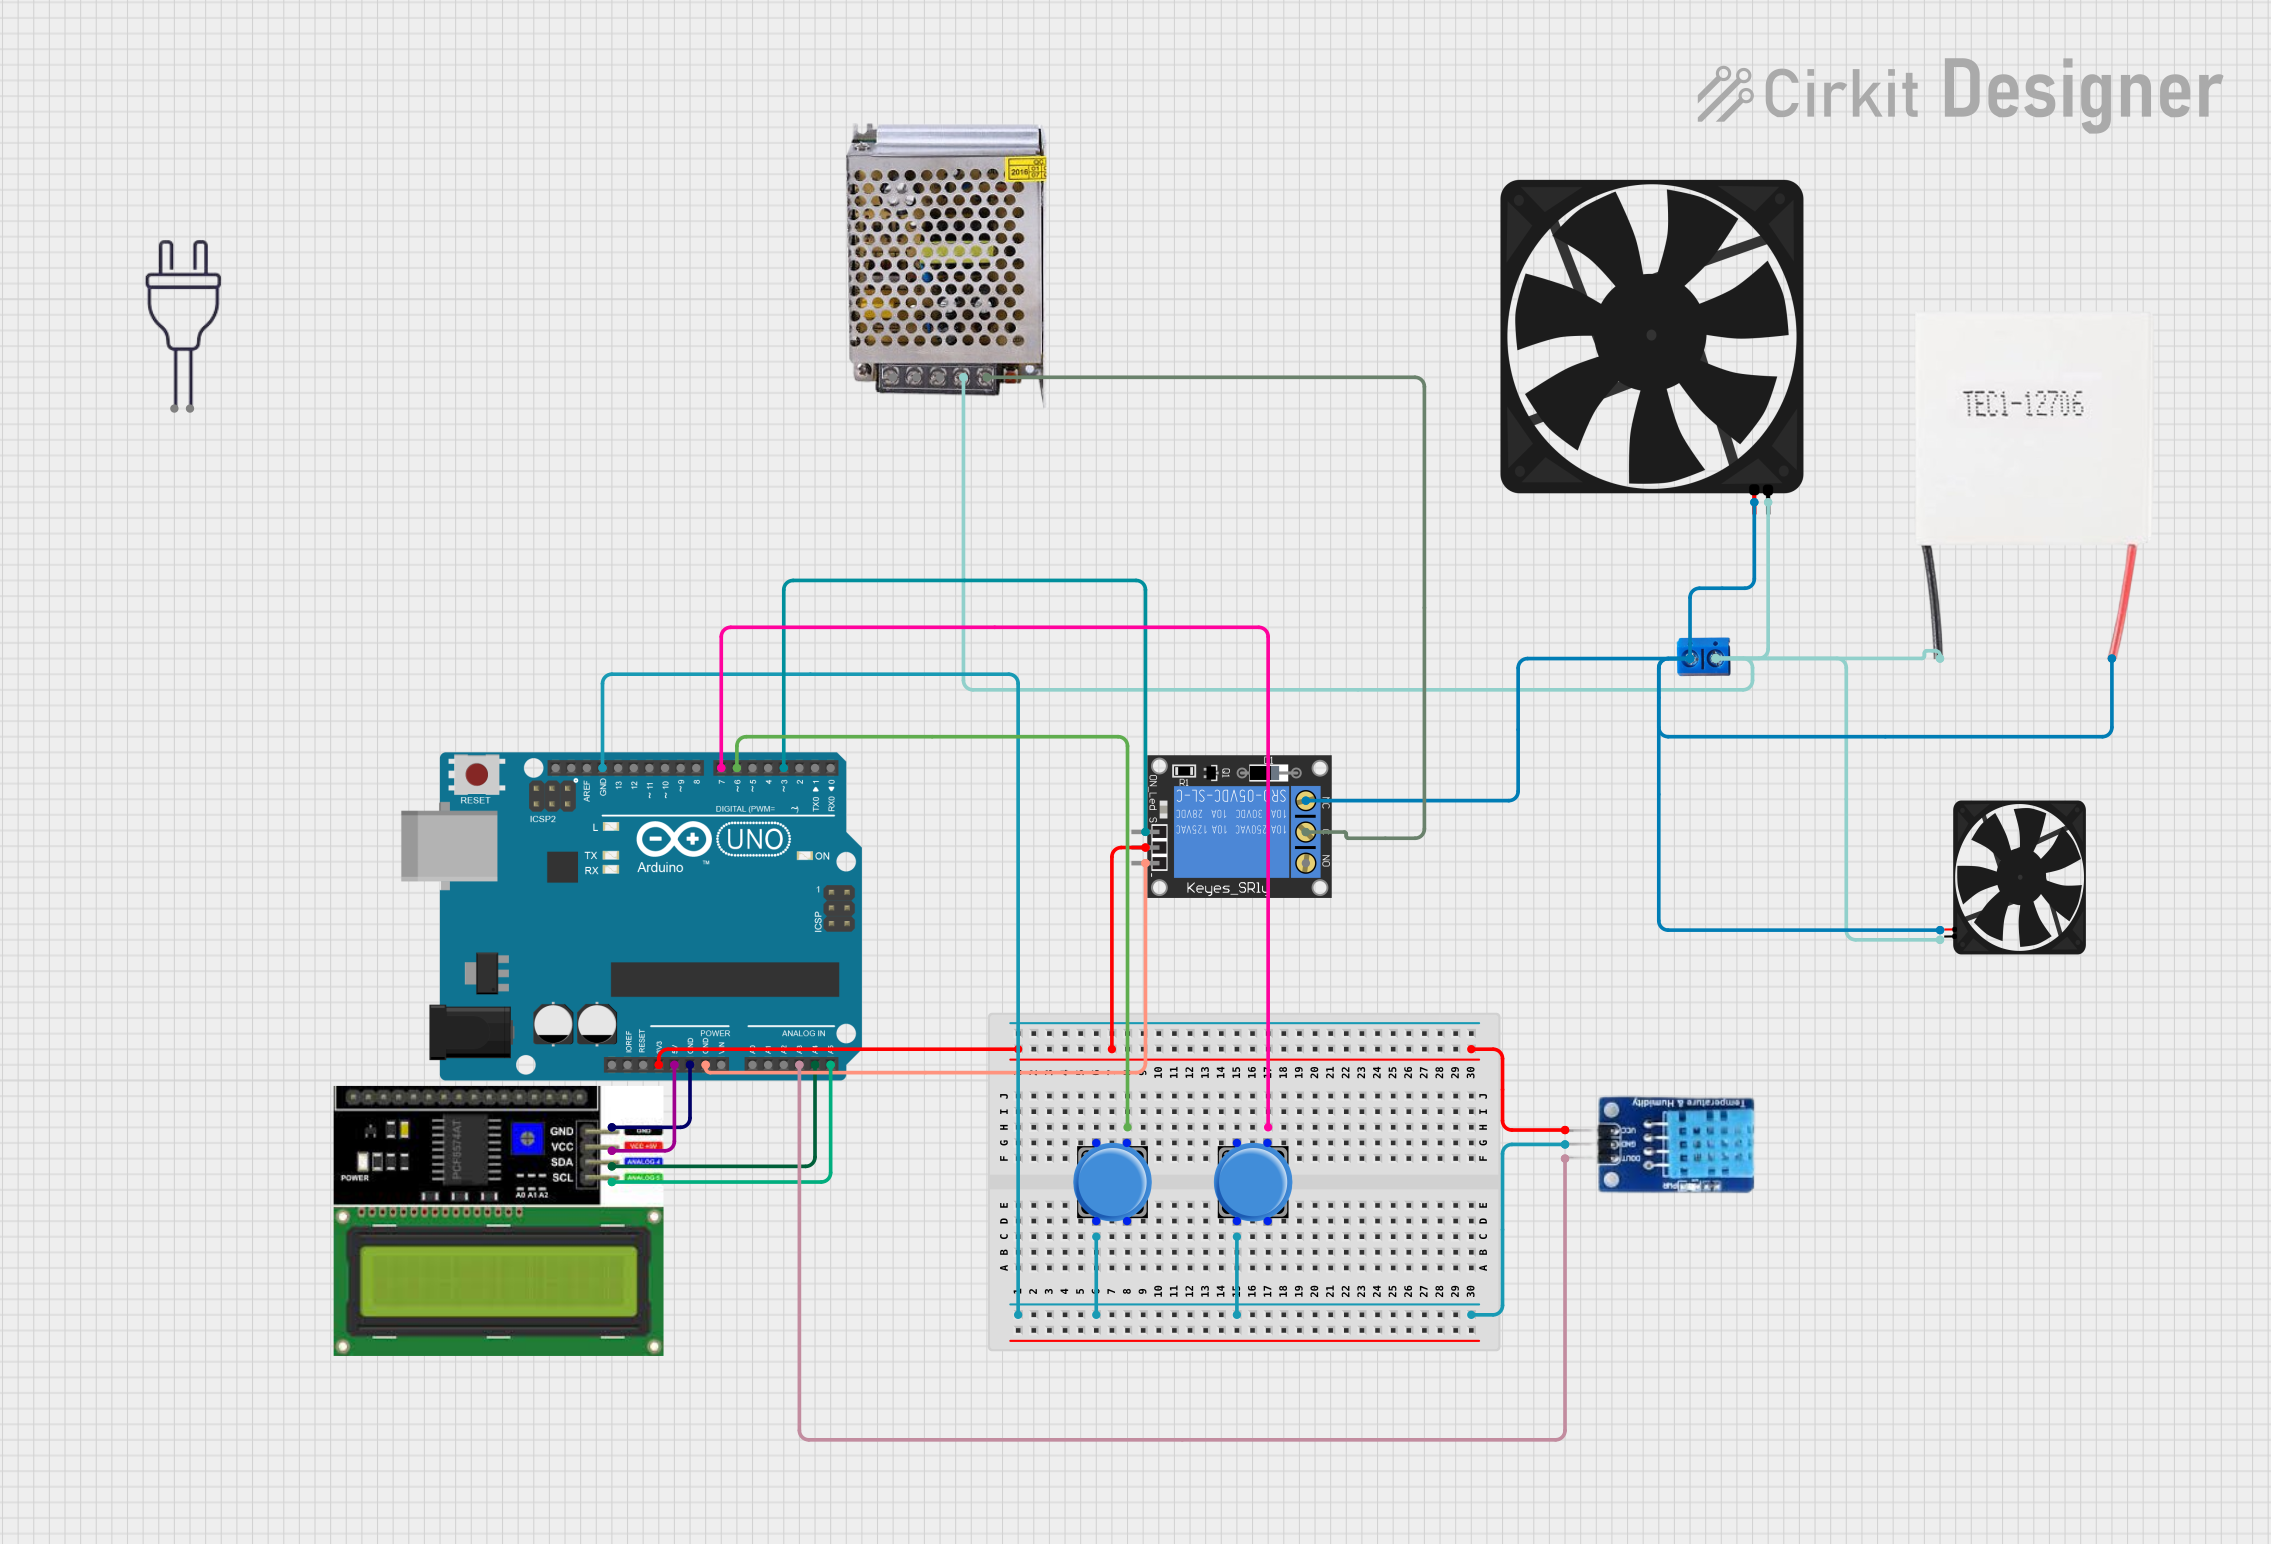
Circuit Documentation
Summary
This circuit is designed to monitor temperature and humidity using a DHT11 sensor and display the readings on an LCD I2C display. It includes an Arduino UNO microcontroller for processing sensor data and controlling a relay based on the temperature. Two pushbuttons allow the user to adjust the set temperature at which the relay is activated. The relay controls a Peltier module and two fans, which are likely used for a temperature regulation application. The circuit is powered by a 12V 5A power supply.
Component List
- Arduino UNO: A microcontroller board based on the ATmega328P. It has digital input/output pins, analog inputs, a USB connection for programming, and power management features.
- LCD I2C Display: A liquid crystal display with an I2C interface for displaying text and numbers.
- DHT11: A basic, ultra-low-cost digital temperature and humidity sensor.
- 1-Channel Relay (5V 10A): An electromechanical switch that allows control of a large current with a small current. It has normally open (NO) and normally closed (NC) connections.
- Pushbutton (x2): A simple switch mechanism for controlling some aspect of a machine or a process.
- Peltier Module: A solid-state active heat pump which transfers heat from one side of the device to the other.
- Fan (x2): An electric device that produces airflow for the purpose of cooling or ventilation.
- Terminal PCB 2 Pin: A simple two-pin terminal block for connecting wires to a PCB.
- POWER SUPPLY 12V 5AMP: A power supply unit that converts 220V AC to 12V DC and can deliver up to 5A of current.
- power 220v: Represents the main AC power supply.
Wiring Details
Arduino UNO
- GND: Connected to the ground pins of the Pushbuttons, DHT11, LCD I2C Display, and 1-Channel Relay.
- 3.3V: Supplies power to the 1-Channel Relay and DHT11.
- 5V: Supplies power to the LCD I2C Display.
- A3: Receives the data signal from the DHT11 sensor.
- A4 (SDA): Connected to the SDA pin of the LCD I2C Display for I2C communication.
- A5 (SCL): Connected to the SCL pin of the LCD I2C Display for I2C communication.
- D3: Controls the signal pin of the 1-Channel Relay.
- D6: Connected to one of the Pushbuttons for input.
- D7: Connected to the other Pushbutton for input.
LCD I2C Display
- GND: Connected to the ground of the Arduino UNO.
- VCC: Powered by the 5V output from the Arduino UNO.
- SDA: Connected to the A4 pin of the Arduino UNO.
- SCL: Connected to the A5 pin of the Arduino UNO.
DHT11
- DATA: Connected to the A3 pin of the Arduino UNO.
- GND: Connected to the ground of the Arduino UNO.
- VCC: Powered by the 3.3V output from the Arduino UNO.
1-Channel Relay (5V 10A)
- NC: Connected to the positive side of the Peltier Module, Fans, and Terminal PCB 2 Pin.
- signal: Controlled by the D3 pin of the Arduino UNO.
- C: Connected to the 12V-24V Output (DC) from the POWER SUPPLY.
- power: Powered by the 3.3V output from the Arduino UNO.
- ground: Connected to the ground of the Arduino UNO.
Pushbuttons (x2)
- Pin 2: Both buttons share a common ground with the Arduino UNO.
- Pin 3: One button is connected to the D6 pin and the other to the D7 pin of the Arduino UNO for input.
Peltier Module
- Negative: Connected to the ground side of the Terminal PCB 2 Pin.
- Positive: Connected to the NC pin of the 1-Channel Relay.
Fans (x2)
- GND: Both fans share a common ground with the Terminal PCB 2 Pin.
- 5V: Both fans are connected to the positive side of the Terminal PCB 2 Pin.
Terminal PCB 2 Pin
- Pin A: Connected to the positive side of the Peltier Module and both Fans.
- Pin B: Connected to the ground side of the Peltier Module, both Fans, and the GND (DC) of the POWER SUPPLY.
POWER SUPPLY 12V 5AMP
- 12V-24V Output (DC): Connected to the C pin of the 1-Channel Relay.
- GND (DC): Connected to the ground side of the Terminal PCB 2 Pin.
Documented Code
#include <DHT.h>
#include <Wire.h>
#include <LiquidCrystal_I2C.h>

// Define pin assignments
#define DHTPIN A3
#define DHTTYPE DHT11
#define UP_BUTTON_PIN 6
#define DOWN_BUTTON_PIN 7
#define RELAY_PIN 3

// Create DHT sensor object
DHT dht(DHTPIN, DHTTYPE);

// LCD setup (assuming you are using an I2C LCD)
LiquidCrystal_I2C lcd(0x27, 16, 2); // Adjust the address and size if necessary

// Variables
int setTemperature = 23; // Temperature to activate relay
const unsigned long INTERVAL = 1000; // Update interval for sensor readings
unsigned long previousTime = 0;

void setup() {
  Serial.begin(9600);

  pinMode(RELAY_PIN, OUTPUT);
  digitalWrite(RELAY_PIN, HIGH); // Initially turn off the relay

  pinMode(UP_BUTTON_PIN, INPUT_PULLUP);
  pinMode(DOWN_BUTTON_PIN, INPUT_PULLUP);

  dht.begin();

  lcd.init();
  lcd.backlight();
  lcd.setCursor(0, 0);
  lcd.print("Initializing...");
  delay(1000);

  lcd.clear();
  Serial.println("DHT11 Humidity & Temperature Sensor");
  delay(1000);
}

void loop() {
  unsigned long currentTime = millis();

  if (currentTime - previousTime >= INTERVAL) {
    previousTime = currentTime;

    // Read temperature and humidity
    float humidity = dht.readHumidity();
    float temperature = dht.readTemperature();

    // Check if readings failed
    if (isnan(humidity) || isnan(temperature)) {
      Serial.println("Failed to read from DHT sensor!");
      return;
    }

    // Print to Serial Monitor
    Serial.print("Current humidity = ");
    Serial.print(humidity, 1);
    Serial.print("%  Temperature = ");
    Serial.print(temperature, 1);
    Serial.print((char)223);
    Serial.println("C");

    // Display on LCD
    lcd.setCursor(0, 0);
    lcd.print("Hum:");
    lcd.print(humidity, 0);
    lcd.print("%");

    lcd.setCursor(0, 1);
    lcd.print("Temp:");
    lcd.print(temperature, 0);
    lcd.print((char)223);
    lcd.print("C");

    // Relay control
    if (temperature > setTemperature) {
      Serial.println("Relay: ON");
      lcd.setCursor(9, 0);
      lcd.print("SW:ON  ");
      digitalWrite(RELAY_PIN, LOW);
    } else {
      Serial.println("Relay: OFF");
      lcd.setCursor(9, 0);
      lcd.print("SW:OFF ");
      digitalWrite(RELAY_PIN, HIGH);
    }

    // Button handling
    if (digitalRead(UP_BUTTON_PIN) == LOW) {
      setTemperature++;
      delay(200); // Debounce delay
    }

    if (digitalRead(DOWN_BUTTON_PIN) == LOW) {
      setTemperature--;
      delay(200); // Debounce delay
    }

    // Display set temperature on LCD
    lcd.setCursor(10, 1);
    lcd.print("Set:");
    lcd.print(setTemperature);
  }
}
This code is designed to run on the Arduino UNO microcontroller. It initializes the DHT11 sensor and the LCD display, reads temperature and humidity data, and displays the readings on the LCD. It also controls a relay based on the temperature reading and allows the user to adjust the set temperature using pushbuttons.