
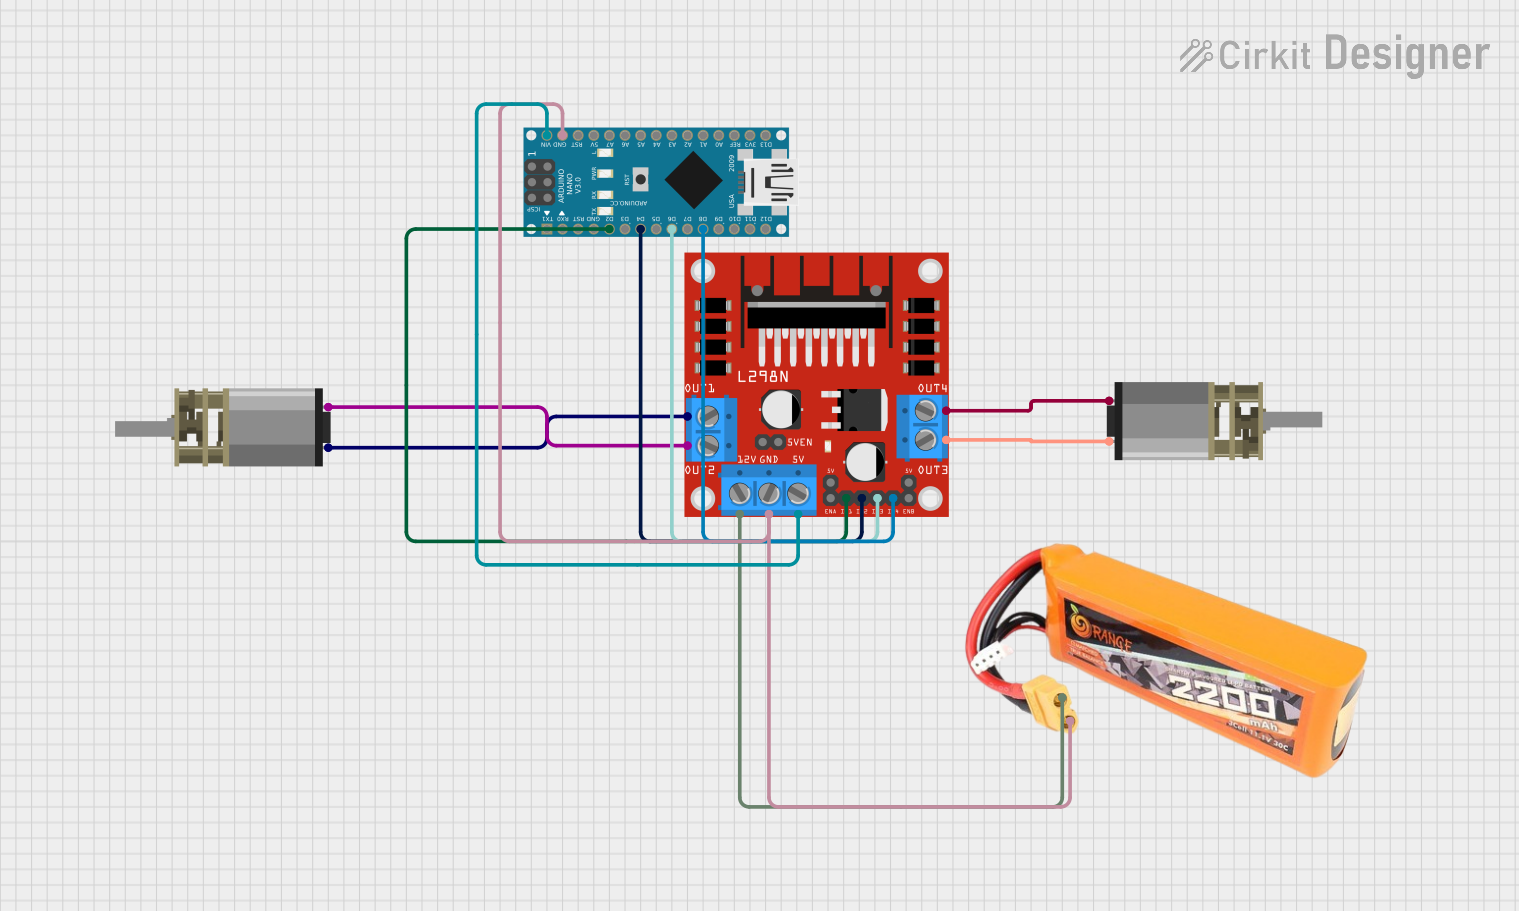
Circuit Documentation
Summary
This circuit is designed to control two DC Mini Metal Gear Motors using an Arduino Nano microcontroller and an L298N DC motor driver. The motors are powered by a lipo battery with a capacity of 2200mAh and a discharge rate of 30C. The Arduino Nano is programmed to turn on the motors and set them to move forward upon powering up the system.
Component List
Arduino Nano
- Microcontroller board based on the ATmega328P
- It has a variety of digital and analog I/O pins
- Used for controlling the L298N motor driver
L298N DC Motor Driver
- A dual H-bridge motor driver capable of driving two DC motors
- It receives control signals from the Arduino Nano
- Powers the DC motors using the battery
DC Mini Metal Gear Motor (x2)
- Small DC motors with gear reduction
- Controlled by the L298N motor driver
- Used for creating motion in the desired application
Lipo Battery 2200mAh 30C
- A rechargeable battery providing power to the circuit
- Supplies 12V to the motor driver and also powers the Arduino Nano
Wiring Details
Arduino Nano
- D2 connected to L298N driver IN1
- D4 connected to L298N driver IN2
- D6 connected to L298N driver IN3
- D8 connected to L298N driver IN4
- VIN connected to L298N driver 5V
- GND connected to L298N driver GND and lipo battery GND
L298N DC Motor Driver
- IN1 connected to Arduino Nano D2
- IN2 connected to Arduino Nano D4
- IN3 connected to Arduino Nano D6
- IN4 connected to Arduino Nano D8
- 5V connected to Arduino Nano VIN
- GND connected to Arduino Nano GND and lipo battery GND
- OUT1 connected to Motor 1 IN1
- OUT2 connected to Motor 1 IN2
- OUT3 connected to Motor 2 IN2
- OUT4 connected to Motor 2 IN1
- 12V connected to lipo battery VCC
DC Mini Metal Gear Motor 1
- IN1 connected to L298N driver OUT1
- IN2 connected to L298N driver OUT2
DC Mini Metal Gear Motor 2
- IN1 connected to L298N driver OUT4
- IN2 connected to L298N driver OUT3
Lipo Battery 2200mAh 30C
- VCC connected to L298N driver 12V
- GND connected to L298N driver GND and Arduino Nano GND
Documented Code
/*
 * This Arduino sketch controls two DC motors using an L298N motor driver.
 * The motors are powered on and set to move forward when the Arduino is
 * powered on.
 */

// Define motor control pins
const int motor1Pin1 = 2; // IN1 on L298N
const int motor1Pin2 = 4; // IN2 on L298N
const int motor2Pin1 = 6; // IN3 on L298N
const int motor2Pin2 = 8; // IN4 on L298N

void setup() {
  // Set all motor control pins to output
  pinMode(motor1Pin1, OUTPUT);
  pinMode(motor1Pin2, OUTPUT);
  pinMode(motor2Pin1, OUTPUT);
  pinMode(motor2Pin2, OUTPUT);

  // Turn on motors to move forward
  digitalWrite(motor1Pin1, HIGH);
  digitalWrite(motor1Pin2, LOW);
  digitalWrite(motor2Pin1, HIGH);
  digitalWrite(motor2Pin2, LOW);
}

void loop() {
  // No need to do anything in the loop for this task
}
The code is written for the Arduino Nano and is responsible for initializing the motor control pins as outputs and setting the motors to move forward by sending appropriate HIGH and LOW signals to the L298N motor driver. The setup() function is called once when the Arduino is powered on, and the loop() function runs continuously but is not used in this application.