Cirkit Designer
Your all-in-one circuit design IDE
Home /
Project Documentation
Arduino Nano Battery Monitor with Bluetooth and LCD Display

Circuit Documentation
Summary
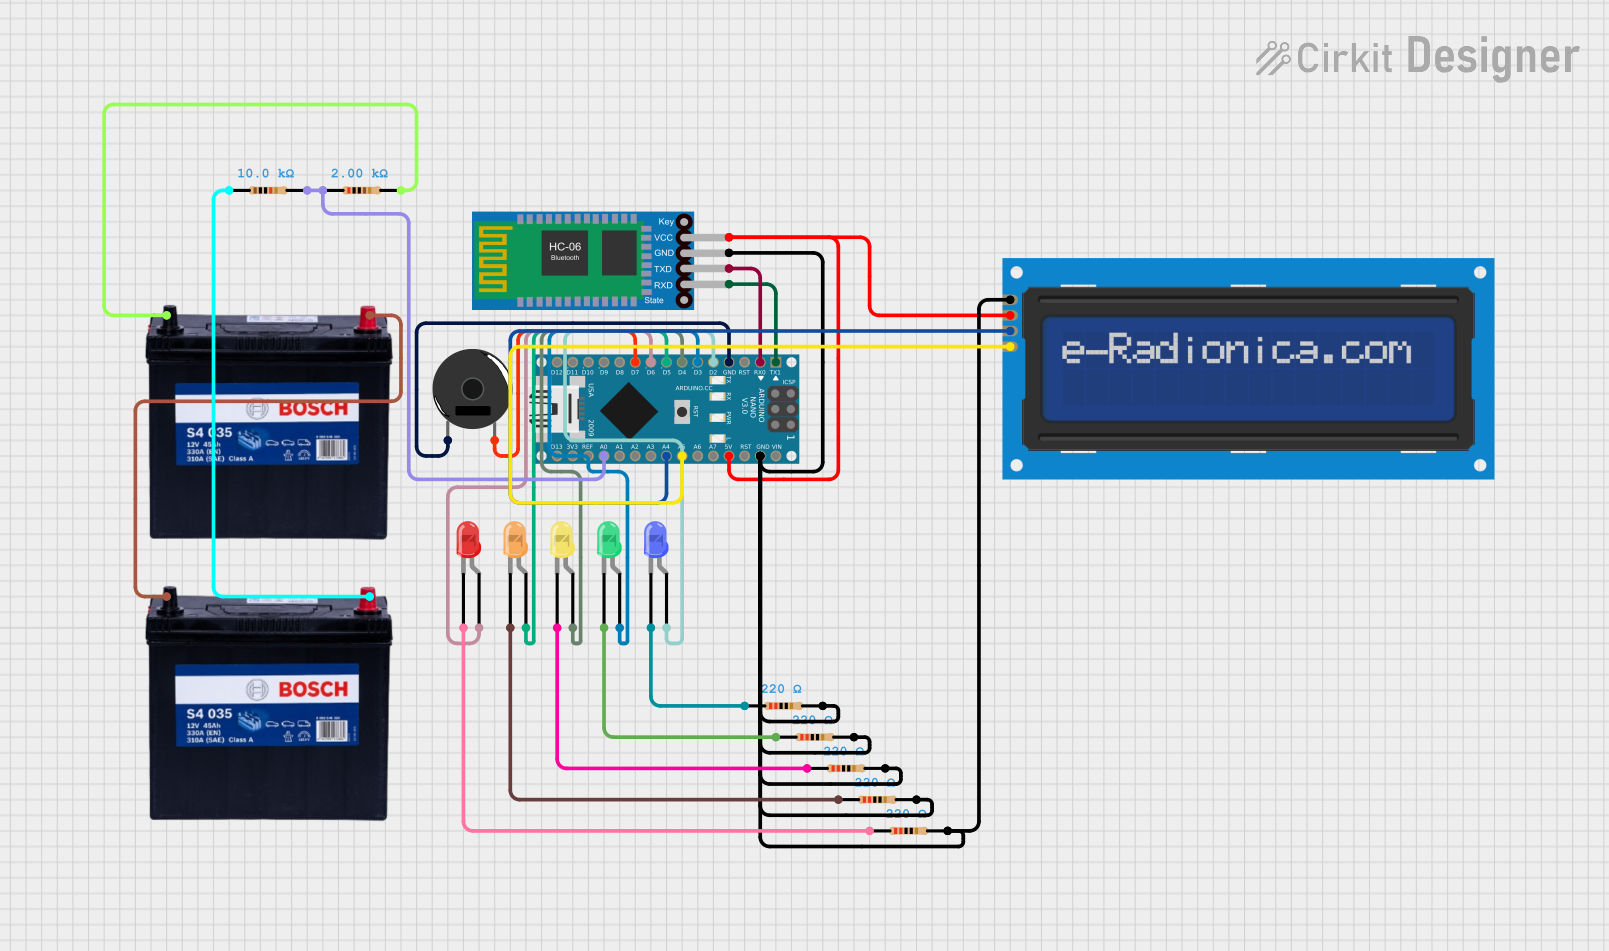
This circuit is designed to monitor the voltage of a 12V battery and display the voltage and charge percentage on an LCD screen. It also uses an Arduino Nano to control multiple LEDs and a piezo buzzer. The Bluetooth HC-06 module is used for wireless communication, allowing the battery status to be sent to a remote device.
Component List
Arduino Nano
- Description: Microcontroller board based on the ATmega328P.
- Pins: D1/TX, D0/RX, RESET, GND, D2, D3, D4, D5, D6, D7, D8, D9, D10, D11/MOSI, D12/MISO, VIN, 5V, A7, A6, A5, A4, A3, A2, A1, A0, AREF, 3V3, D13/SCK
Bluetooth HC-06
- Description: Bluetooth module for wireless communication.
- Pins: VCC, GND, TXD, RXD
Piezo Buzzer
- Description: Sound-producing device.
- Pins: pin 1, pin 2
LED: Two Pin (red)
- Description: Red LED.
- Pins: cathode, anode
LED: Two Pin (green)
- Description: Green LED.
- Pins: cathode, anode
LED: Two Pin (blue)
- Description: Blue LED.
- Pins: cathode, anode
LED: Two Pin (yellow)
- Description: Yellow LED.
- Pins: cathode, anode
LED: Two Pin (orange)
- Description: Orange LED.
- Pins: cathode, anode
Resistor (220 Ohms)
- Description: Resistor with 220 Ohms resistance.
- Pins: pin1, pin2
Resistor (10k Ohms)
- Description: Resistor with 10k Ohms resistance.
- Pins: pin1, pin2
Resistor (2k Ohms)
- Description: Resistor with 2k Ohms resistance.
- Pins: pin1, pin2
12V 200Ah Battery
- Description: Power source.
- Pins: GND, 12V
LCD screen 16x2 I2C
- Description: LCD screen with I2C interface.
- Pins: SCL, SDA, VCC, GND
Wiring Details
Arduino Nano
- D1/TX connected to Bluetooth HC-06 RXD
- D0/RX connected to Bluetooth HC-06 TXD
- GND connected to:
- Piezo Buzzer pin 1
- Resistor pin2 (multiple resistors)
- Bluetooth HC-06 GND
- LCD screen 16x2 I2C GND
- D2 connected to LED: Two Pin (blue) anode
- D3 connected to LED: Two Pin (green) anode
- D4 connected to LED: Two Pin (yellow) anode
- D5 connected to LED: Two Pin (orange) anode
- D6 connected to LED: Two Pin (red) anode
- D7 connected to Piezo Buzzer pin 2
- 5V connected to:
- Bluetooth HC-06 VCC
- LCD screen 16x2 I2C VCC
- A5 connected to LCD screen 16x2 I2C SCL
- A4 connected to LCD screen 16x2 I2C SDA
- A0 connected to:
- Resistor pin1 (2k Ohms)
- Resistor pin2 (10k Ohms)
Bluetooth HC-06
- RXD connected to Arduino Nano D1/TX
- TXD connected to Arduino Nano D0/RX
- GND connected to Arduino Nano GND
- VCC connected to Arduino Nano 5V
Piezo Buzzer
- pin 1 connected to Arduino Nano GND
- pin 2 connected to Arduino Nano D7
LED: Two Pin (red)
- anode connected to Arduino Nano D6
- cathode connected to Resistor pin1 (220 Ohms)
LED: Two Pin (green)
- anode connected to Arduino Nano D3
- cathode connected to Resistor pin1 (220 Ohms)
LED: Two Pin (blue)
- anode connected to Arduino Nano D2
- cathode connected to Resistor pin1 (220 Ohms)
LED: Two Pin (yellow)
- anode connected to Arduino Nano D4
- cathode connected to Resistor pin1 (220 Ohms)
LED: Two Pin (orange)
- anode connected to Arduino Nano D5
- cathode connected to Resistor pin1 (220 Ohms)
Resistor (220 Ohms)
- pin1 connected to LED cathode
- pin2 connected to Arduino Nano GND
Resistor (10k Ohms)
- pin1 connected to 12V 200Ah Battery 12V
- pin2 connected to Resistor pin1 (2k Ohms)
Resistor (2k Ohms)
- pin1 connected to Arduino Nano A0
- pin2 connected to 12V 200Ah Battery GND
12V 200Ah Battery
- GND connected to Resistor pin2 (2k Ohms)
- 12V connected to Resistor pin1 (10k Ohms)
LCD screen 16x2 I2C
- SCL connected to Arduino Nano A5
- SDA connected to Arduino Nano A4
- VCC connected to Arduino Nano 5V
- GND connected to Arduino Nano GND
Code Documentation
#include <Wire.h>
#include <LiquidCrystal_I2C.h>
#include <SoftwareSerial.h>

// Initialize the LCD with I2C address 0x27, 16 columns, and 2 rows
LiquidCrystal_I2C lcd(0x27, 16, 2);

// Bluetooth module connections
SoftwareSerial BTSerial(0, 1); // RX, TX

// Define pin numbers
const int ledPins[] = {2, 3, 4, 5, 6};
const int buzzerPin = 7;
const int batteryPin = A0;  // Analog pin to read battery voltage

void setup() {
  // Initialize LED pins as outputs
  for (int i = 0; i < 5; i++) {
    pinMode(ledPins[i], OUTPUT);
  }
  // Initialize buzzer pin as output
  pinMode(buzzerPin, OUTPUT);
  // Initialize serial communication for Bluetooth
  BTSerial.begin(9600);
  // Initialize serial communication for debugging
  Serial.begin(9600);
  // Initialize the LCD
  lcd.begin();
  lcd.backlight();
}

void loop() {
  int batteryLevel = analogRead(batteryPin);
  float voltage = batteryLevel * (5.0 / 1023.0) * ((10.0 + 2.0) / 2.0);  // Convert to voltage

  // Map voltage to percentage (assuming 20V to 28V range)
  int percentage = map(voltage, 20, 28, 0, 100);

  Serial.print("Battery Voltage: ");
  Serial.print(voltage);
  Serial.print("V, Percentage: ");
  Serial.print(percentage);
  Serial.println("%");

  // Send data over Bluetooth
  BTSerial.print("Battery Voltage: ");
  BTSerial.print(voltage);
  BTSerial.print("V, Percentage: ");
  BTSerial.print(percentage);
  BTSerial.println("%");

  // Display data on LCD
  lcd.clear();
  lcd.setCursor(0, 0);
  lcd.print("Voltage: ");
  lcd.print(voltage);
  lcd.print("V");
  lcd.setCursor(0, 1);
  lcd.print("Charge: ");
  lcd.print(percentage);
  lcd.print("%");

  // Determine LED states based on percentage
  for (int i = 0; i < 5; i++) {
    if (percentage > (i + 1) * 20) {
      digitalWrite(ledPins[i], HIGH);
    } else {
      digitalWrite(ledPins[i], LOW);
    }
  }

  // Sound buzzer if battery level is below 30%
  if (percentage < 30) {
    for (int i = 0; i <