
Circuit Documentation
Summary
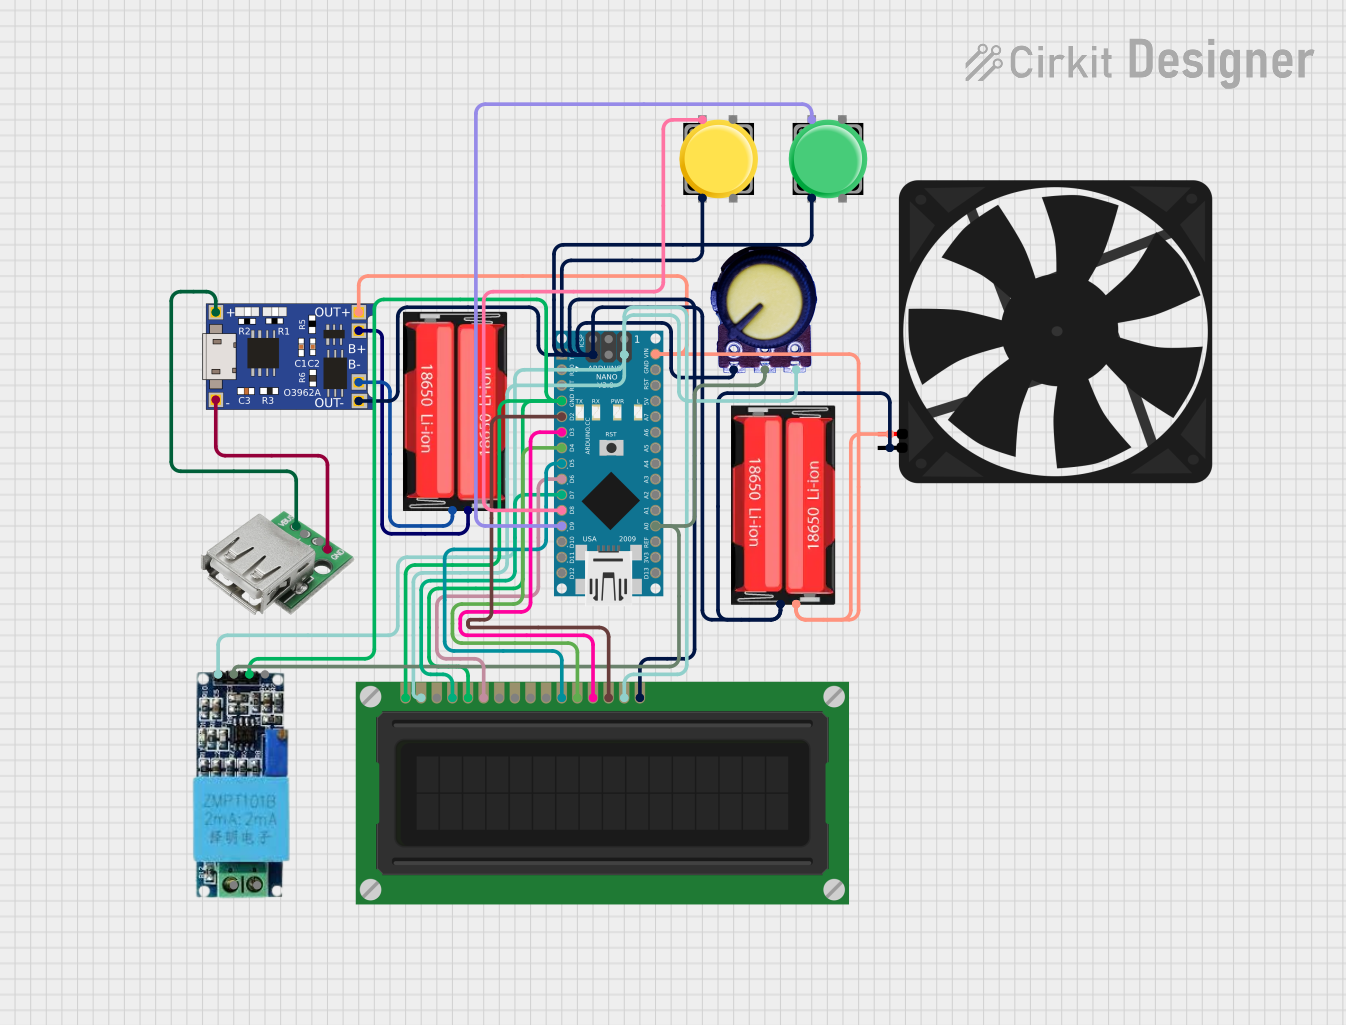
This circuit involves an Arduino Nano microcontroller interfacing with various components including an LCD display, pushbuttons, a potentiometer, a voltage sensor, a fan, and a TP4056 battery charger module connected to 18650 Li-Ion batteries. The circuit is designed to read inputs from the pushbuttons and potentiometer, display information on the LCD, and control the fan. The TP4056 module is used to charge the 18650 Li-Ion batteries.
Component List
Arduino Nano
- Description: A small, complete, and breadboard-friendly board based on the ATmega328P.
- Pins: D1/TX, D0/RX, RESET, GND, D2, D3, D4, D5, D6, D7, D8, D9, D10, D11/MOSI, D12/MISO, VIN, 5V, A7, A6, A5, A4, A3, A2, A1, A0, AREF, 3V3, D13/SCK
18650 Li-Ion Battery
- Description: A rechargeable lithium-ion battery.
- Pins: Positive, Negative
TP4056
- Description: A linear battery charger module for single-cell lithium-ion batteries.
- Pins: OUT-, B-, B+, OUT+, IN-, IN+
USB Female
- Description: A USB female connector for power input.
- Pins: VCC, GND, -D, +D
Fan
- Description: A small DC fan for cooling purposes.
- Pins: GND, 5V
LCD Display (16 pin)
- Description: A 16x2 character LCD display.
- Pins: VSS, VDD, VO, RS, R_W, E, DB0, DB1, DB2, DB3, DB4, DB5, DB6, DB7, A, K
Voltage Sensor
- Description: A sensor to measure voltage levels.
- Pins: Ground, Phase, Vcc, Out, Gnd
Pushbutton
- Description: A simple pushbutton switch.
- Pins: Pin 2, Pin 1, Pin 3, Pin 4
Potentiometer
- Description: A variable resistor used to adjust voltage levels.
- Pins: GND, Output, VCC
Wiring Details
Arduino Nano
GND is connected to:
- VSS of LCD Display
- R_W of LCD Display
- Gnd of Voltage Sensor
- GND of Potentiometer
- Pin 2 of Pushbutton 1
- Pin 2 of Pushbutton 2
- GND of Fan
- K of LCD Display
- OUT- of TP4056
- Negative of 18650 Li-Ion Battery
D2 is connected to DB7 of LCD Display
D3 is connected to DB6 of LCD Display
D4 is connected to DB5 of LCD Display
D5 is connected to DB4 of LCD Display
D6 is connected to E of LCD Display
D7 is connected to RS of LCD Display
D8 is connected to Pin 1 of Pushbutton 2
D9 is connected to Pin 1 of Pushbutton 1
VIN is connected to:
- 5V of Fan
- OUT+ of TP4056
- Positive of 18650 Li-Ion Battery
A0 is connected to:
- Output of Potentiometer
- Out of Voltage Sensor
5V is connected to:
- VCC of Potentiometer
- VDD of LCD Display
- A of LCD Display
- Vcc of Voltage Sensor
TP4056
B+ is connected to Positive of 18650 Li-Ion Battery
B- is connected to Negative of 18650 Li-Ion Battery
IN- is connected to GND of USB Female
IN+ is connected to VCC of USB Female
USB Female
GND is connected to IN- of TP4056
VCC is connected to IN+ of TP4056
Fan
GND is connected to GND of Arduino Nano
5V is connected to VIN of Arduino Nano
LCD Display (16 pin)
VSS is connected to GND of Arduino Nano
VDD is connected to 5V of Arduino Nano
R_W is connected to GND of Arduino Nano
E is connected to D6 of Arduino Nano
RS is connected to D7 of Arduino Nano
DB4 is connected to D5 of Arduino Nano
DB5 is connected to D4 of Arduino Nano
DB6 is connected to D3 of Arduino Nano
DB7 is connected to D2 of Arduino Nano
A is connected to 5V of Arduino Nano
K is connected to GND of Arduino Nano
Voltage Sensor
Gnd is connected to GND of Arduino Nano
Vcc is connected to 5V of Arduino Nano
Out is connected to A0 of Arduino Nano
Pushbutton 1
Pin 1 is connected to D9 of Arduino Nano
Pin 2 is connected to GND of Arduino Nano
Pushbutton 2
Pin 1 is connected to D8 of Arduino Nano
Pin 2 is connected to GND of Arduino Nano
Potentiometer
GND is connected to GND of Arduino Nano
Output is connected to A0 of Arduino Nano
VCC is connected to 5V of Arduino Nano
Code Documentation
Arduino Nano Code
void setup() {
  // put your setup code here, to run once:

}

void loop() {
  // put your main code here, to run repeatedly:

}
This code is a basic template for the Arduino Nano. The setup() function is where you initialize your components and settings, and the loop() function is where the main logic of your program runs repeatedly. Currently, the code does not perform any specific actions and serves as a starting point for further development.