
ESP8266 NodeMCU Automatic Water Tank Filling System with Dual Water Level Sensors and Relay-Controlled Pump
View and Edit Project In Cirkit Designer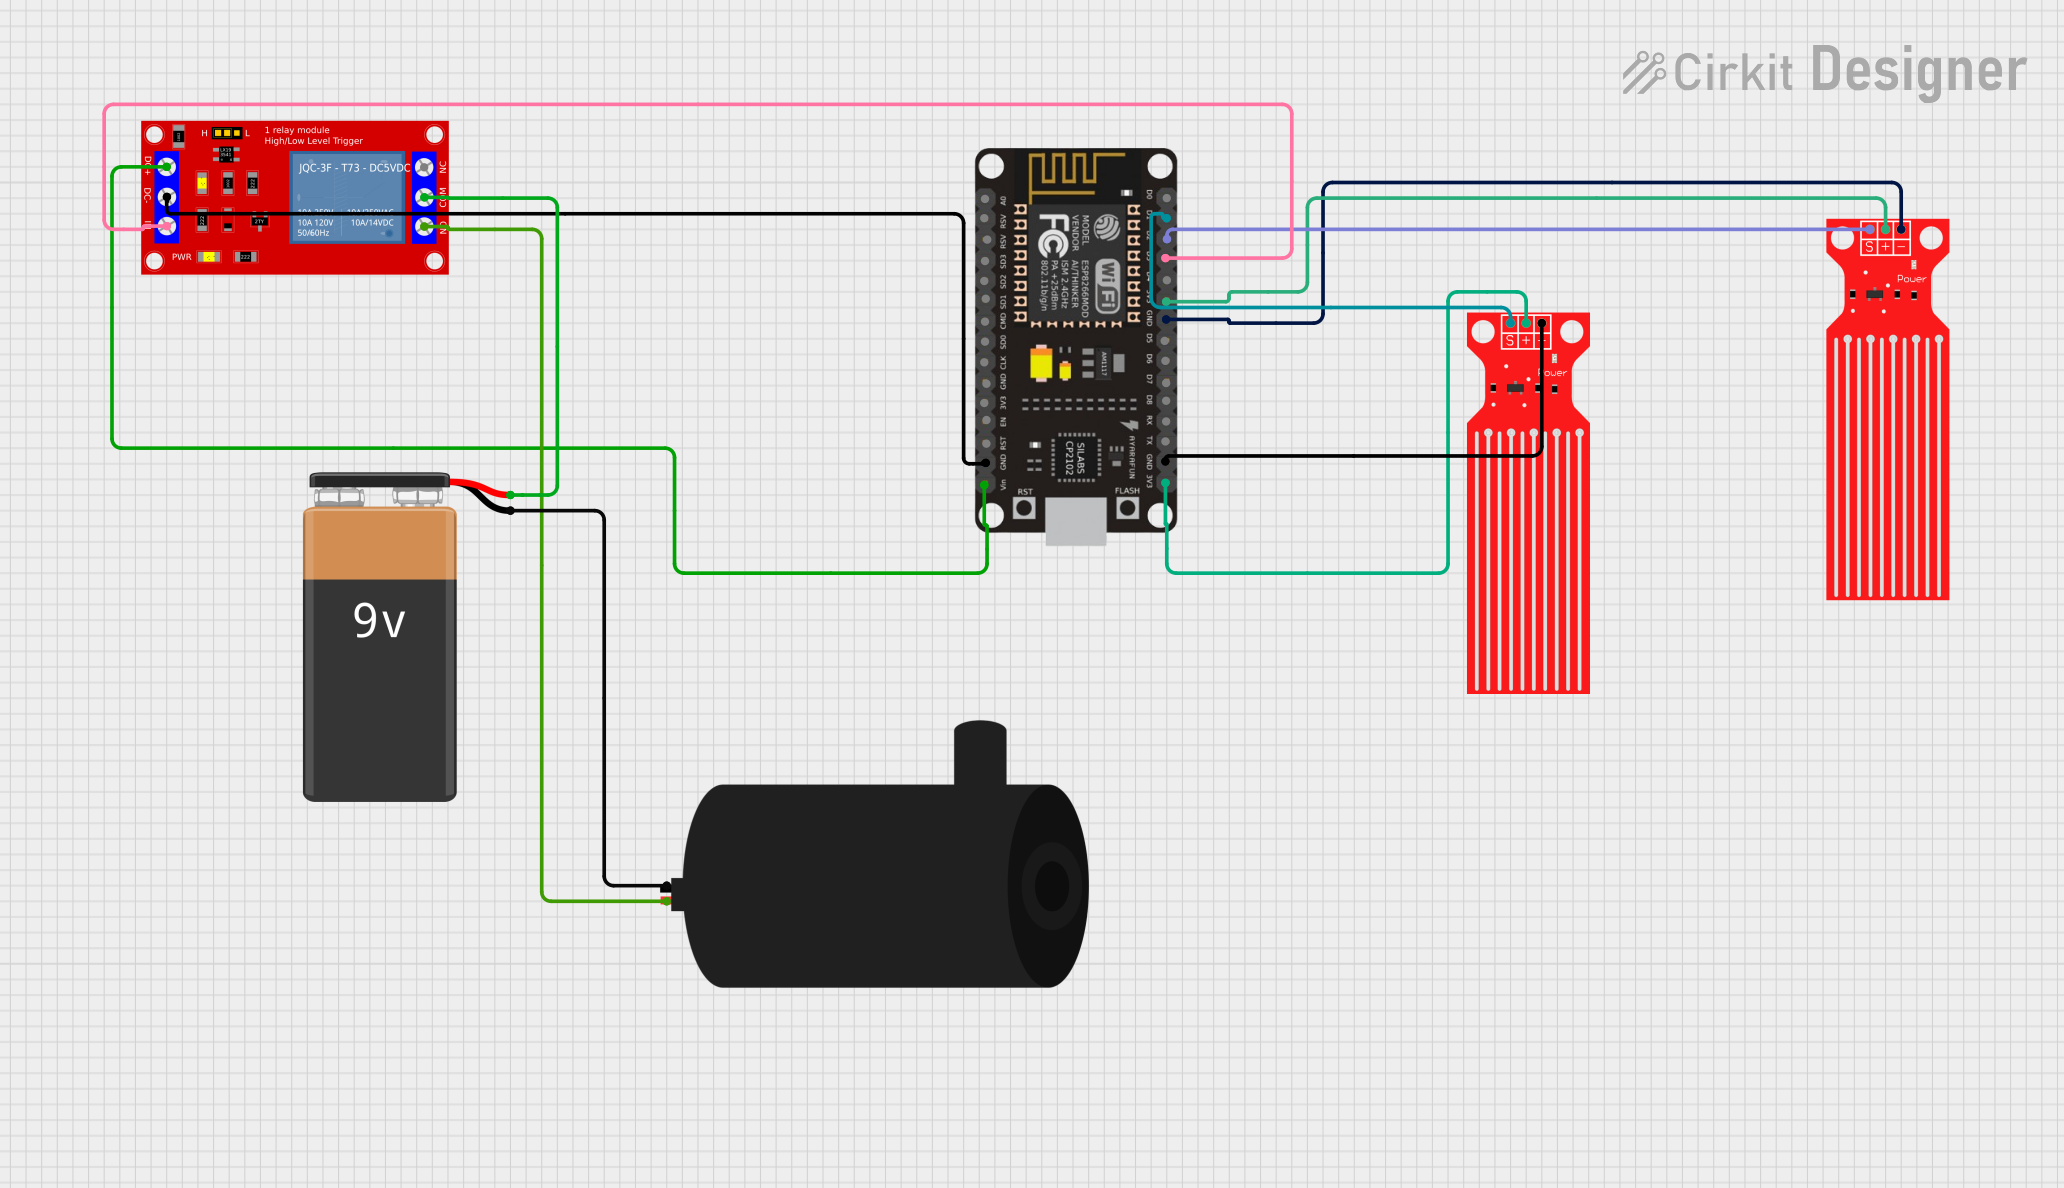
Automatic Tank Filling System Documentation
Summary
This document provides a detailed overview of an automatic tank filling system. The system uses an ESP8266 NodeMCU microcontroller to control a water pump based on the water levels detected by two water level sensors. The system ensures that the water pump is turned off when both sensors detect water and turned on when neither sensor detects water.
Component List
ESP8266 NodeMCU
- Description: A low-cost Wi-Fi microcontroller with multiple GPIO pins.
- Pins: D0, D1, D2, D3, D4, 3V3, GND, D5, D6, D7, D8, RX, TX, A0, RSV, SD3, SD2, SD1, CMD, SD0, CLK, EN, RST, VIN
Water Level Sensor (Low)
- Description: A sensor used to detect the water level in a tank.
- Pins: SIG, VCC, GND
Water Level Sensor (High)
- Description: A sensor used to detect the water level in a tank.
- Pins: SIG, VCC, GND
1 Channel 5V Relay Module
- Description: A relay module used to control the water pump.
- Pins: VCC+, VCC- (GND), IN, N.O., COM, N.C.
9V Battery
- Description: A power source for the water pump.
- Pins: -, +
Water Pump
- Description: A pump used to fill the tank with water.
- Pins: positive, negative
Wiring Details
ESP8266 NodeMCU
- D1: Connected to SIG pin of the high water level sensor.
- D2: Connected to SIG pin of the low water level sensor.
- D3: Connected to IN pin of the relay module.
- 3V3: Connected to VCC pin of both water level sensors.
- GND: Connected to GND pin of both water level sensors and VCC- (GND) pin of the relay module.
- VIN: Connected to VCC+ pin of the relay module.
Water Level Sensor (Low)
- SIG: Connected to D2 pin of the ESP8266 NodeMCU.
- VCC: Connected to 3V3 pin of the ESP8266 NodeMCU.
- GND: Connected to GND pin of the ESP8266 NodeMCU.
Water Level Sensor (High)
- SIG: Connected to D1 pin of the ESP8266 NodeMCU.
- VCC: Connected to 3V3 pin of the ESP8266 NodeMCU.
- GND: Connected to GND pin of the ESP8266 NodeMCU.
1 Channel 5V Relay Module
- IN: Connected to D3 pin of the ESP8266 NodeMCU.
- VCC+: Connected to VIN pin of the ESP8266 NodeMCU.
- VCC- (GND): Connected to GND pin of the ESP8266 NodeMCU.
- N.O.: Connected to positive pin of the water pump.
- COM: Connected to + pin of the 9V battery.
9V Battery
- +: Connected to COM pin of the relay module.
- -: Connected to negative pin of the water pump.
Water Pump
- positive: Connected to N.O. pin of the relay module.
- negative: Connected to - pin of the 9V battery.
Documented Code
/*
 * Automatic Tank Filling System
 * This code controls a water pump using an ESP8266 NodeMCU. The system uses two
 * water level sensors to detect the water level in a tank. When both sensors
 * detect water, the pump is turned off. When neither sensor detects water, the
 * pump is turned on.
 */

#include <Arduino.h>

const int lowSensorPin = 4;  // Low water level sensor connected to D2 (GPIO4)
const int highSensorPin = 5; // High water level sensor connected to D1 (GPIO5)
const int relayPin = 0;      // Relay module connected to D3 (GPIO0)

void setup() {
  pinMode(lowSensorPin, INPUT);  // Set low sensor pin as input
  pinMode(highSensorPin, INPUT); // Set high sensor pin as input
  pinMode(relayPin, OUTPUT);     // Set relay pin as output
  digitalWrite(relayPin, LOW);   // Initialize relay to off
}

void loop() {
  bool lowSensorState = digitalRead(lowSensorPin);  // Read low sensor state
  bool highSensorState = digitalRead(highSensorPin); // Read high sensor state

  if (lowSensorState == HIGH && highSensorState == HIGH) {
    digitalWrite(relayPin, LOW);  // Turn off pump if both sensors detect water
  } else if (lowSensorState == LOW && highSensorState == LOW) {
    digitalWrite(relayPin, HIGH); // Turn on pump if neither sensor detects water
  }

  delay(1000); // Wait for 1 second before next reading
}
This code initializes the pins for the water level sensors and the relay module. In the loop function, it reads the states of the sensors and controls the relay to turn the water pump on or off based on the water levels detected.