
RFID-Enabled Automated Gate System with Ultrasonic Vehicle Detection
View and Edit Project In Cirkit Designer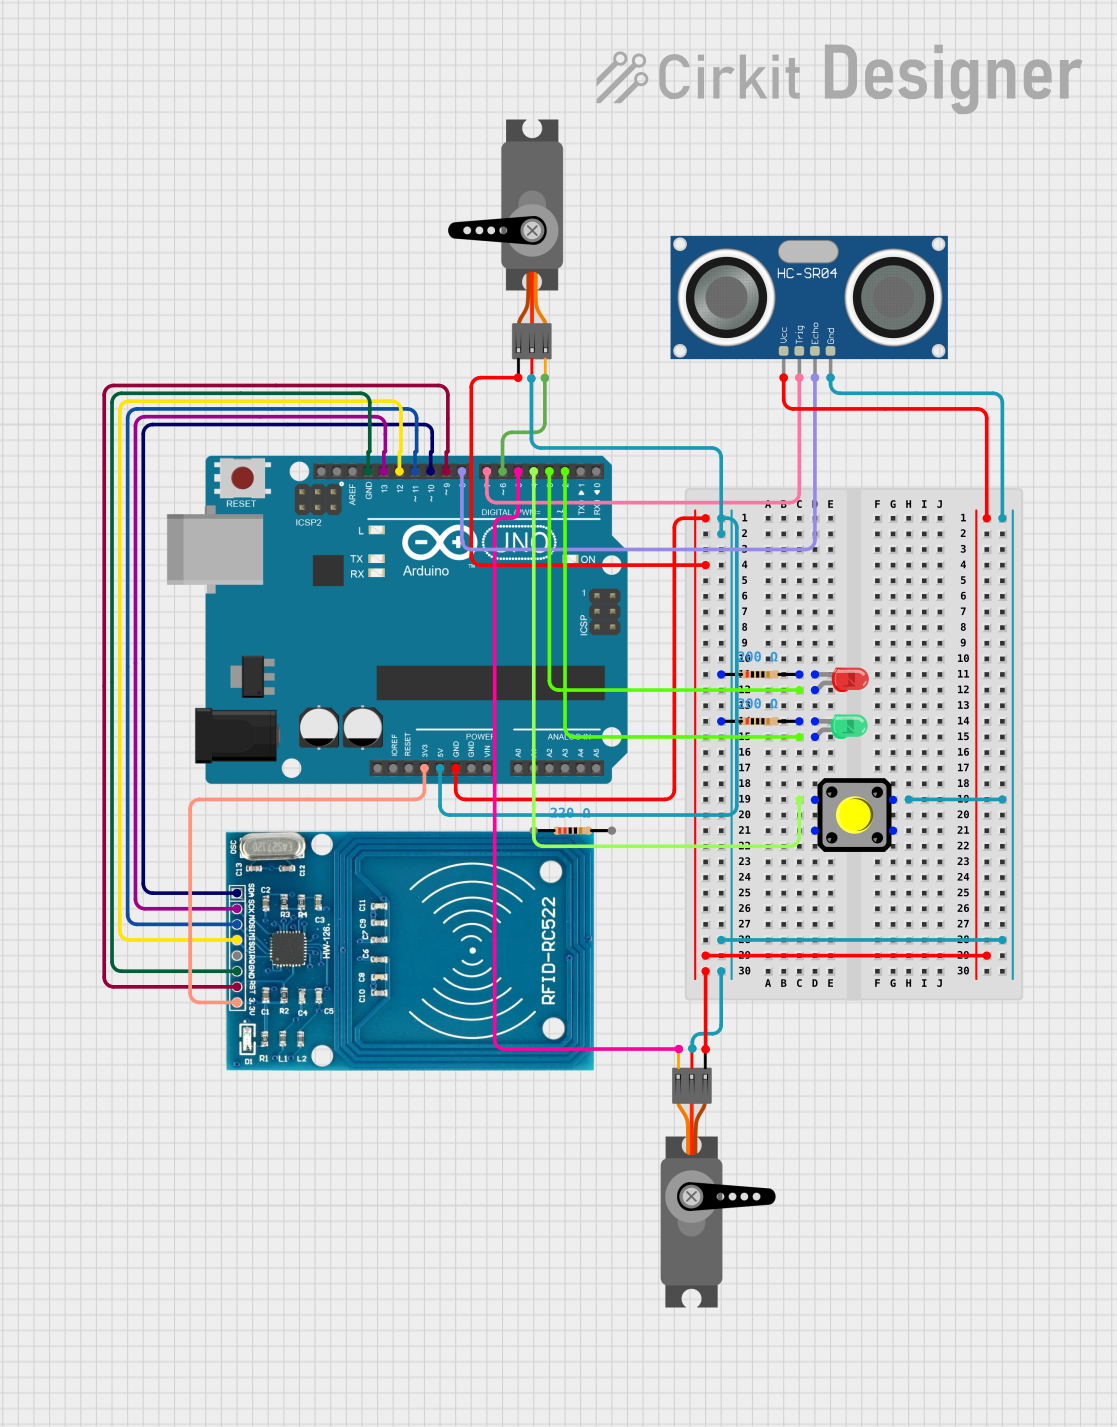
Circuit Documentation
Summary
This circuit is designed to control access through a gate using an RFID system and monitor the exit using an ultrasonic sensor. The main controller is an Arduino UNO, which interfaces with an RFID-RC522 module for scanning RFID tags, two servo motors for operating the entry and exit gates, and an HC-SR04 ultrasonic sensor for detecting the presence of a vehicle at the exit. The circuit also includes LEDs to indicate the status and a pushbutton for manual input.
Component List
RFID-RC522
- Description: RFID reader/writer module for contactless communication at 13.56MHz.
- Pins: VCC (3.3V), RST, GND, IRQ, MISO, MOSI, SCK, SDA.
Arduino UNO
- Description: Microcontroller board based on the ATmega328P.
- Pins: UNUSED, IOREF, Reset, 3.3V, 5V, GND, Vin, A0-A5, SCL, SDA, AREF, D0-D13.
Servo (x2)
- Description: Small rotary actuator or linear actuator that allows for precise control of angular or linear position.
- Pins: GND, VCC, PWM.
HC-SR04 Ultrasonic Sensor
- Description: Ultrasonic ranging module that provides 2cm to 400cm non-contact measurement functionality.
- Pins: VCC, TRIG, ECHO, GND.
LED: Two Pin (green)
- Description: Standard green LED for indication.
- Pins: cathode, anode.
LED: Two Pin (red)
- Description: Standard red LED for indication.
- Pins: cathode, anode.
Pushbutton
- Description: A simple switch mechanism for controlling some aspect of a machine or a process.
- Pins: Pin 1, Pin 2, Pin 3, Pin 4.
Resistor (200 Ohms)
- Description: A passive two-terminal electrical component that implements electrical resistance as a circuit element.
- Resistance: 200 Ohms.
Resistor (220 Ohms)
- Description: A passive two-terminal electrical component that implements electrical resistance as a circuit element.
- Resistance: 220 Ohms.
Wiring Details
RFID-RC522
- VCC (3.3V) connected to Arduino UNO 3.3V.
- RST connected to Arduino UNO D9.
- GND connected to Arduino UNO GND.
- MISO connected to Arduino UNO D12.
- MOSI connected to Arduino UNO D11.
- SCK connected to Arduino UNO D13.
- SDA connected to Arduino UNO D10.
Arduino UNO
- 3.3V, 5V, and GND used for power distribution.
- D2 connected to green LED anode.
- D3 connected to red LED anode.
- D4 connected to Pushbutton Pin 4.
- D5 connected to Servo (exit gate) PWM.
- D6 connected to Servo (entry gate) PWM.
- D7 connected to HC-SR04 Ultrasonic Sensor TRIG.
- D8 connected to HC-SR04 Ultrasonic Sensor ECHO.
- D9, D10, D11, D12, D13 used for RFID-RC522 communication.
Servo (Entry Gate)
- GND connected to Arduino UNO GND.
- VCC connected to Arduino UNO 5V.
- PWM connected to Arduino UNO D6.
Servo (Exit Gate)
- GND connected to Arduino UNO GND.
- VCC connected to Arduino UNO 5V.
- PWM connected to Arduino UNO D5.
HC-SR04 Ultrasonic Sensor
- VCC connected to Arduino UNO 5V.
- TRIG connected to Arduino UNO D7.
- ECHO connected to Arduino UNO D8.
- GND connected to Pushbutton Pin 3.
LED: Two Pin (green)
- Anode connected to Arduino UNO D2.
- Cathode connected to 200 Ohms Resistor.
LED: Two Pin (red)
- Anode connected to Arduino UNO D3.
- Cathode connected to 200 Ohms Resistor.
Pushbutton
- Pin 4 connected to Arduino UNO D4.
- Pin 3 connected to HC-SR04 Ultrasonic Sensor GND.
Resistor (200 Ohms)
- One connected between green LED cathode and Arduino UNO GND.
- Another connected between red LED cathode and Arduino UNO GND.
Resistor (220 Ohms)
- Not directly connected in the circuit as per the net list provided.
Documented Code
#include <SPI.h>
#include <MFRC522.h>
#include <Servo.h>

#define SS_PIN 10
#define RST_PIN 9
MFRC522 rfid(SS_PIN, RST_PIN);
Servo gateServo;
Servo exitServo;

// Ultrasonic Sensor pins
const int trigPin = 7;
const int echoPin = 8;
const long maxDistance = 30; // Maximum distance to detect vehicle (in cm)

String authorizedCard = "1234567890"; // Replace this with the actual card UID

void setup() {
  Serial.begin(9600);
  SPI.begin();
  rfid.PCD_Init();

  gateServo.attach(6); // Servo pin for gate
  exitServo.attach(5); // Servo pin for exit
  gateServo.write(0); // Initial position (closed gate)
  exitServo.write(0); // Initial position

  pinMode(trigPin, OUTPUT);
  pinMode(echoPin, INPUT);

  Serial.println("Place your card near the RFID reader...");
}

void loop() {
  // Look for new cards
  if ( !rfid.PICC_IsNewCardPresent() || !rfid.PICC_ReadCardSerial() )
    return;

  String cardID = "";
  for (byte i = 0; i < rfid.uid.size; i++) {
    cardID += String(rfid.uid.uidByte[i], HEX);
  }

  Serial.print("Card UID: ");
  Serial.println(cardID);

  // Check if card is authorized
  if (cardID.equalsIgnoreCase(authorizedCard)) {
    openGate();
  } else {
    Serial.println("Unauthorized card.");
  }

  // Check for exiting vehicle
  long distance = readUltrasonicDistance();
  if (distance > 0 && distance < maxDistance) {
    openExitGate();
  }

  rfid.PICC_HaltA(); // Halt PICC
}

void openGate() {
  Serial.println("Authorized card detected! Opening gate...");
  gateServo.write(90); // Open the gate by rotating the servo to 90 degrees
  delay(3000); // Keep gate open for 3 seconds
  gateServo.write(0); // Close the gate
  Serial.println("Gate closed.");
}

void openExitGate() {
  Serial.println("Vehicle detected! Opening exit gate...");
  exitServo.write(90); // Open the exit gate by rotating the servo to 90 degrees
  delay(5000); // Keep exit gate open for 5 seconds
  exitServo.write(0); // Close the exit gate
  Serial.println("Exit gate closed.");
}

long readUltrasonicDistance() {
  digitalWrite(trigPin, LOW);
  delayMicroseconds(2);
  digitalWrite(trigPin, HIGH);
  delayMicroseconds(10);
  digitalWrite(trigPin, LOW);

  long duration = pulseIn(echoPin, HIGH);
  long distance = (duration / 2) / 29.1; // Convert to cm

  return distance;
}
This code is designed to run on the Arduino UNO microcontroller. It initializes the RFID reader and the servo motors, reads RFID tags, and operates the gates accordingly. It also reads the distance from the ultrasonic sensor to detect the presence of a vehicle at the exit gate.