
Circuit Documentation
Summary
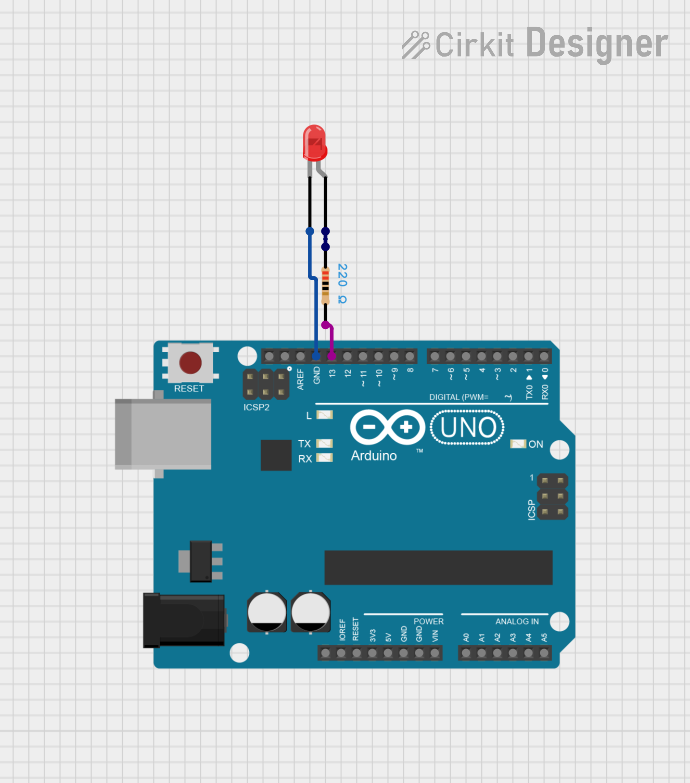
This circuit is designed to control an LED using an Arduino UNO. The LED is connected to a digital pin on the Arduino through a current-limiting resistor. The Arduino is programmed to blink the LED on and off at one-second intervals.
Component List
Arduino UNO
- Description: A microcontroller board based on the ATmega328P.
- Pins: UNUSED, IOREF, Reset, 3.3V, 5V, GND, Vin, A0, A1, A2, A3, A4, A5, SCL, SDA, AREF, D13, D12, D11, D10, D9, D8, D7, D6, D5, D4, D3, D2, D1, D0
Resistor
- Description: A passive electrical component that implements electrical resistance as a circuit element.
- Pins: pin1, pin2
- Properties:
- Resistance: 220 Ohms
LED: Two Pin (red)
- Description: A light-emitting diode (LED) that emits red light.
- Pins: cathode, anode
Wiring Details
Arduino UNO
- GND: Connected to the cathode of the LED.
- D13: Connected to pin2 of the resistor.
Resistor
- pin1: Connected to the anode of the LED.
- pin2: Connected to D13 of the Arduino UNO.
LED: Two Pin (red)
- cathode: Connected to GND of the Arduino UNO.
- anode: Connected to pin1 of the resistor.
Code Documentation
Arduino UNO Code
// Define the LED pin
const int ledPin = 13;

void setup() {
  // Initialize the LED pin as an output
  pinMode(ledPin, OUTPUT);
}

void loop() {
  // Turn the LED on
  digitalWrite(ledPin, HIGH);
  delay(1000); // Wait for 1 second

  // Turn the LED off
  digitalWrite(ledPin, LOW);
  delay(1000); // Wait for 1 second
}
This code is written for the Arduino UNO and is used to blink an LED connected to digital pin 13. The setup function initializes the LED pin as an output. The loop function turns the LED on, waits for one second, turns the LED off, and then waits for another second, repeating this cycle indefinitely.