
Battery-Powered Arduino UNO Weather Station with Relay Control
View and Edit Project In Cirkit Designer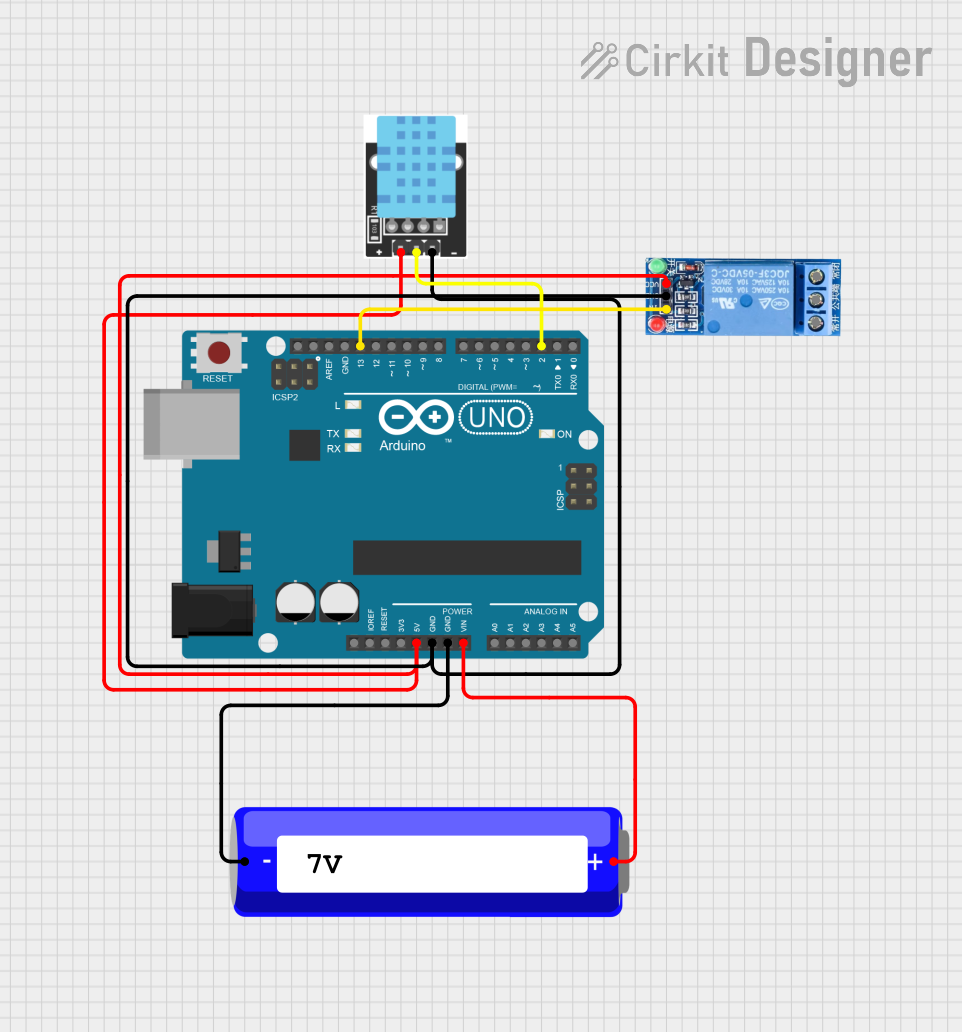
Circuit Documentation
Summary
This document provides a detailed overview of a circuit that includes an Arduino UNO, a KY-015 DHT11 Temperature-Humidity sensor module, a 1 Channel Relay 5V, and a 18650 Li-ion Battery. The circuit is designed to read temperature and humidity data and control a relay based on the readings.
Component List
Arduino UNO
- Description: A microcontroller board based on the ATmega328P.
- Pins: UNUSED, IOREF, Reset, 3.3V, 5V, GND, Vin, A0, A1, A2, A3, A4, A5, SCL, SDA, AREF, D13, D12, D11, D10, D9, D8, D7, D6, D5, D4, D3, D2, D1, D0
KY-015 DHT11 Temperature-Humidity Sensor Module
- Description: A sensor module that measures temperature and humidity.
- Pins: VCC, GND, DOUT
1 Channel Relay 5V
- Description: A relay module that can be controlled by a microcontroller to switch high voltage devices.
- Pins: VCC, GND, IN, NC, COM, NO
18650 Li-ion Battery
- Description: A rechargeable lithium-ion battery.
- Pins: -, +
Comment
- Description: A placeholder for comments or notes in the circuit.
- Pins: None
Wiring Details
Arduino UNO
- 5V: Connected to VCC of the 1 Channel Relay 5V and VCC of the KY-015 DHT11 Temperature-Humidity Sensor Module.
- GND: Connected to GND of the 1 Channel Relay 5V, GND of the KY-015 DHT11 Temperature-Humidity Sensor Module, and - of the 18650 Li-ion Battery.
- Vin: Connected to + of the 18650 Li-ion Battery.
- D13: Connected to IN of the 1 Channel Relay 5V.
- D2: Connected to DOUT of the KY-015 DHT11 Temperature-Humidity Sensor Module.
KY-015 DHT11 Temperature-Humidity Sensor Module
- VCC: Connected to 5V of the Arduino UNO.
- GND: Connected to GND of the Arduino UNO.
- DOUT: Connected to D2 of the Arduino UNO.
1 Channel Relay 5V
- VCC: Connected to 5V of the Arduino UNO.
- GND: Connected to GND of the Arduino UNO.
- IN: Connected to D13 of the Arduino UNO.
18650 Li-ion Battery
- -: Connected to GND of the Arduino UNO.
- +: Connected to Vin of the Arduino UNO.
Documented Code
Arduino UNO Code
void setup() {
  // put your setup code here, to run once:

}

void loop() {
  // put your main code here, to run repeatedly:

}
Additional Documentation
// This file is intended for additional documentation and notes.
This document provides a comprehensive overview of the circuit, including the components used, their connections, and the code running on the Arduino UNO.